
Photographing Reptiles and Amphibians on a Black Background:
Shoot through Workflow - UPDATED November 2025
I recently posted an updated version of my tutorial about photographing reptiles and amphibians on a white background, so I figured I’d go ahead and post an updated tutorial about photographing herps on a black background, which is relatively easy now by masking the background in Adobe Camera Raw or Lightroom. This setup creates dramatic images that showcase the subject on a black background. Some photographers like to place the subject on a piece of clear acrylic to create a reflection, which can be very appealing. This is a personal choice. Compositing the subject from the background is relatively easy as long as you follow the steps I outline below.
Equipment and Software
(2-3) Elinchrom Style BX 500 Ri Compact MonoLight or LED Continuous Lighting
Adobe Camera RAW (Lightroom has the same Develop Module)
Adobe Photoshop 2025
Gray card (white balance)
Lint roller
Photography/Camera Settings
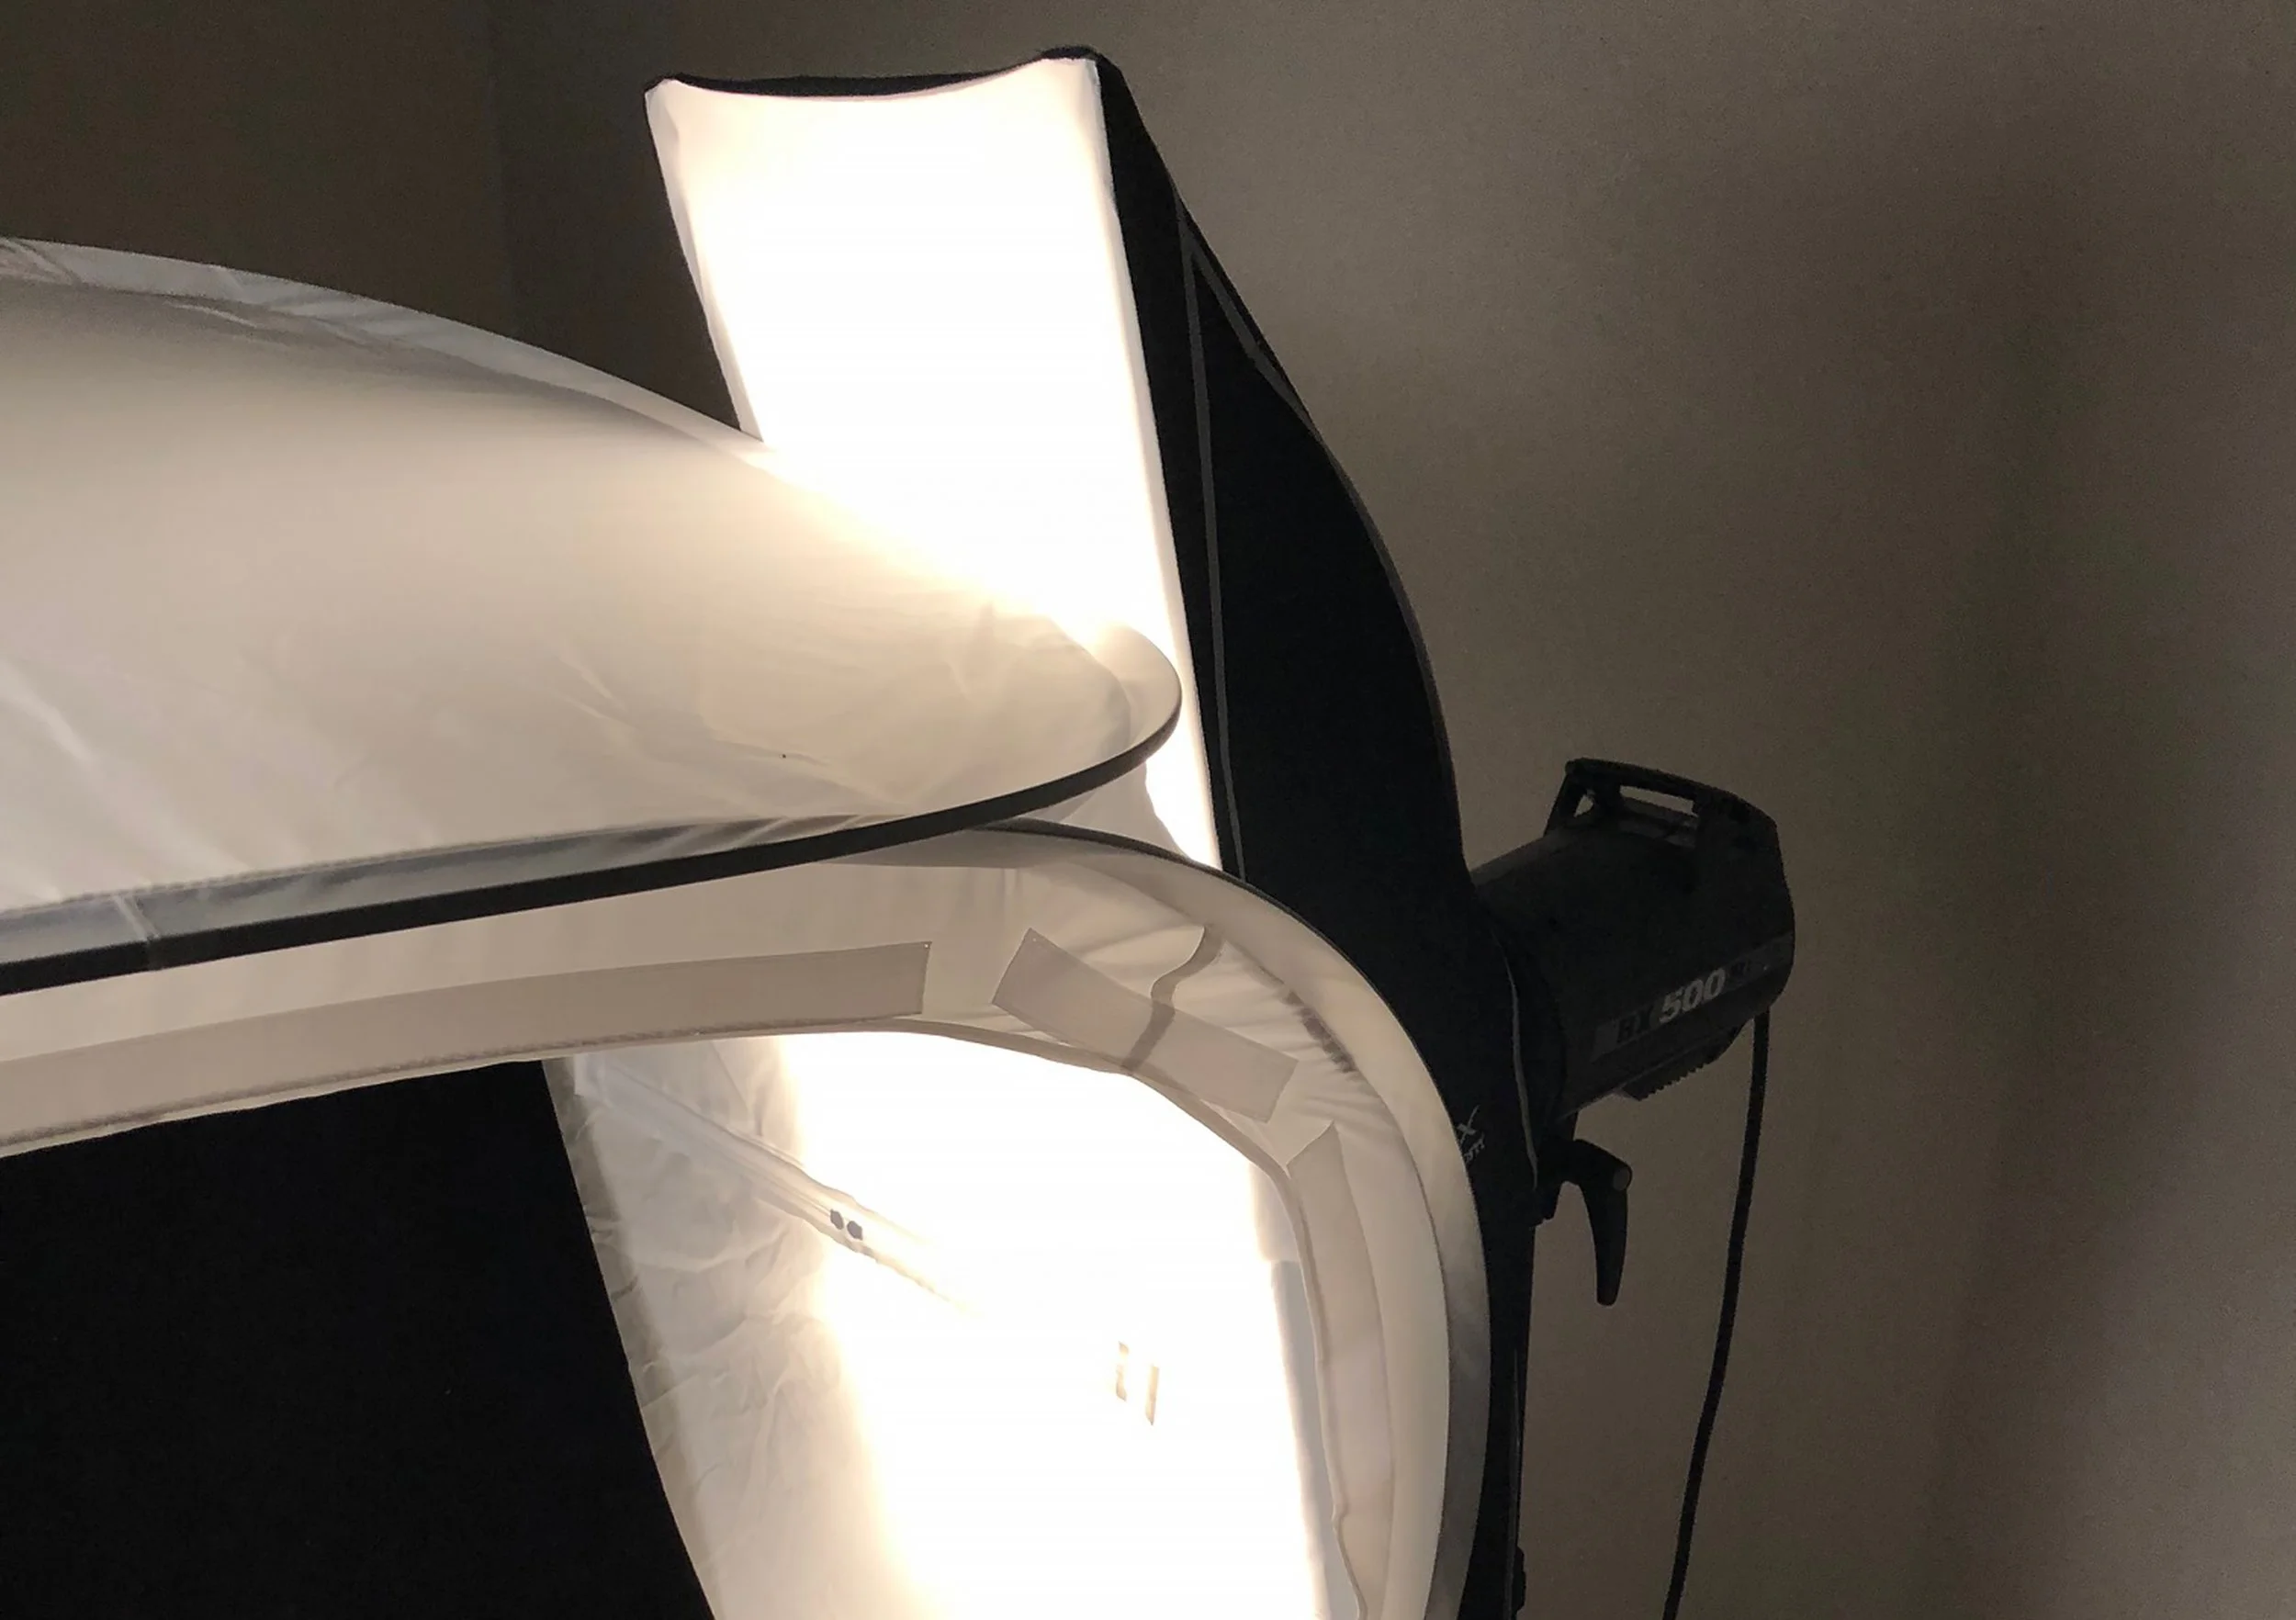
Key light (left side of light tent): strobe with 3x4’ gridded softbox at full power (500 watts) since stopped down to f/11-f/22
Fill light (right side of light tent): strobe with stripbox modifier about one stop lower than the key light
Shutter at 1/125
ISO 100
Handheld - herps are always on the move!
Always shoot RAW opposed to JPEG to have a lossless file. You’re going to want all of the pixels!
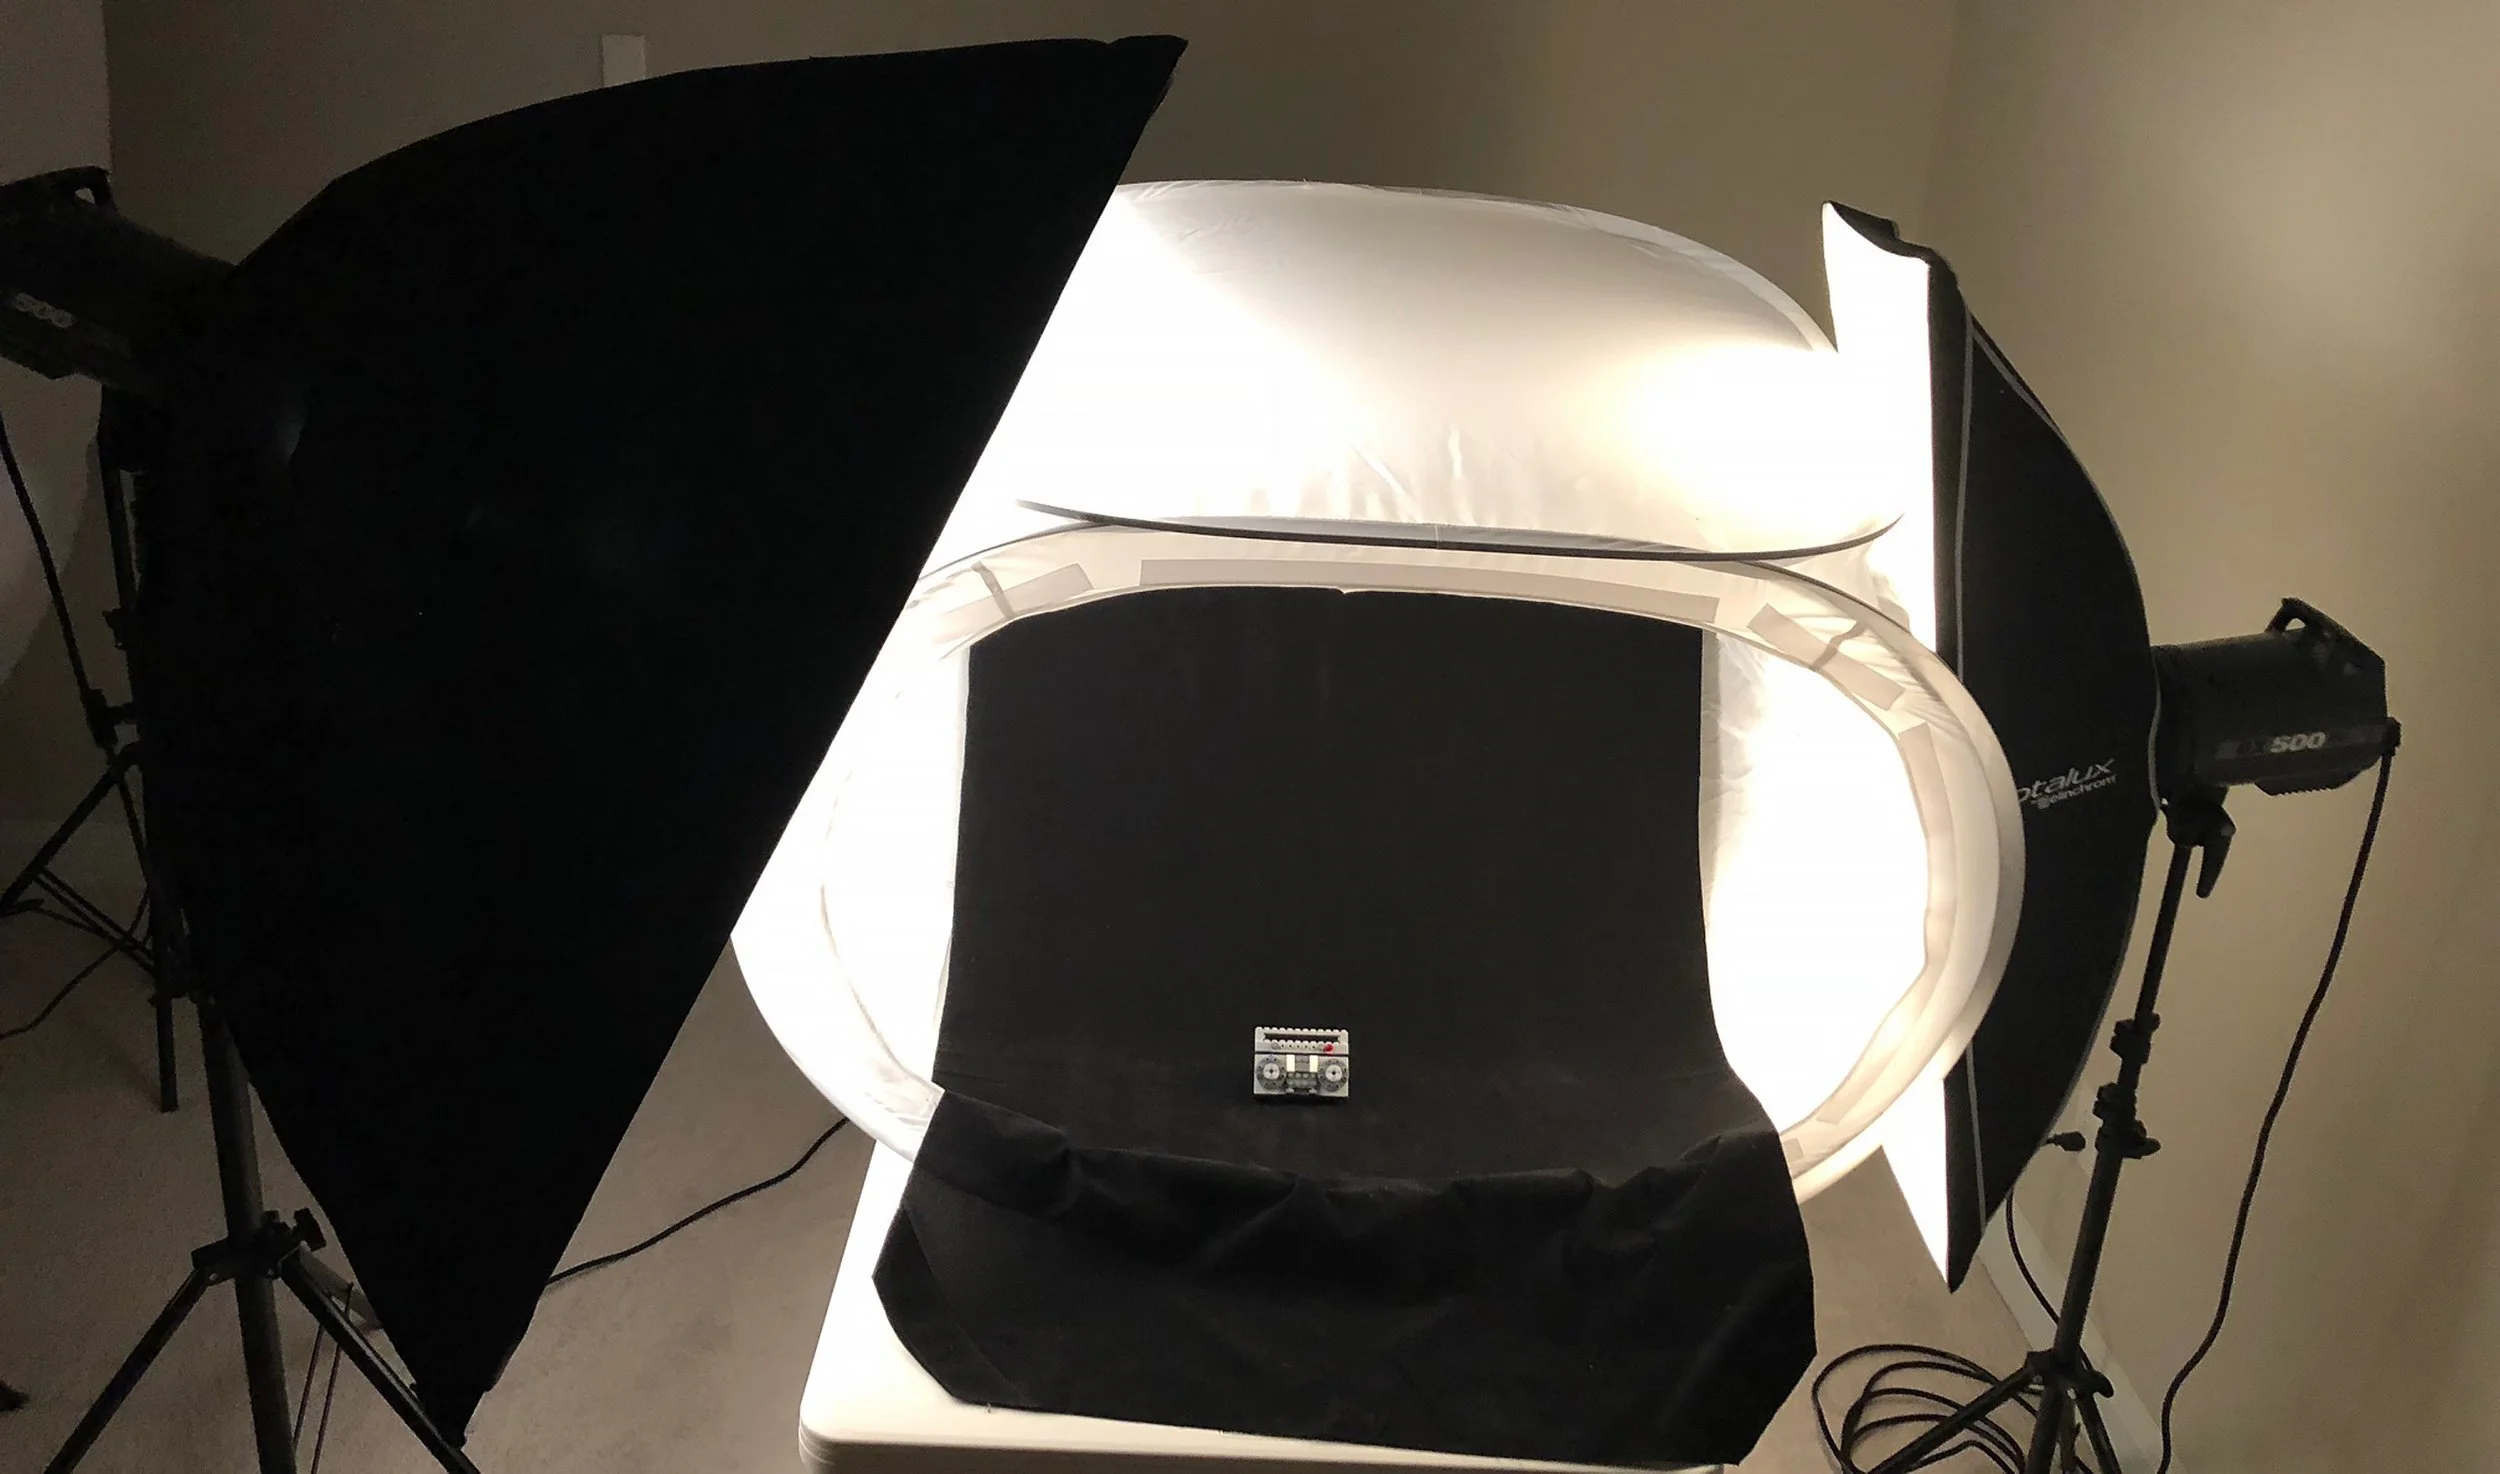
Set up the light tent on sturdy table, making sure that there is enough room on the sides and top for lights and stands. The sweep is really important with this setup since the goal is to absorb as much light as possible. I like to use a piece of black faux velvet as the background (sweep) that can be purchased at any big-box hobby supply store. Once the sweep is positioned, you can use a lint roller to remove any detritus from it.
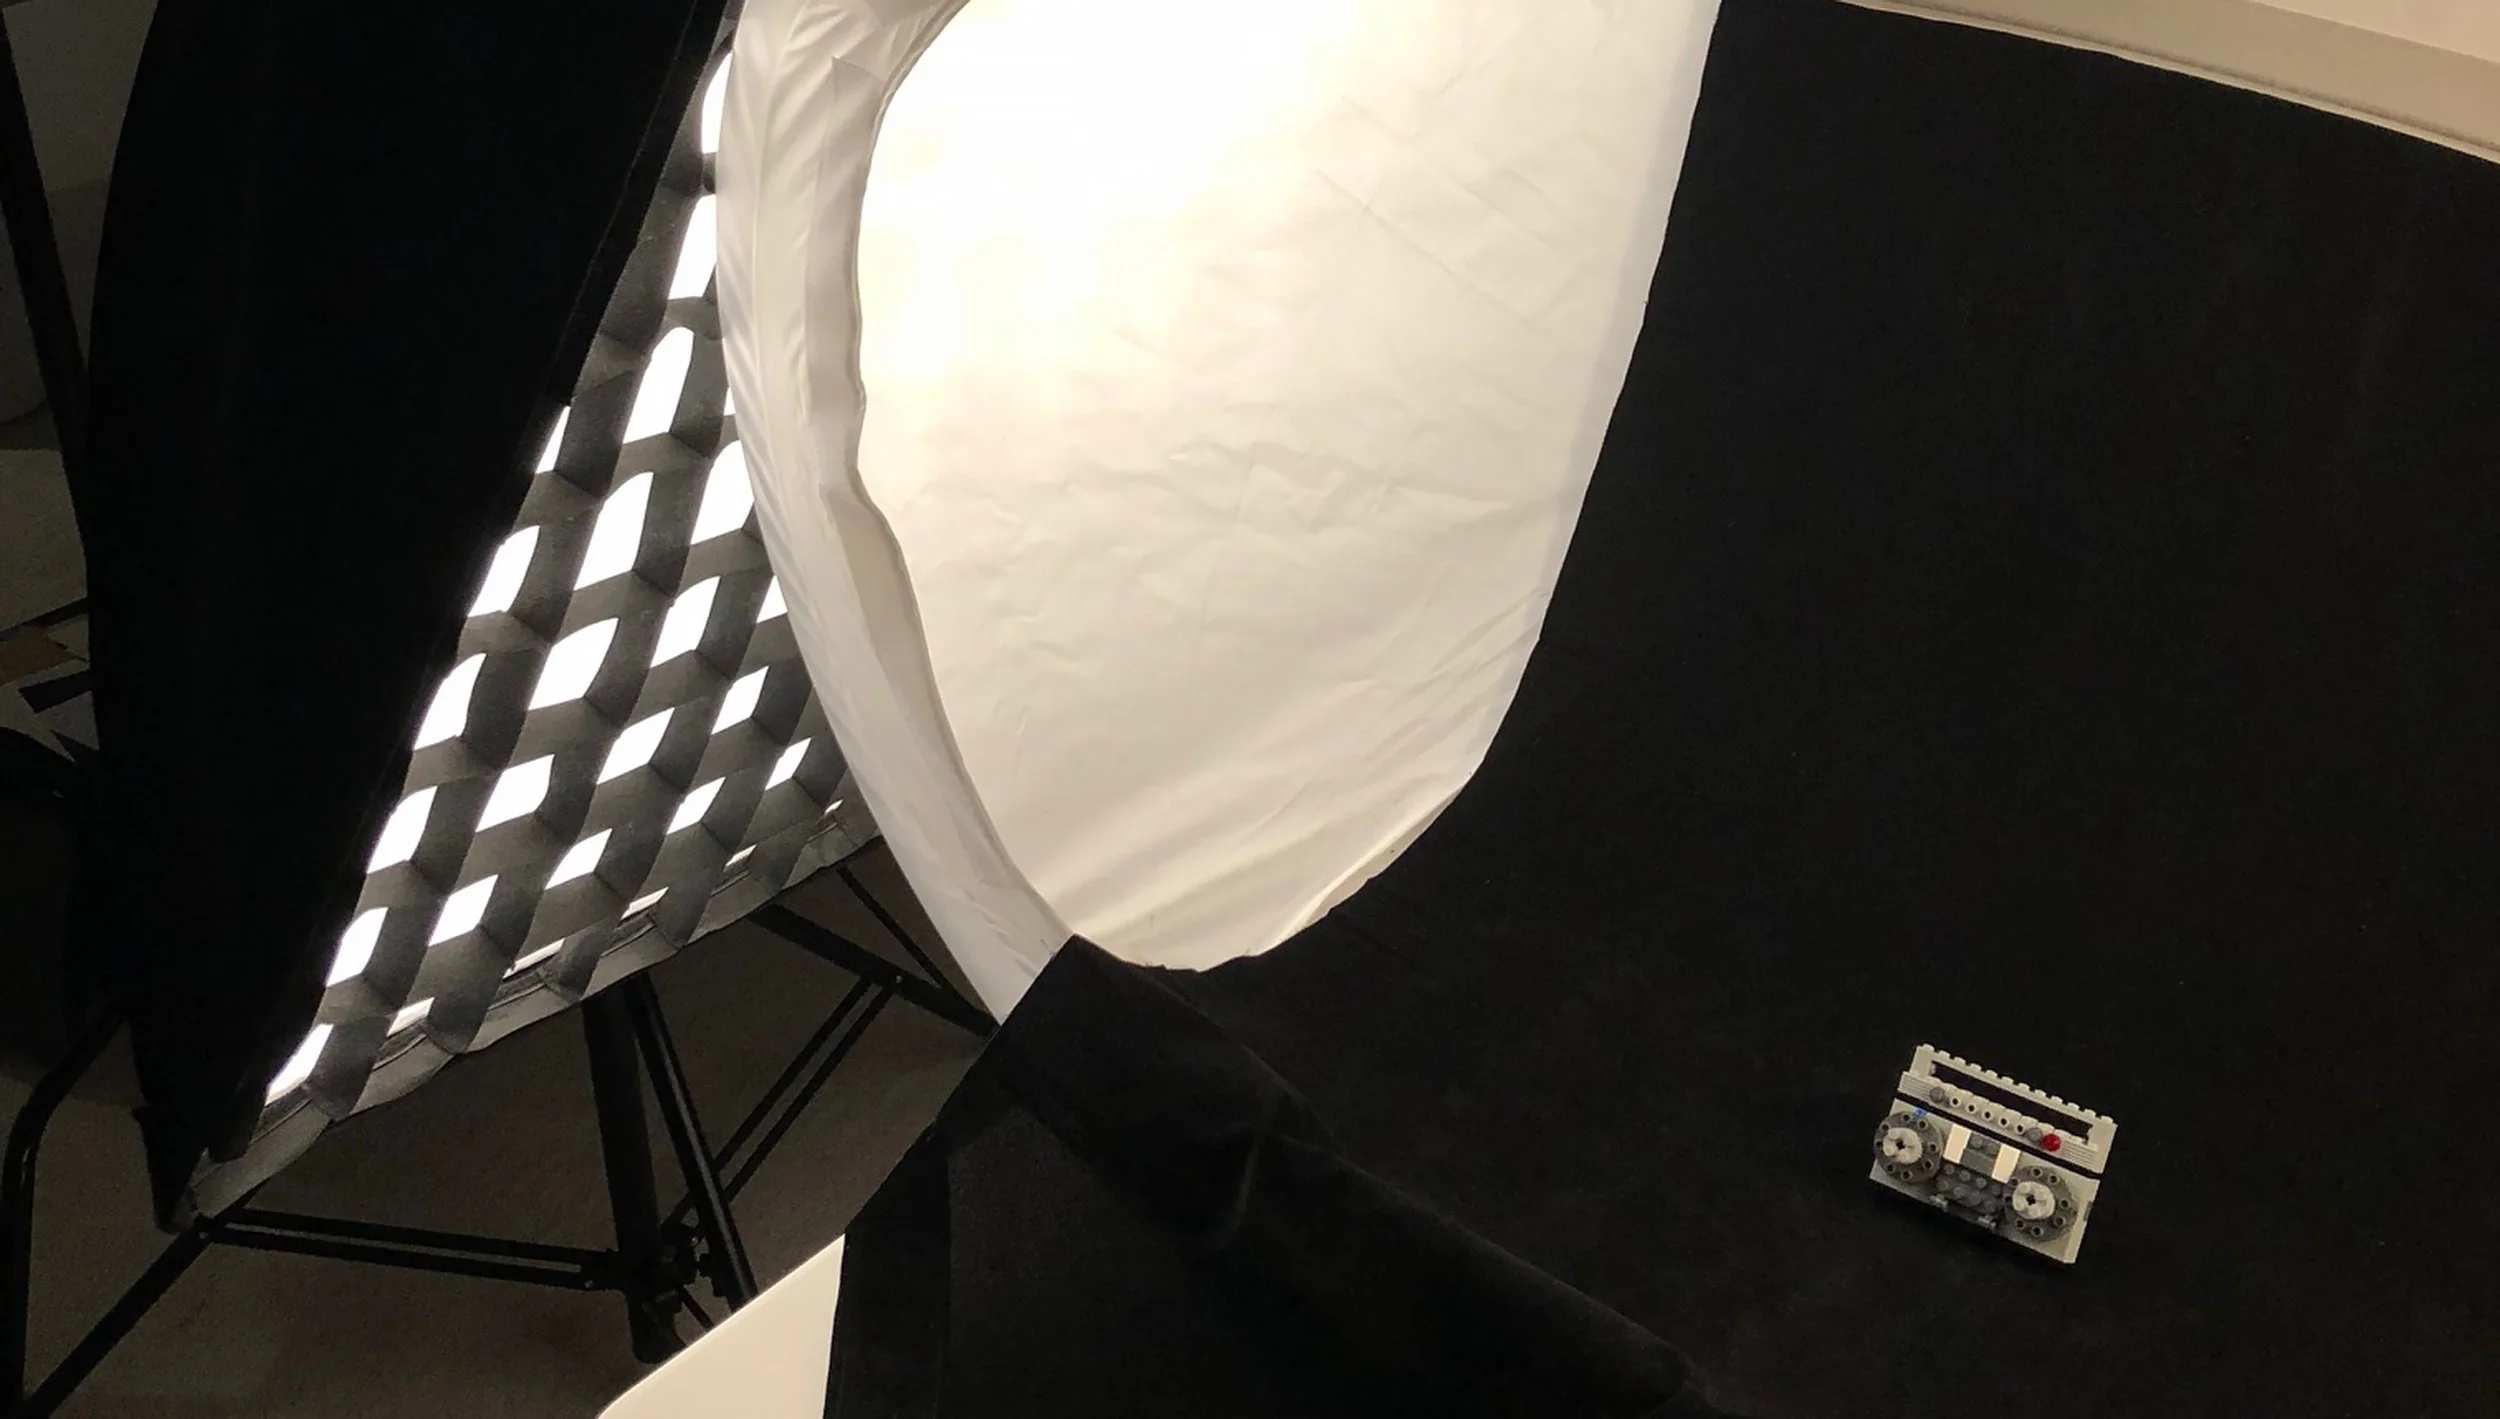
Now it's time to set up the key (main) light. I typically do a 2-light setup when photographing herps, but I sometimes use an additional light focused down from the top if I need additional lighting. The overhead light can be the key light, and the lights on the left and right can be the fill lights. This tutorial will be a 2-light setup, with the key light on the left and fill light on the right like in the first photo. I feel like this 2-light setup is much more dramatic than the 3-light setup mentioned. Play around with the lights to see what is most appealing to you. The key light is a 3x4' gridded softbox that is on the left side of the light tent. I like to use gridded main lights to really focus the light on the subject. The main light strobe (you can use LED continuous lighting) is cranked all of the way up to full power (500 watts) since I usually stop down to f/11-f/22 to get as much of the subject in focus.
The light on the right side of the light tent is the fill light. Fill lights are used to open up shadows, but this light for this setup is also doing some heavy lifting. It isn't gridded because it is needed for broader light coverage of the subject. A square, rectangular, or circular modifier is fine. The strobe (again, LED continuous lights are great!) is about a stop to stop and a half lower than the main light. I used as lego in the shoot portion of the tutorial because I didn't want to have to wrangle any herps. Ha!
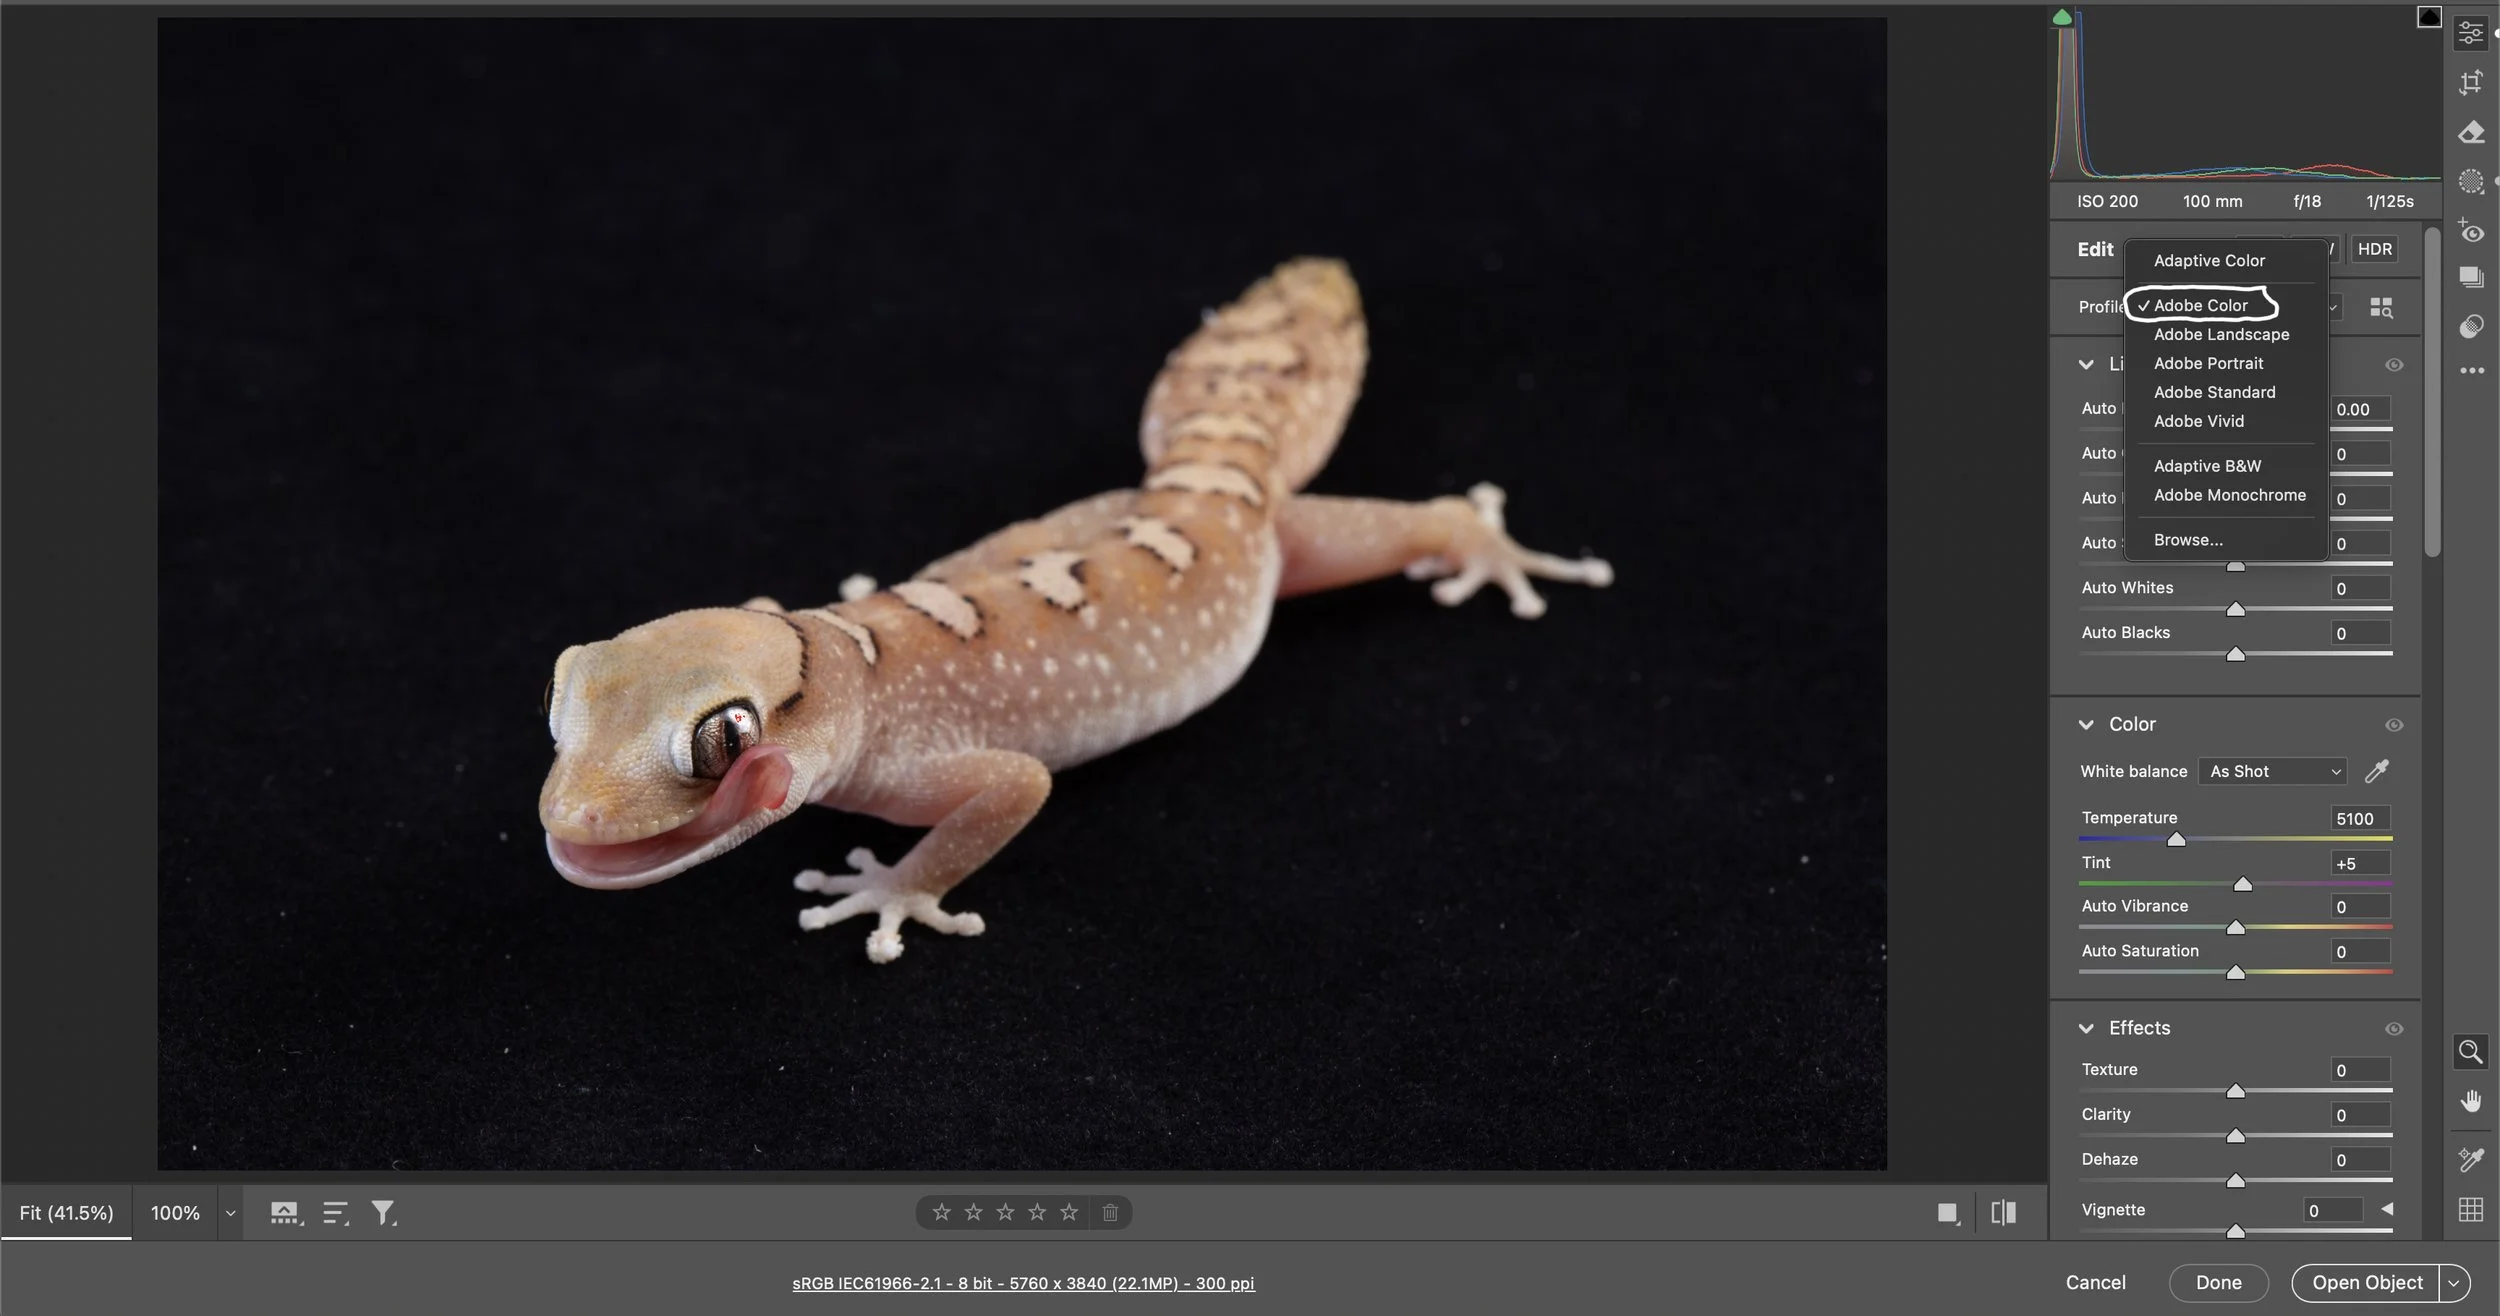
Now, let's post-process an image. My subject for this tutorial is Diplodactylus galeatus. Open the image in Adobe Camera Raw (Lightroom has the same Develop Module). Select the Color Profile you want to use. I use Adobe Color most of the time because I feel like it's a really good starting point.
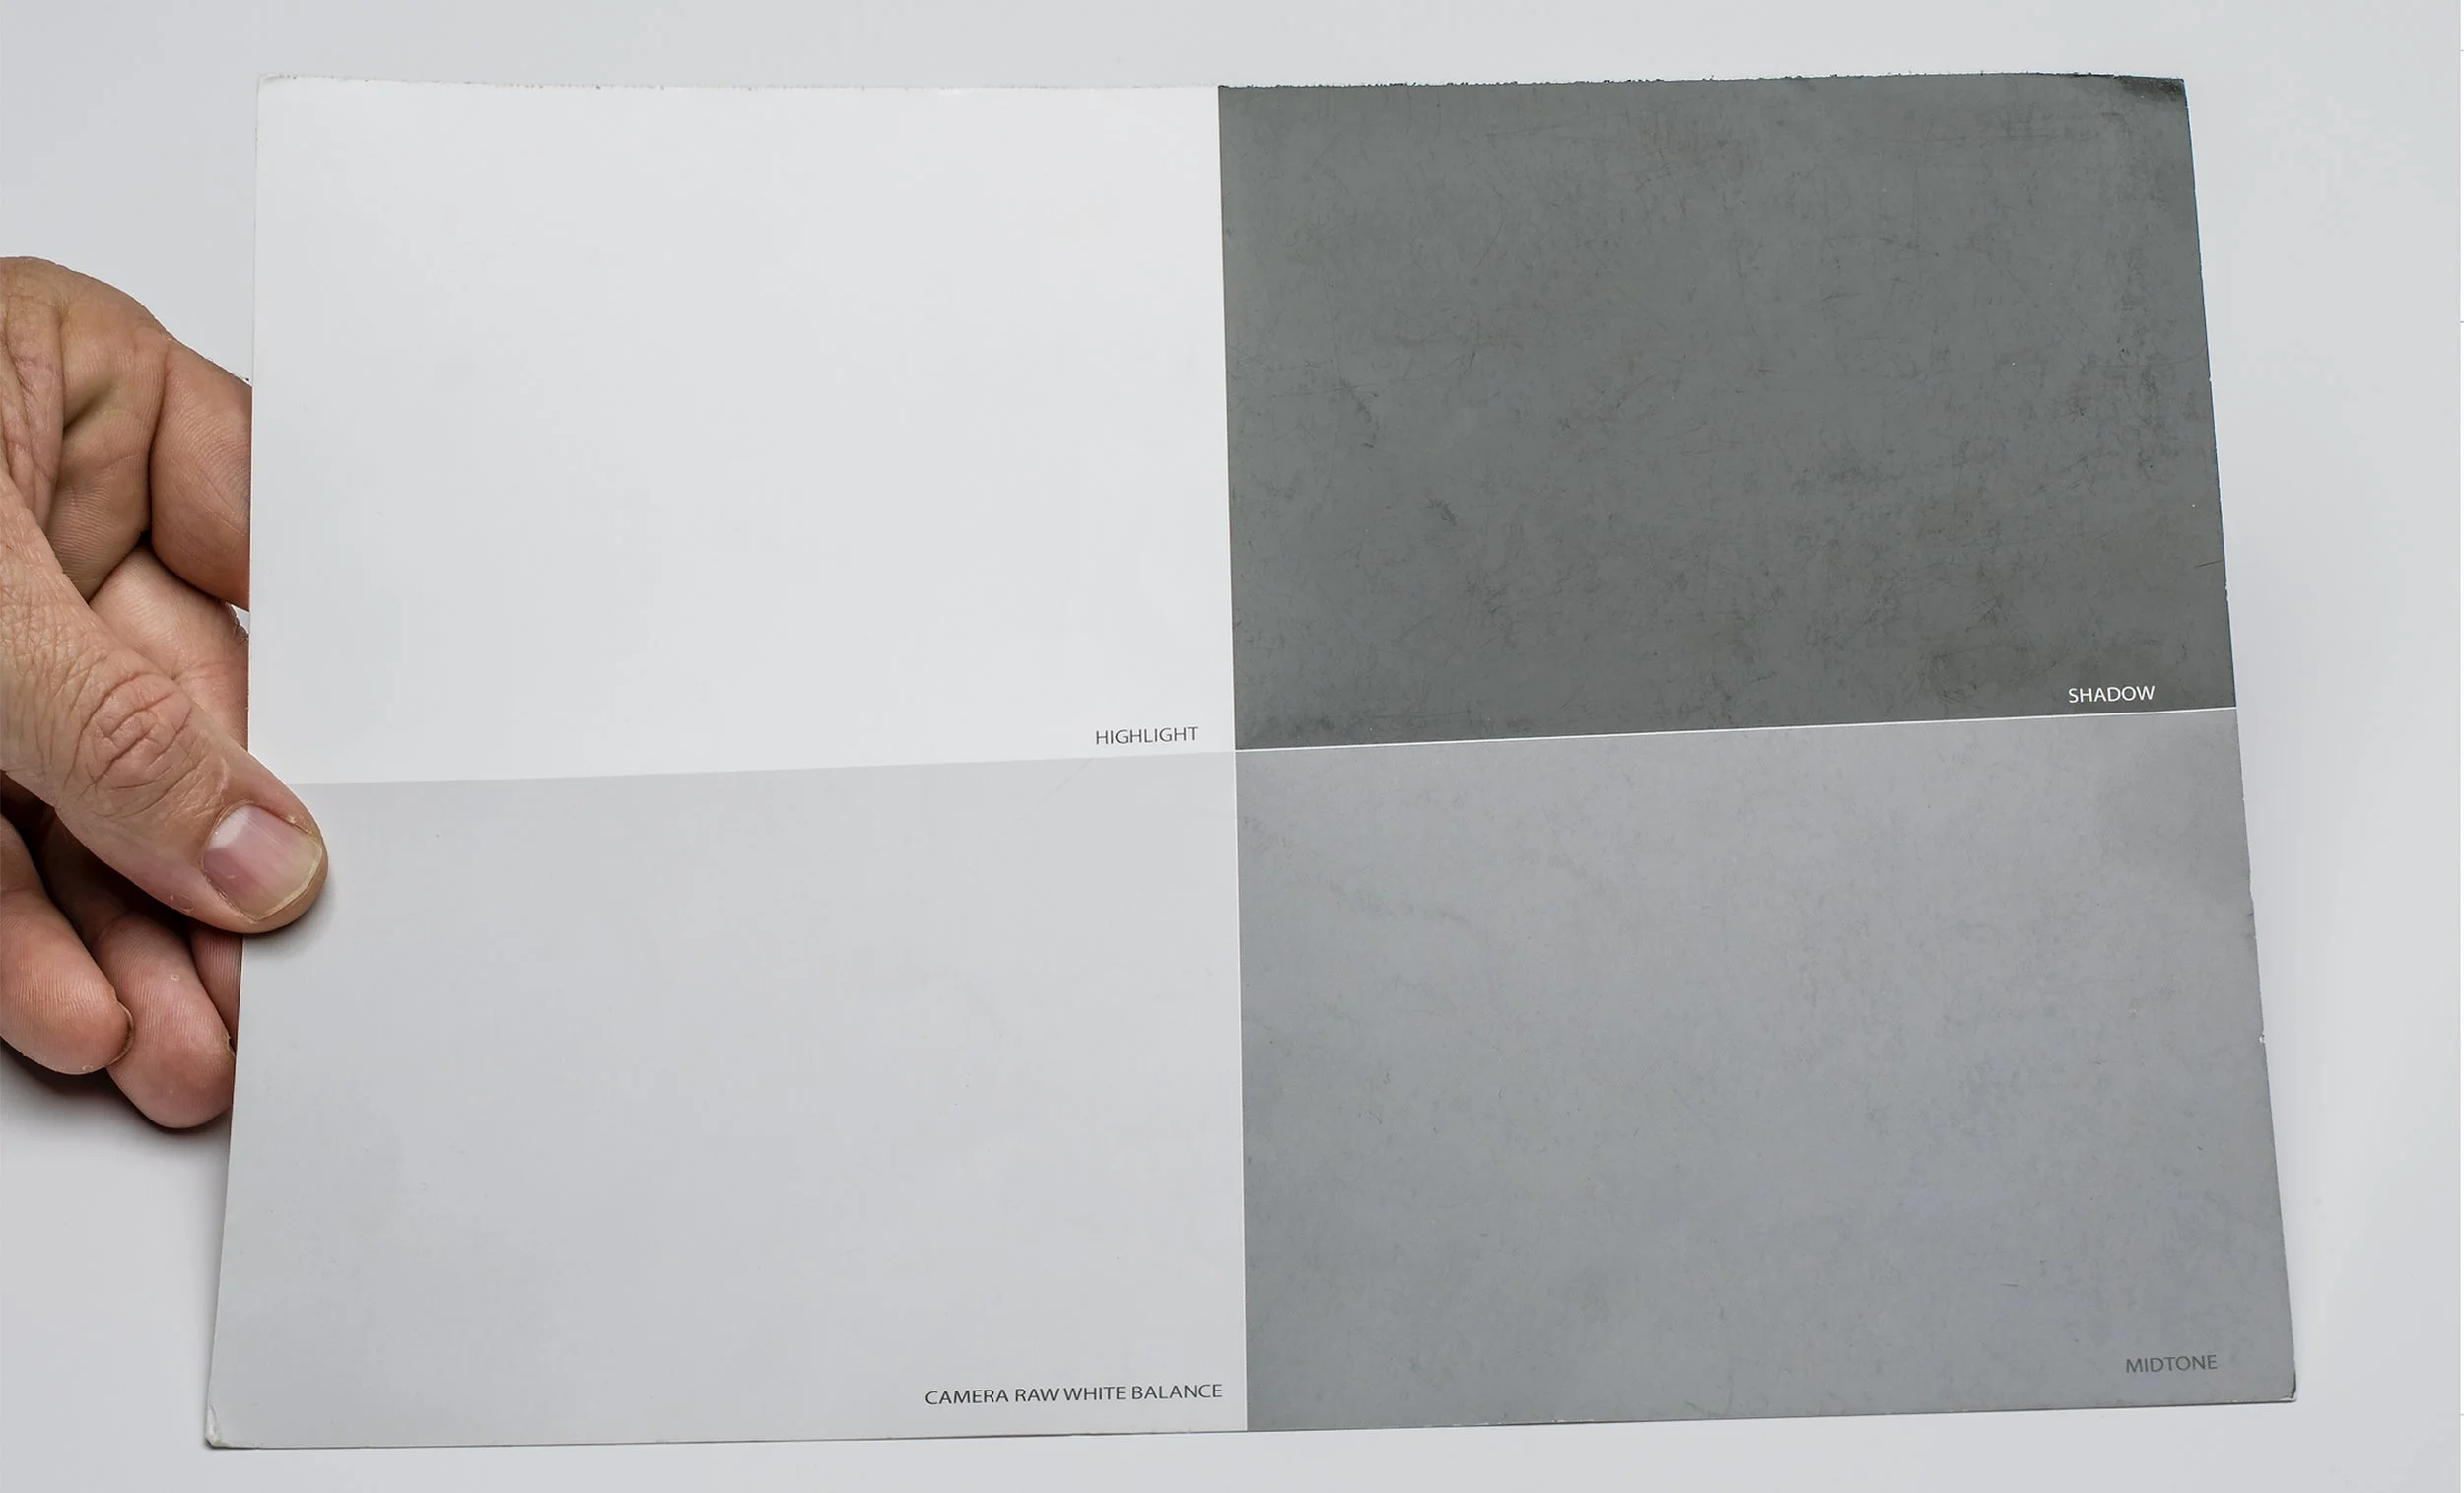
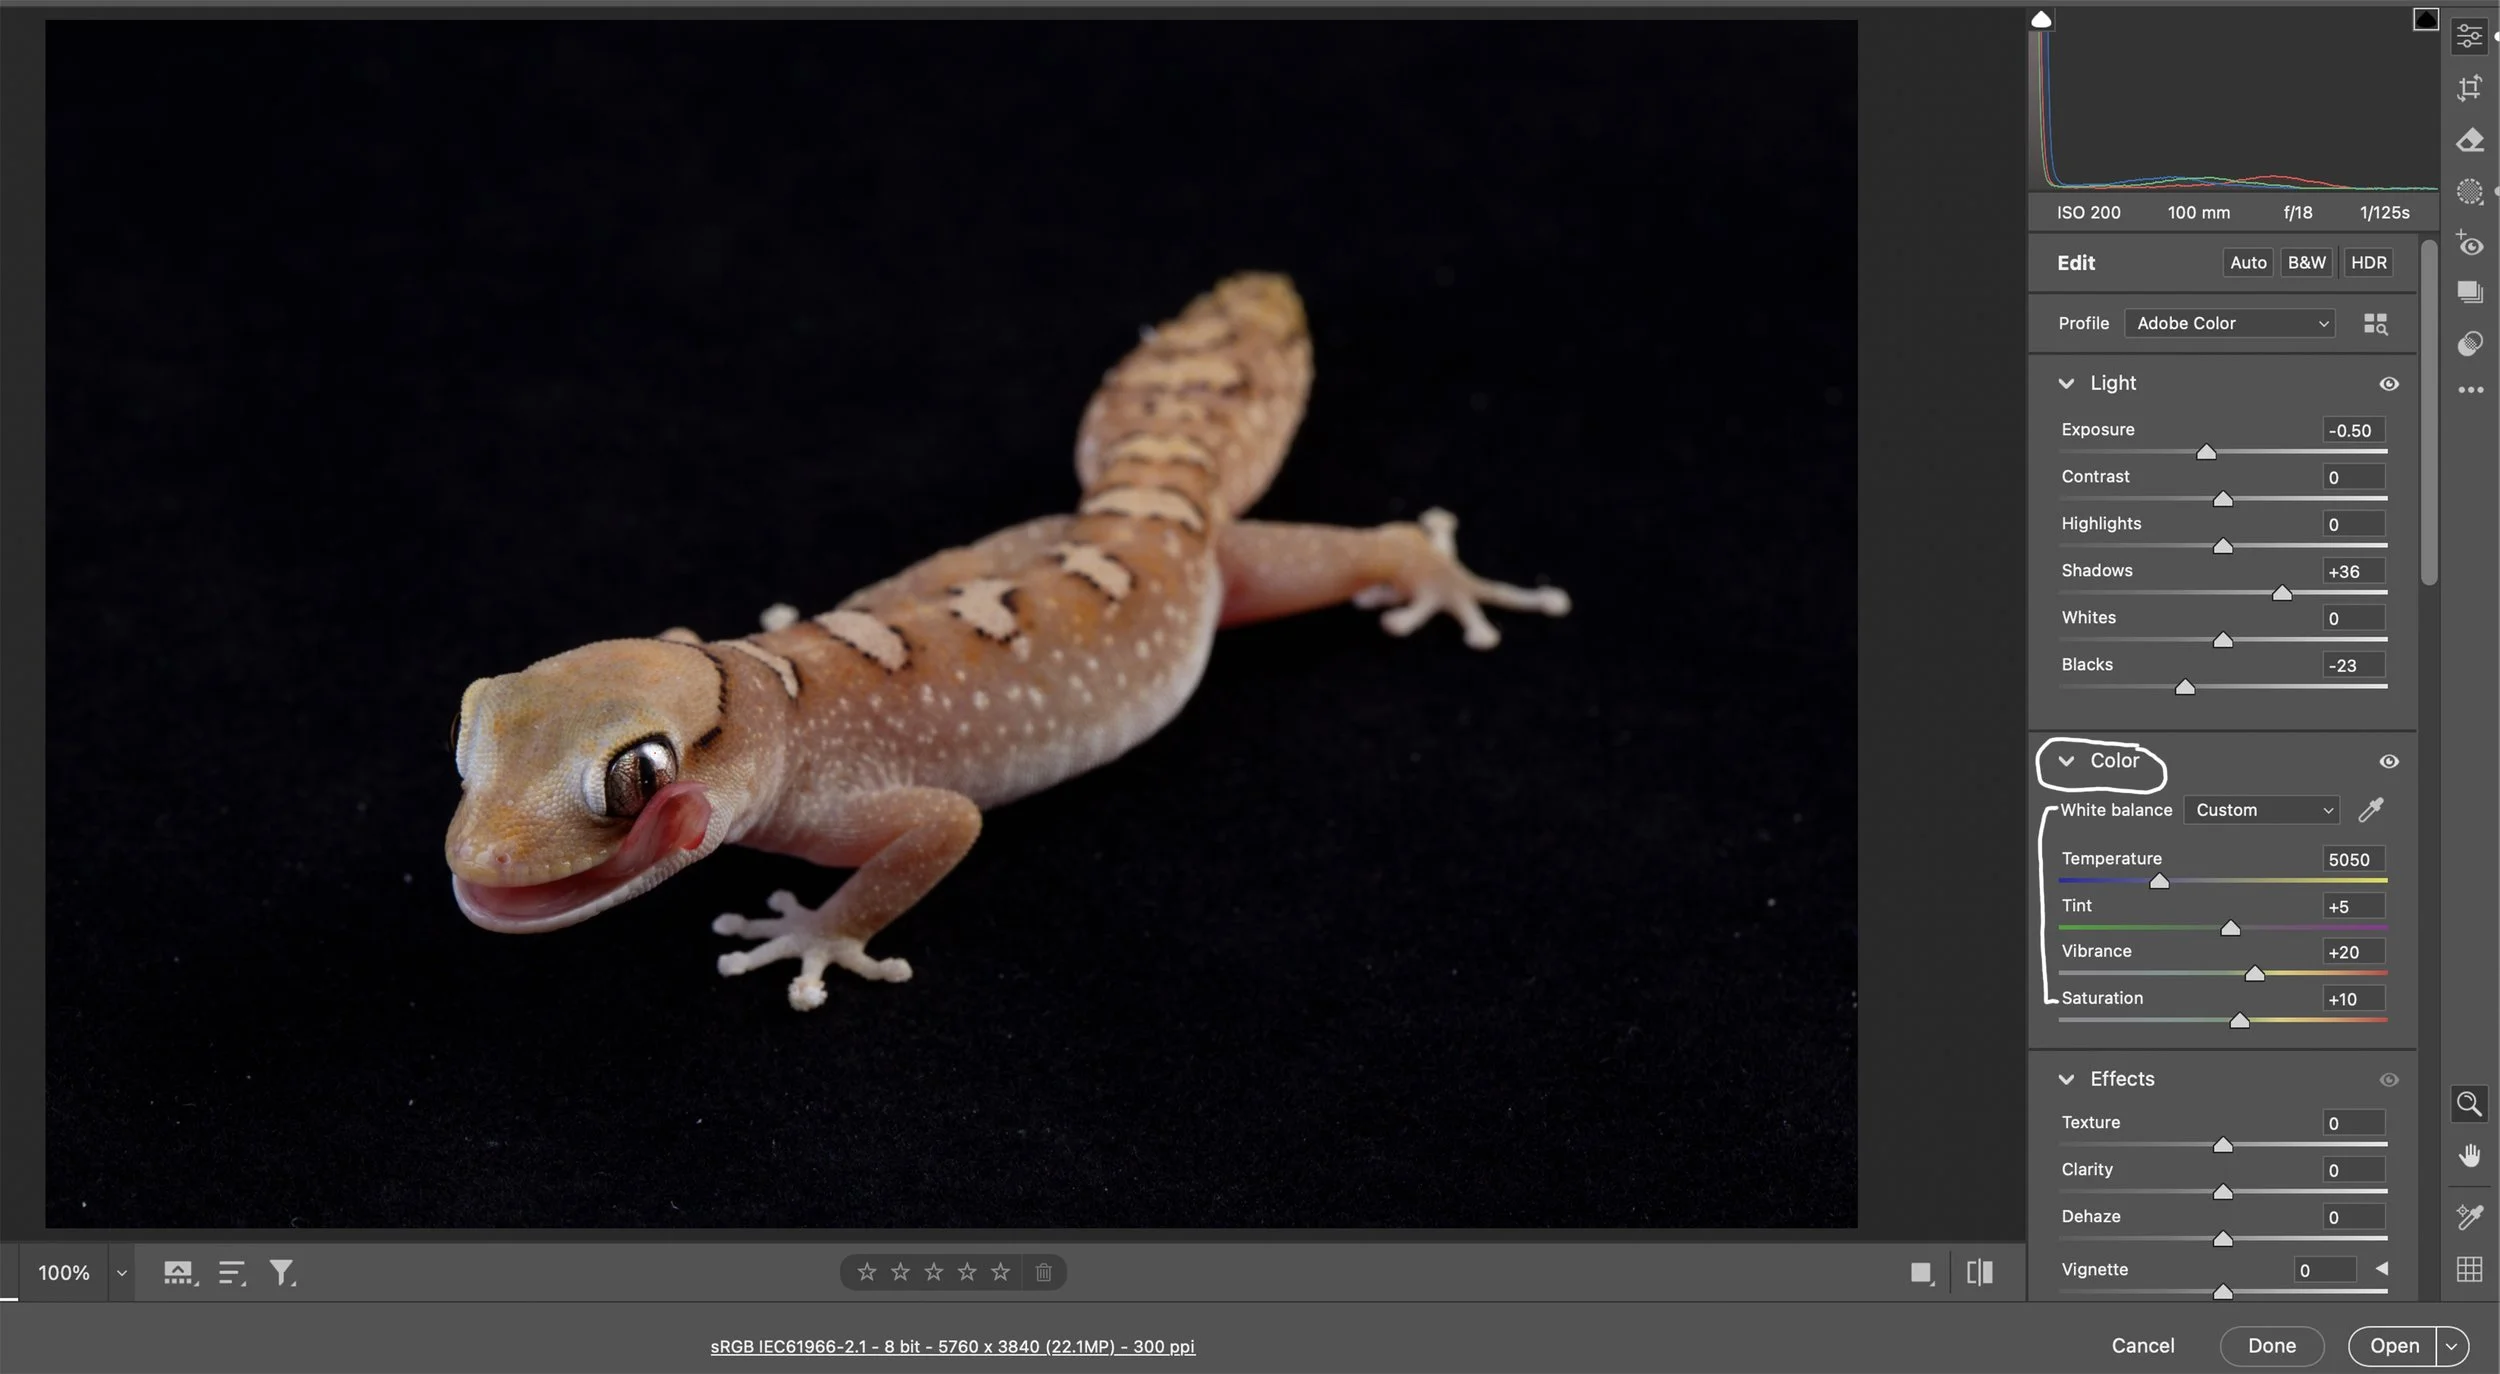
Next, let's move down to the Color sliders (White Balance - Temperature, Tint, Vibrance, and Saturation). As mentioned in the other tutorial, I know my Elinchrom strobes are around 4900-5100K, but you can use a gray card to easily get the correct white balance by using the White Balance Eye Dropper Tool in ACR to sample the Camera Raw White Balance (18% gray) swatch on a gray card. It works like a charm, and you'll nail white balance every time. White balance is a creative decision, but I like the specimens to look as true to life as possible. The next slider is Tint. I rarely touch this slider and usually leave it as-is. After the Tint slider is Vibrance. It changes the saturation of the image without causing unpleasant color casts. I usually try to keep it around +20. The final slider in the Color Panel is Saturation. Stay conservative, y'all. Oversaturating an image is bush league. This Diplodactylus galeatus needs a little saturation, so I pushed this slider to +10.

After the Color sliders, it’s time to work down the Light sliders (Exposure through Blacks). The subject is a touch overexposed, so I’m going move the Exposure slider to the left to make the image slightly darker. I moved that slider to the left by about 1/2 a stop. The next slider down is Contrast, and I typically don’t mess with that slider since I adjust contrast with some of the other sliders. The next slider down is Highlights, which only needs to be used to control the brightness of the lighter parts of the photo. The next slider is Shadows, and that controls the brightness of the darker parts of the photo. I’m going to open them up a bit by pushing the slider to the right. The next slider down is Whites, which I rarely touch. The last slider in the Light panel is Blacks. I used to use this slider to make the black background completely black, but when you move that slider to the left, it makes all the blacks in the image darker, including the subject. There is a much better way to make the background completely black, which I will explain in detail shortly. Now, I use the Blacks slider to deepen some of the blacks in the subject. I moved this slider to the left to accentuate some of the darker parts of the gecko.

Next Panel is the Effects Panel. I really only use the Texture Slider in this panel because, quite frankly, the others are unnecessary. The Texture Slider is great for reptiles and amphibians. I pushed this one to +39. I usually move this slider to the right +20 to +40. Sometimes I use the Clarity Slider to increase edge contrast. This image needed a little edge contrast, so I moved it to +10.
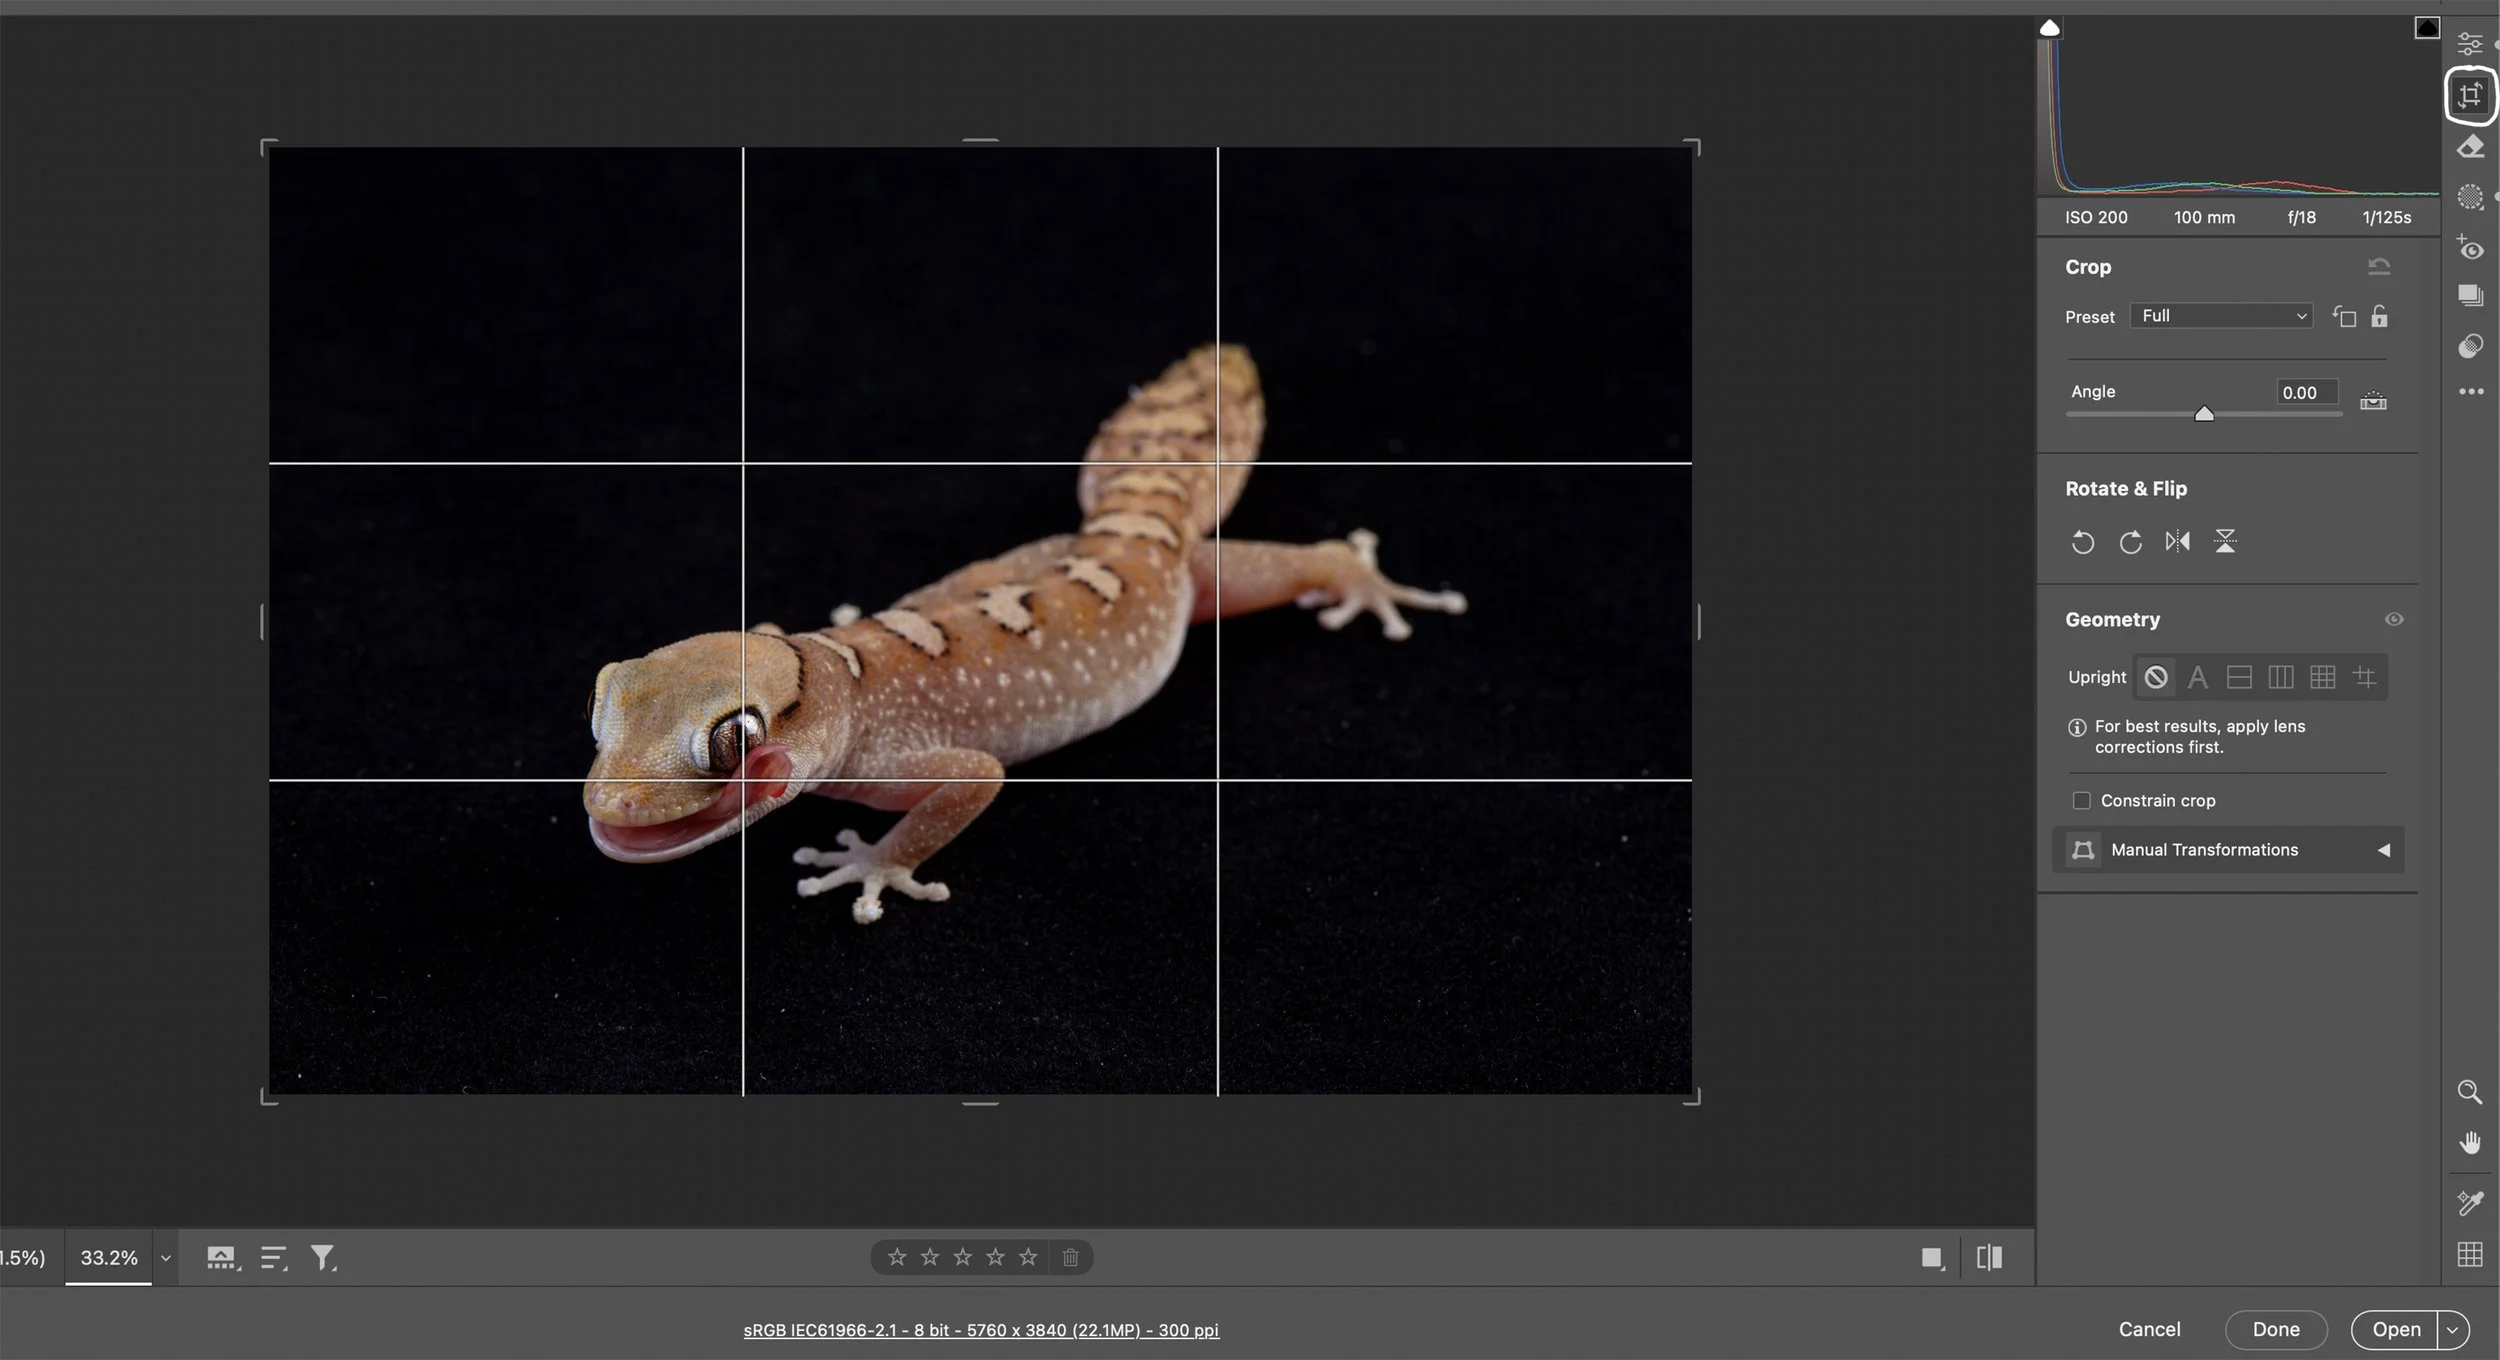
Next, I crop the image as needed, using the rule of thirds. The rule of thirds is a composition guideline in photography and art that suggests dividing an image into nine equal parts with two horizontal and two vertical lines, and placing key elements along these lines or at their intersections. I usually like to put the subject’s eye at one of the intersections as seen in this image.
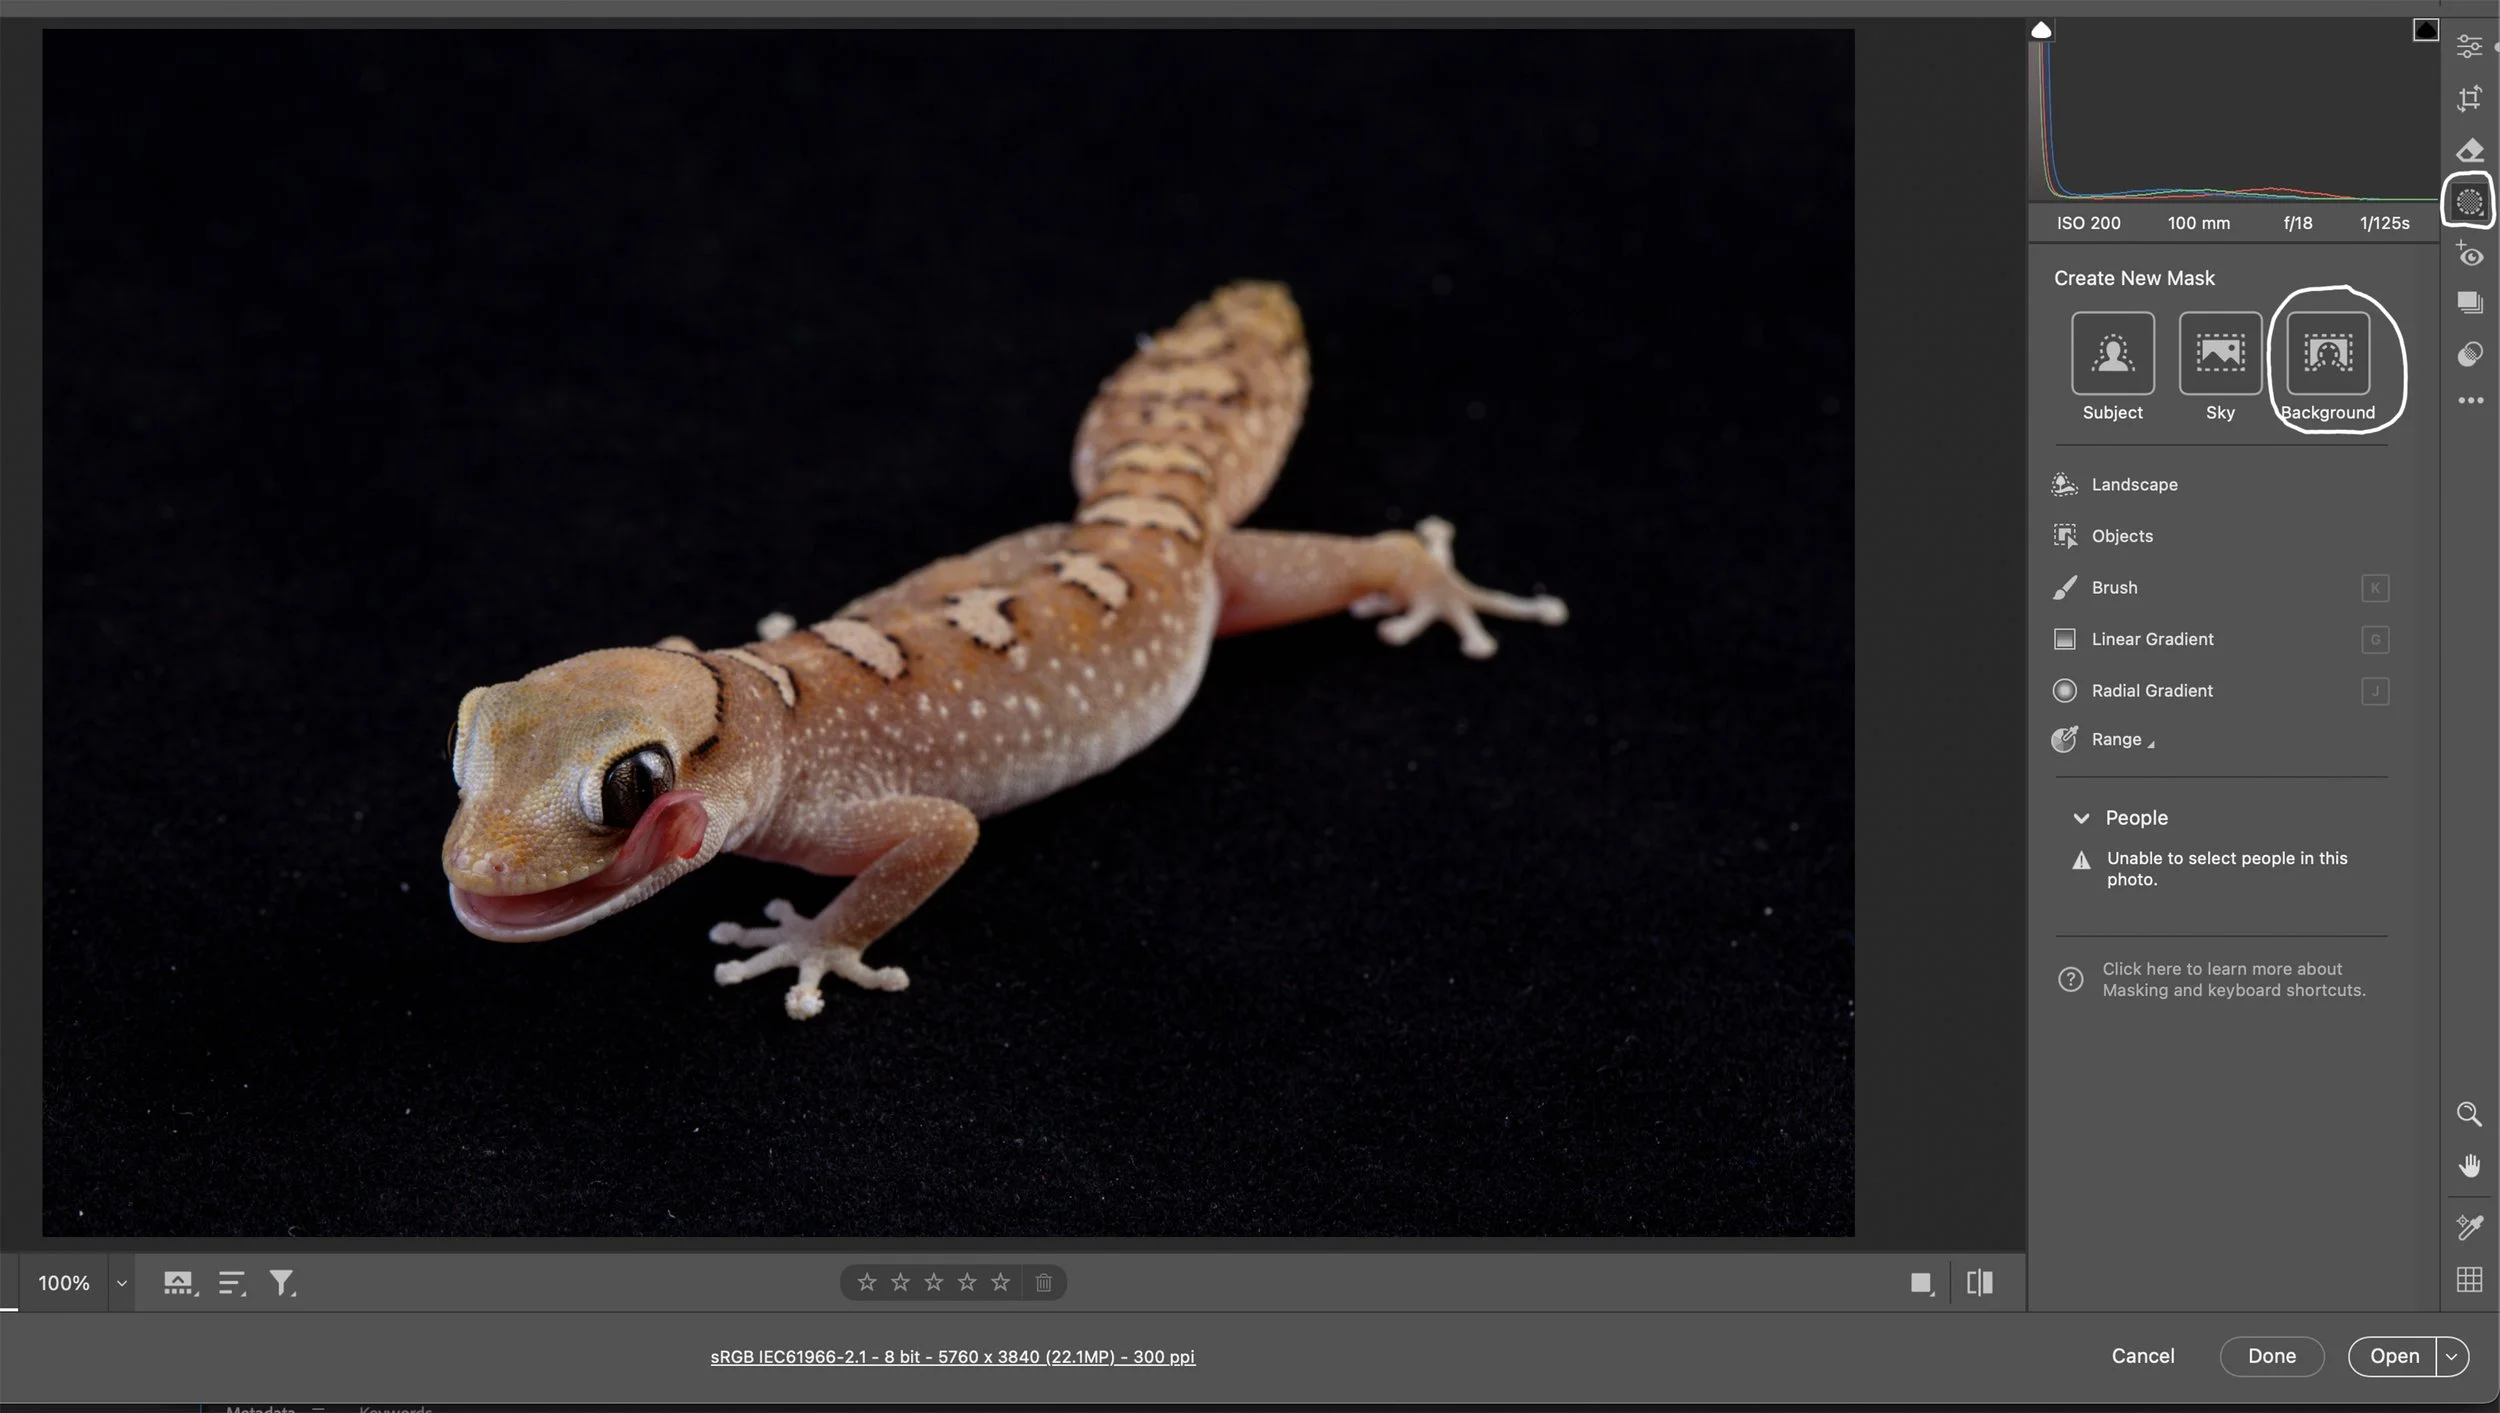
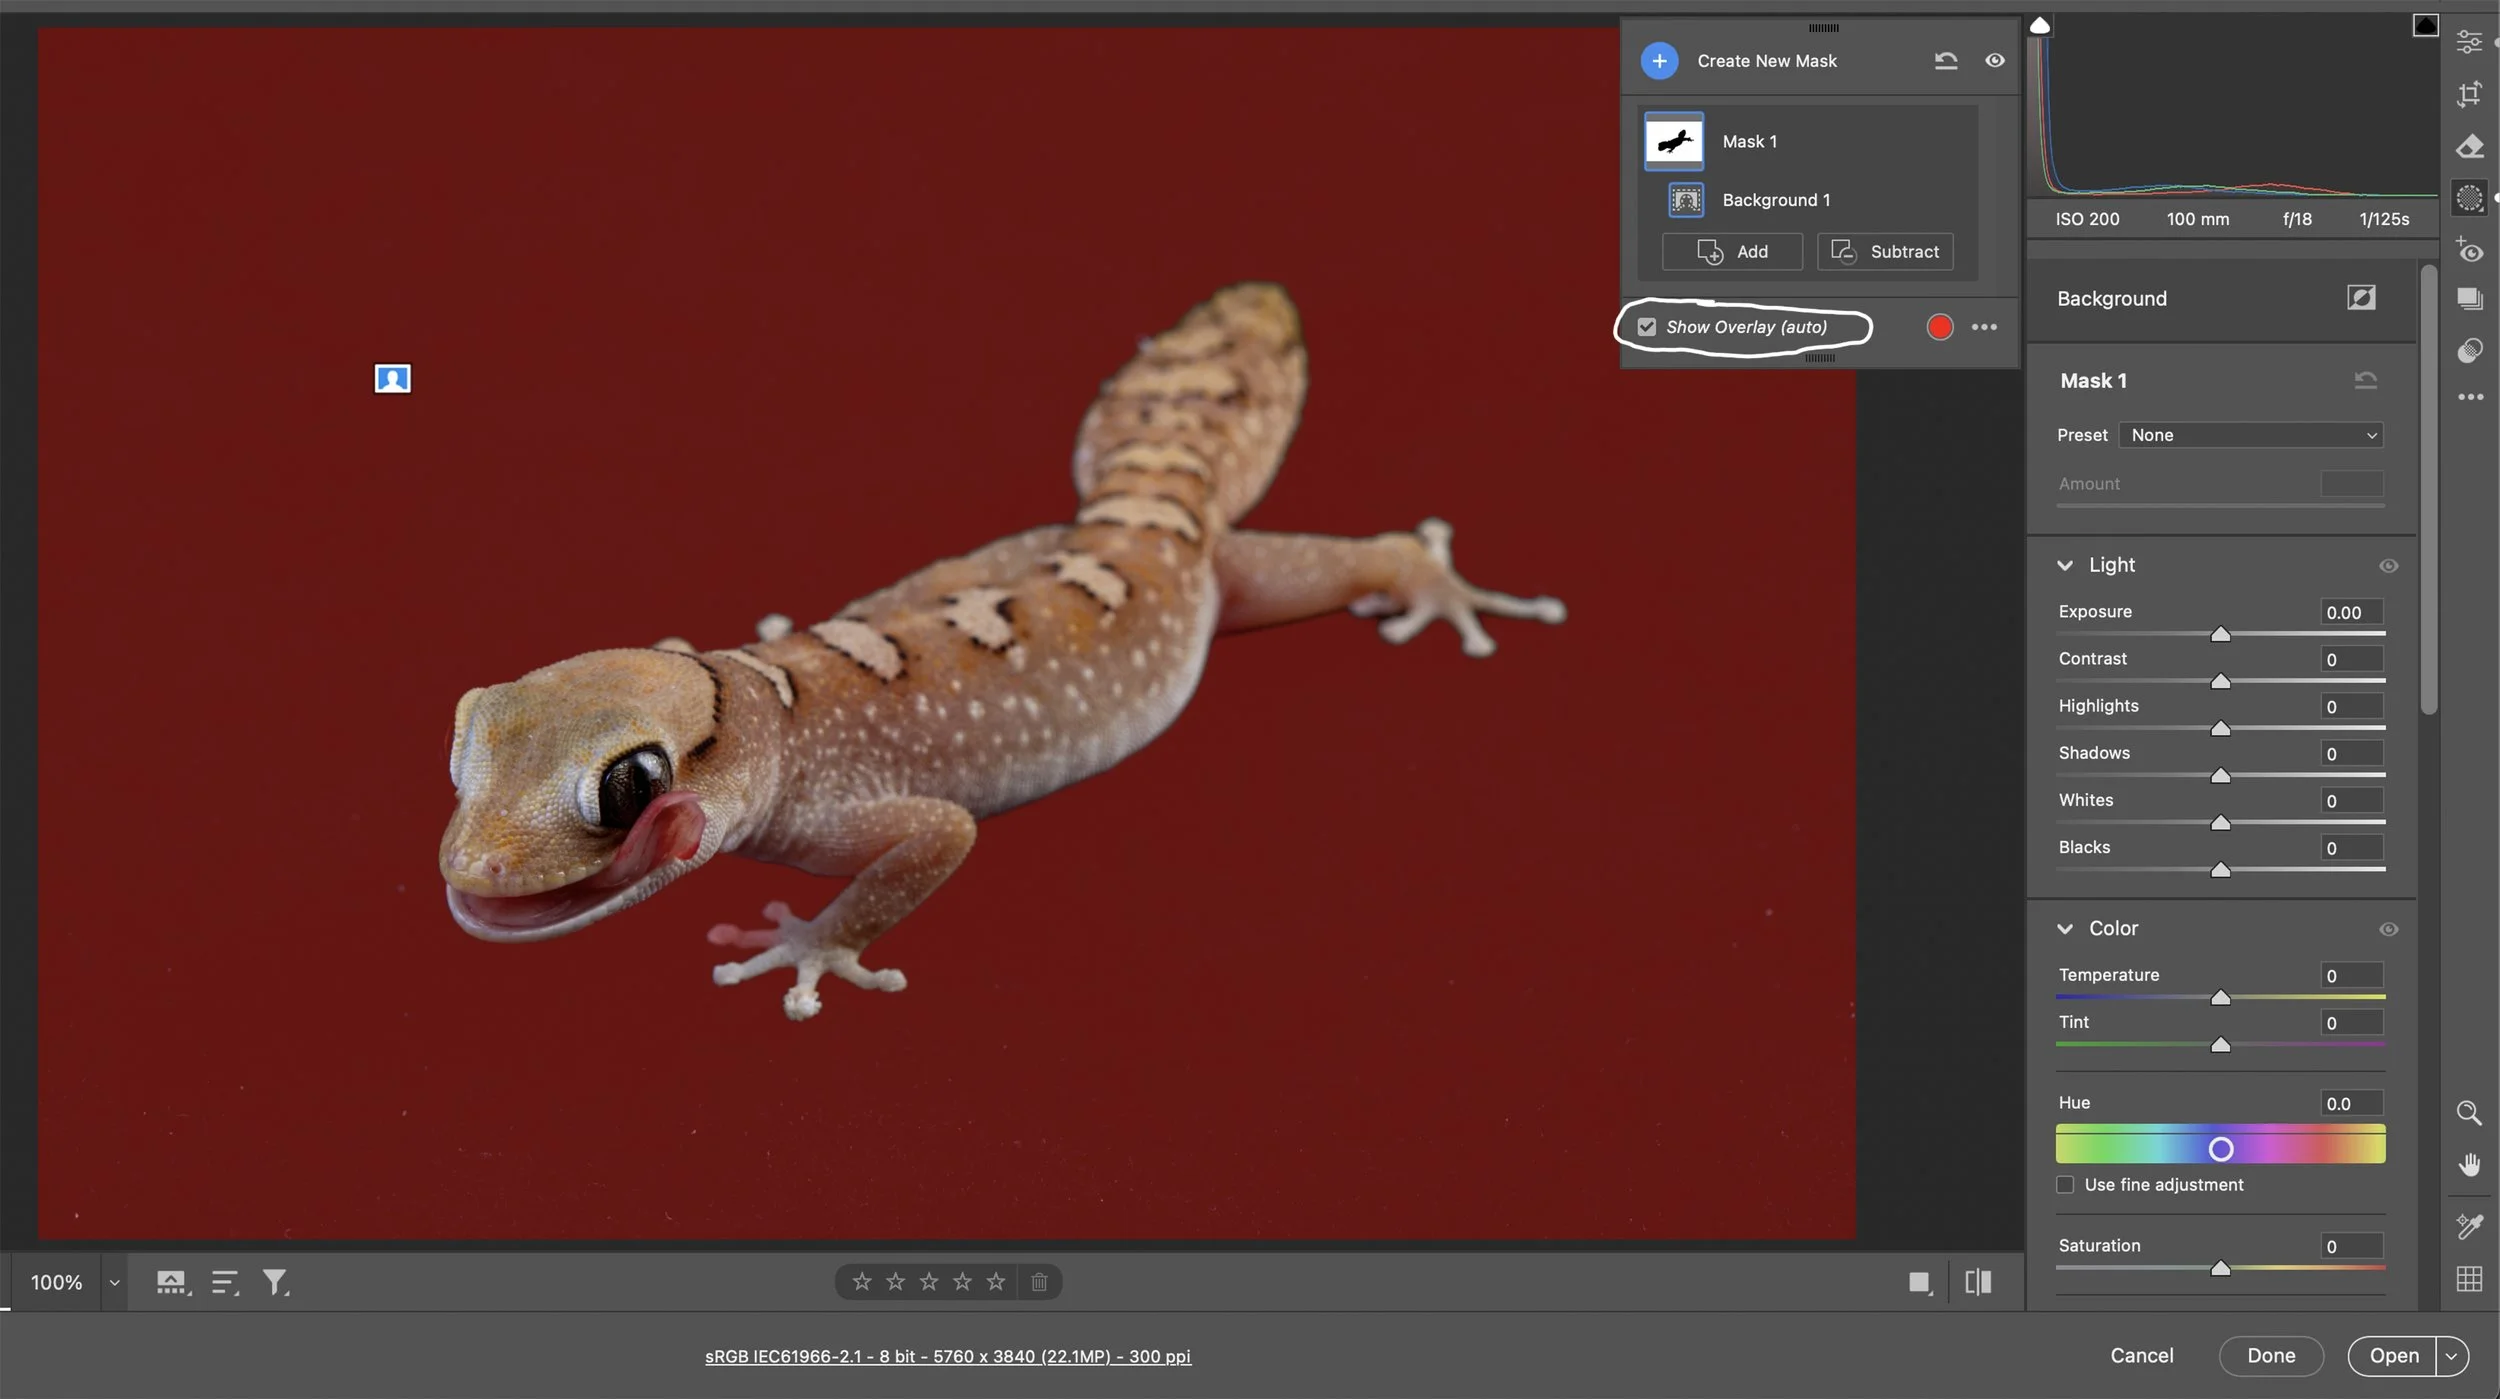
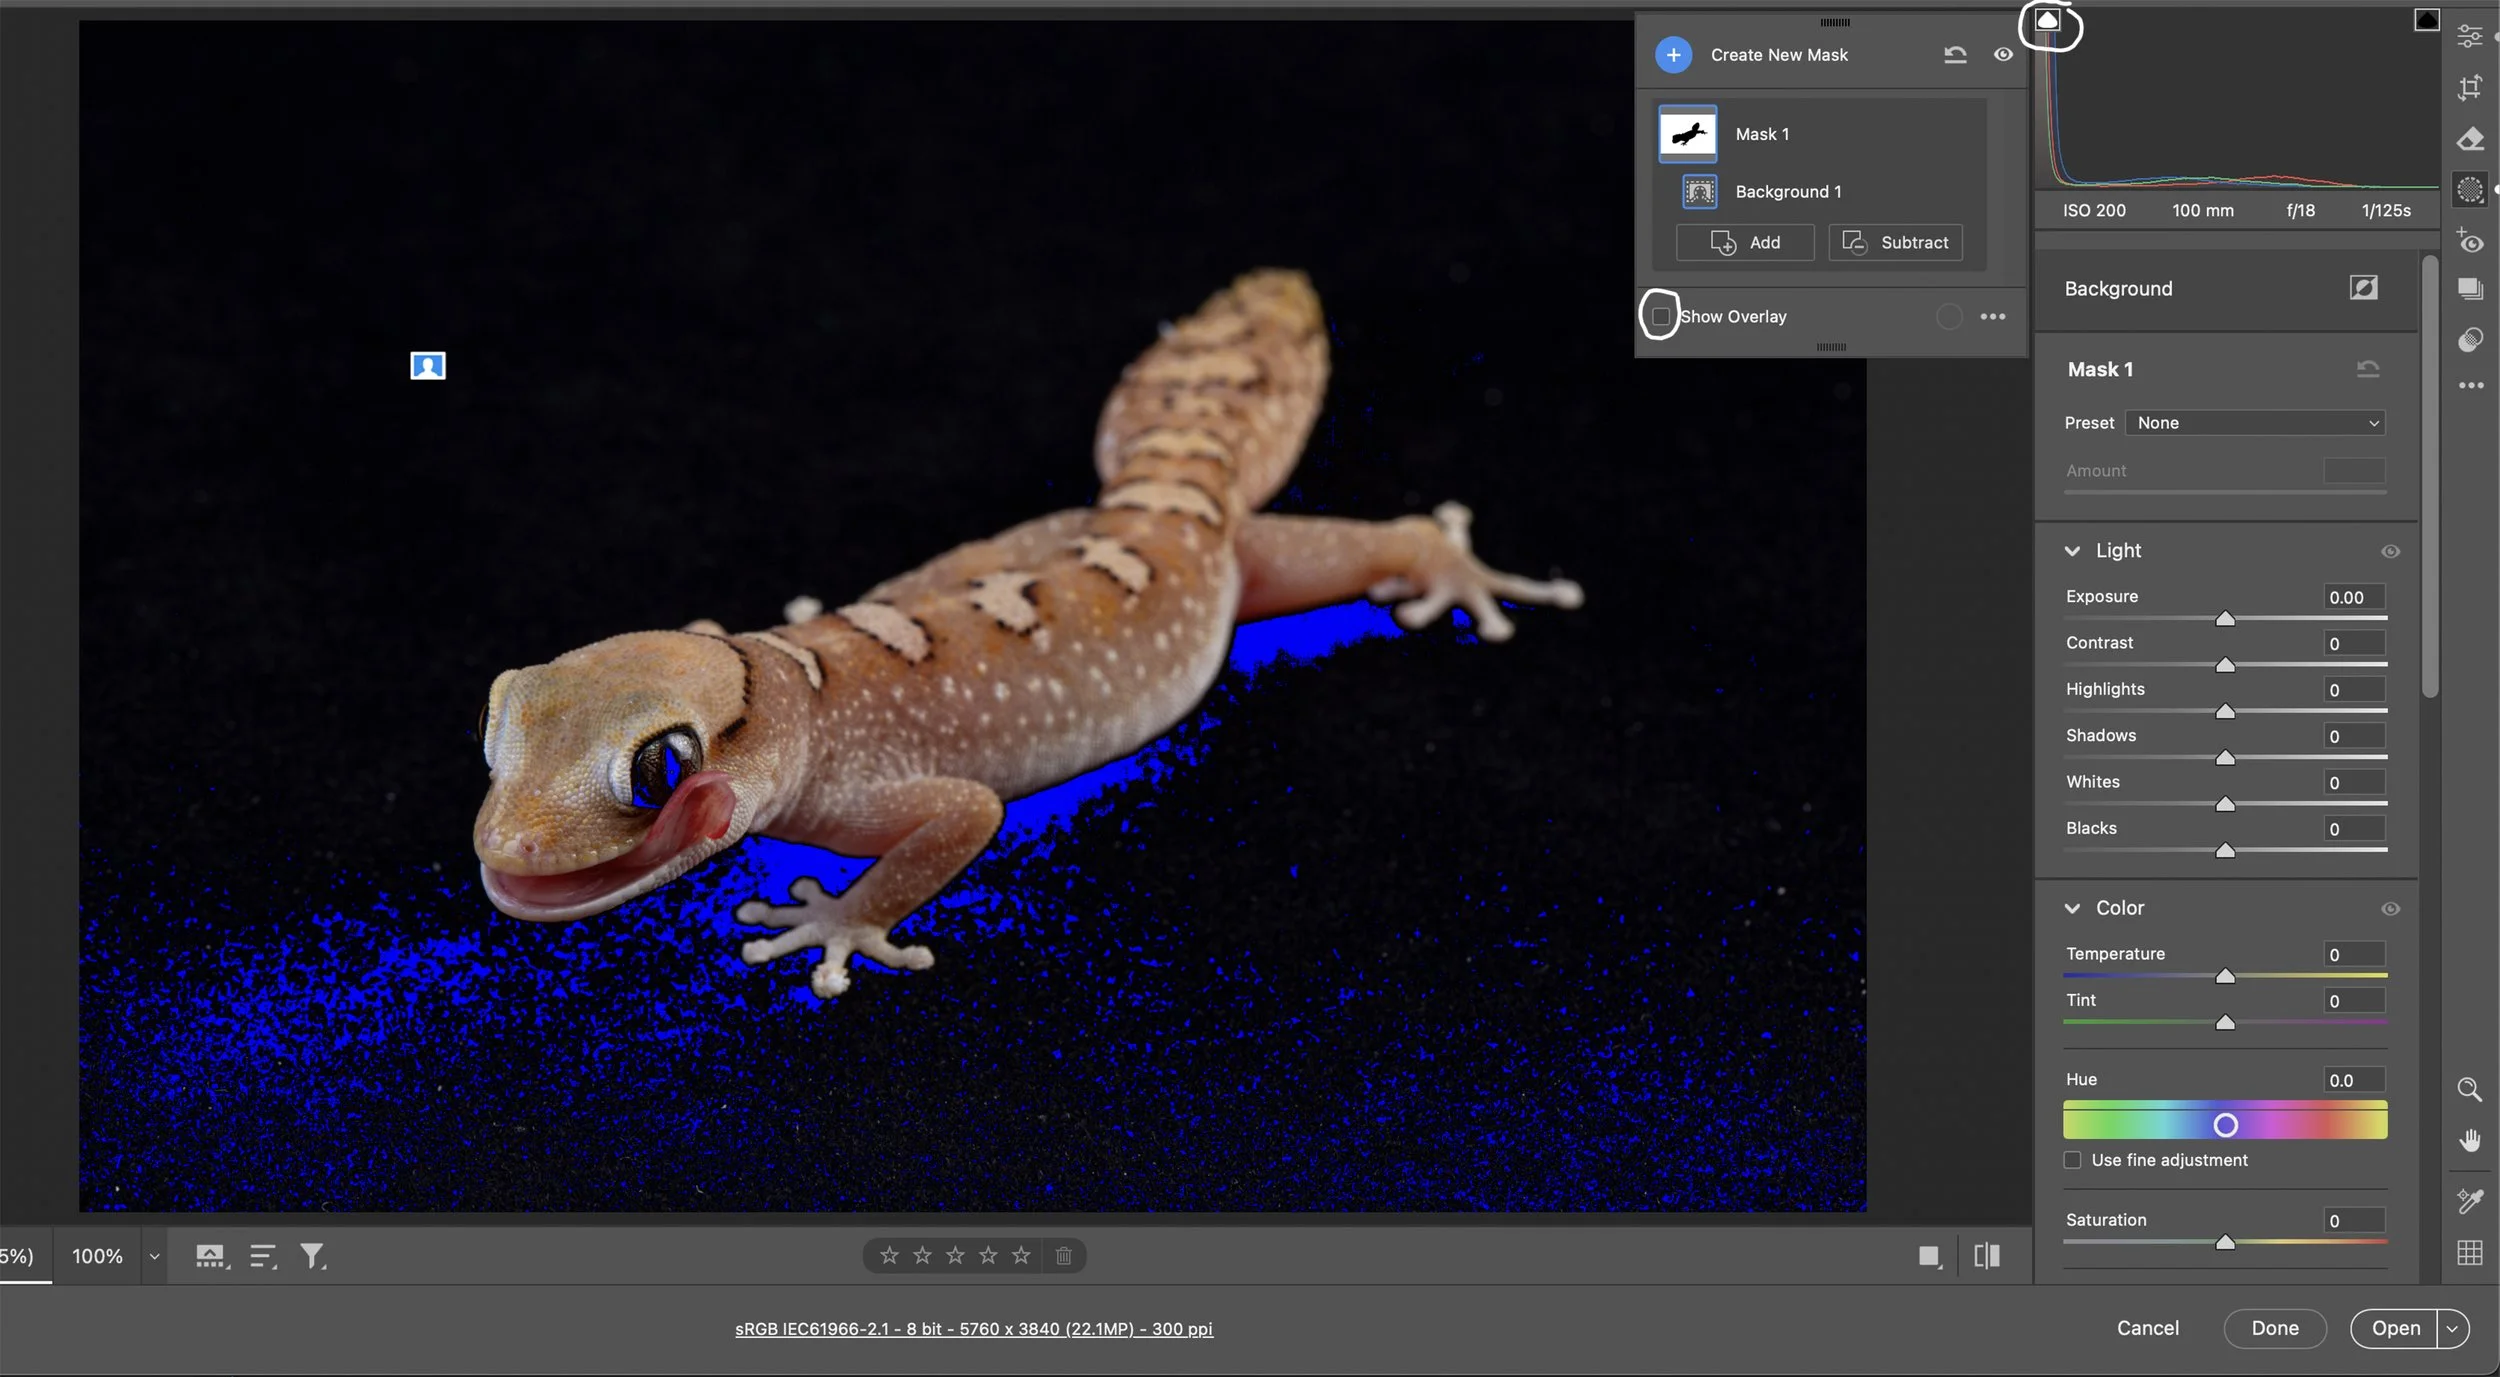
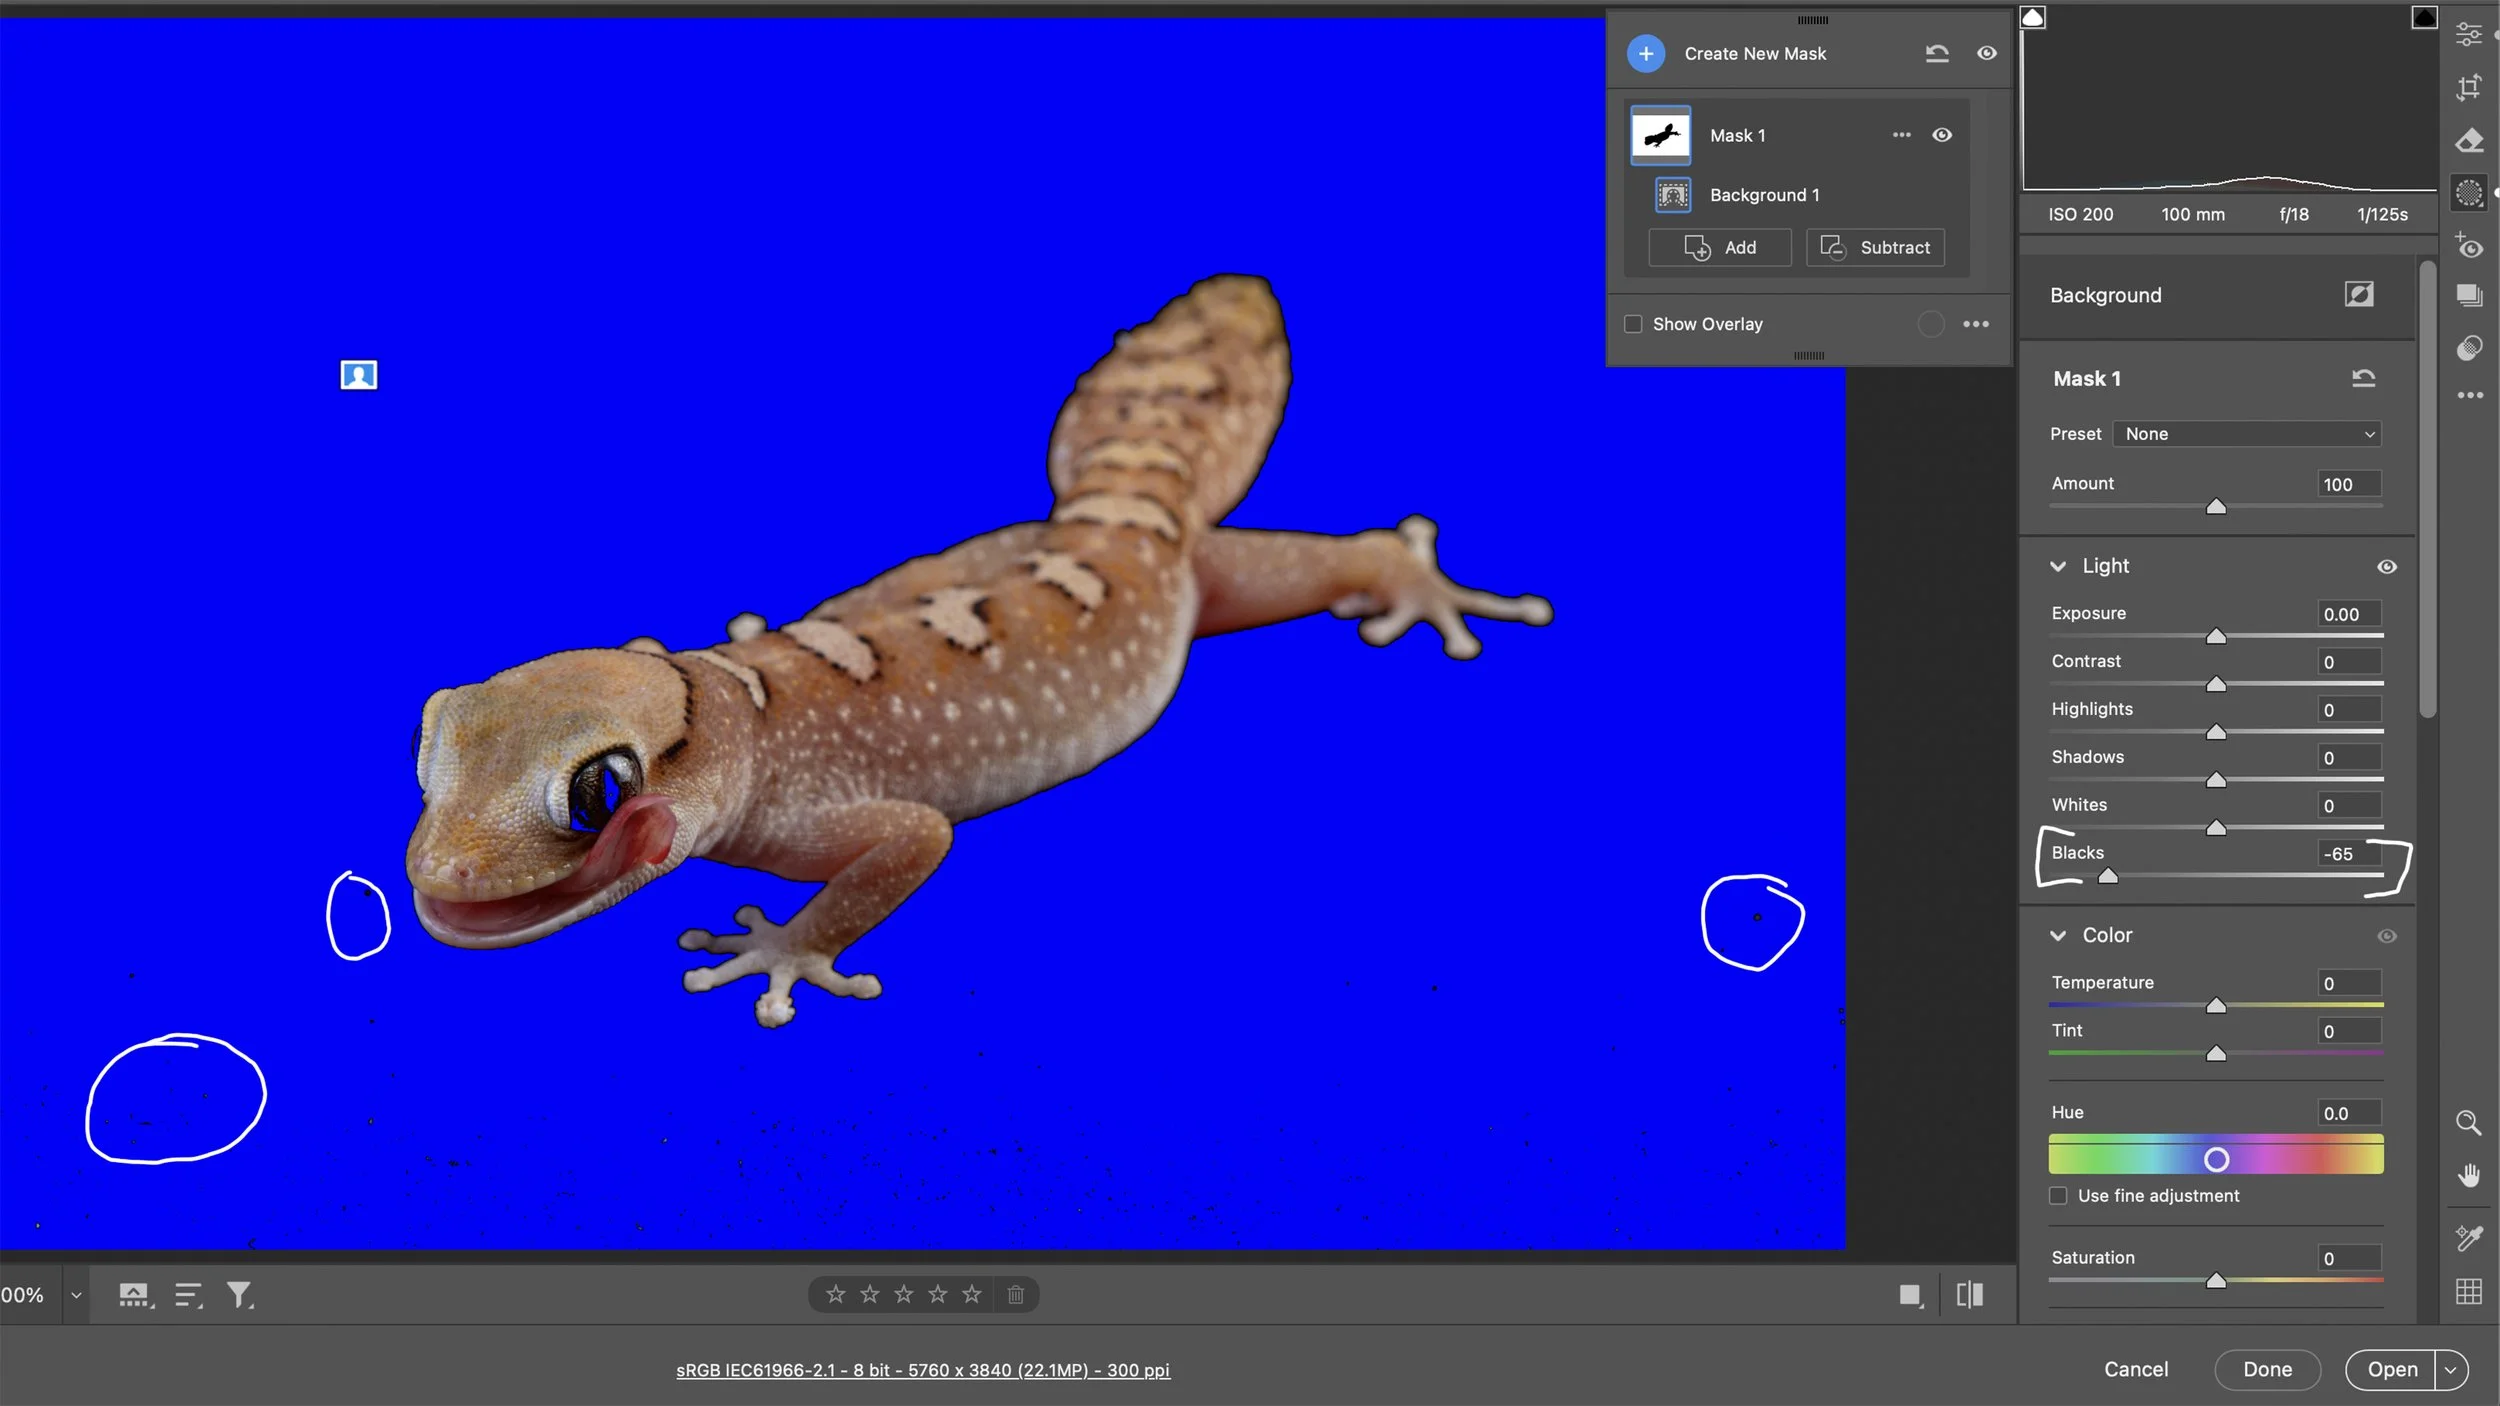
It’s time to make the background completely black! Click the Masking (M) icon in the right sidebar. The Masking Tool allows you to edit any sort of the image using a variety of tools to define the area you want to edit. Click on the Background in Create New Mask. Once it is clicked, it will show an overlay of the background (red). You’re going to want to uncheck Show Overlay so you can see the black background. Next, click the Shadow clipping warning. It’s the white arrow in the Histogram. When it is clicked, it will show the areas of the image that are completely black/in shadow as the blue color in the image. Move the Black Slider to the left until the background in completely black (it will show as blue with the clipping warning turned on). I pulled the Blacks Slider to -65, which made the background completely black. You will notice some artifacts in the image that will need to be removed from the background with the Remove Tool after fixing the underexposed eye.
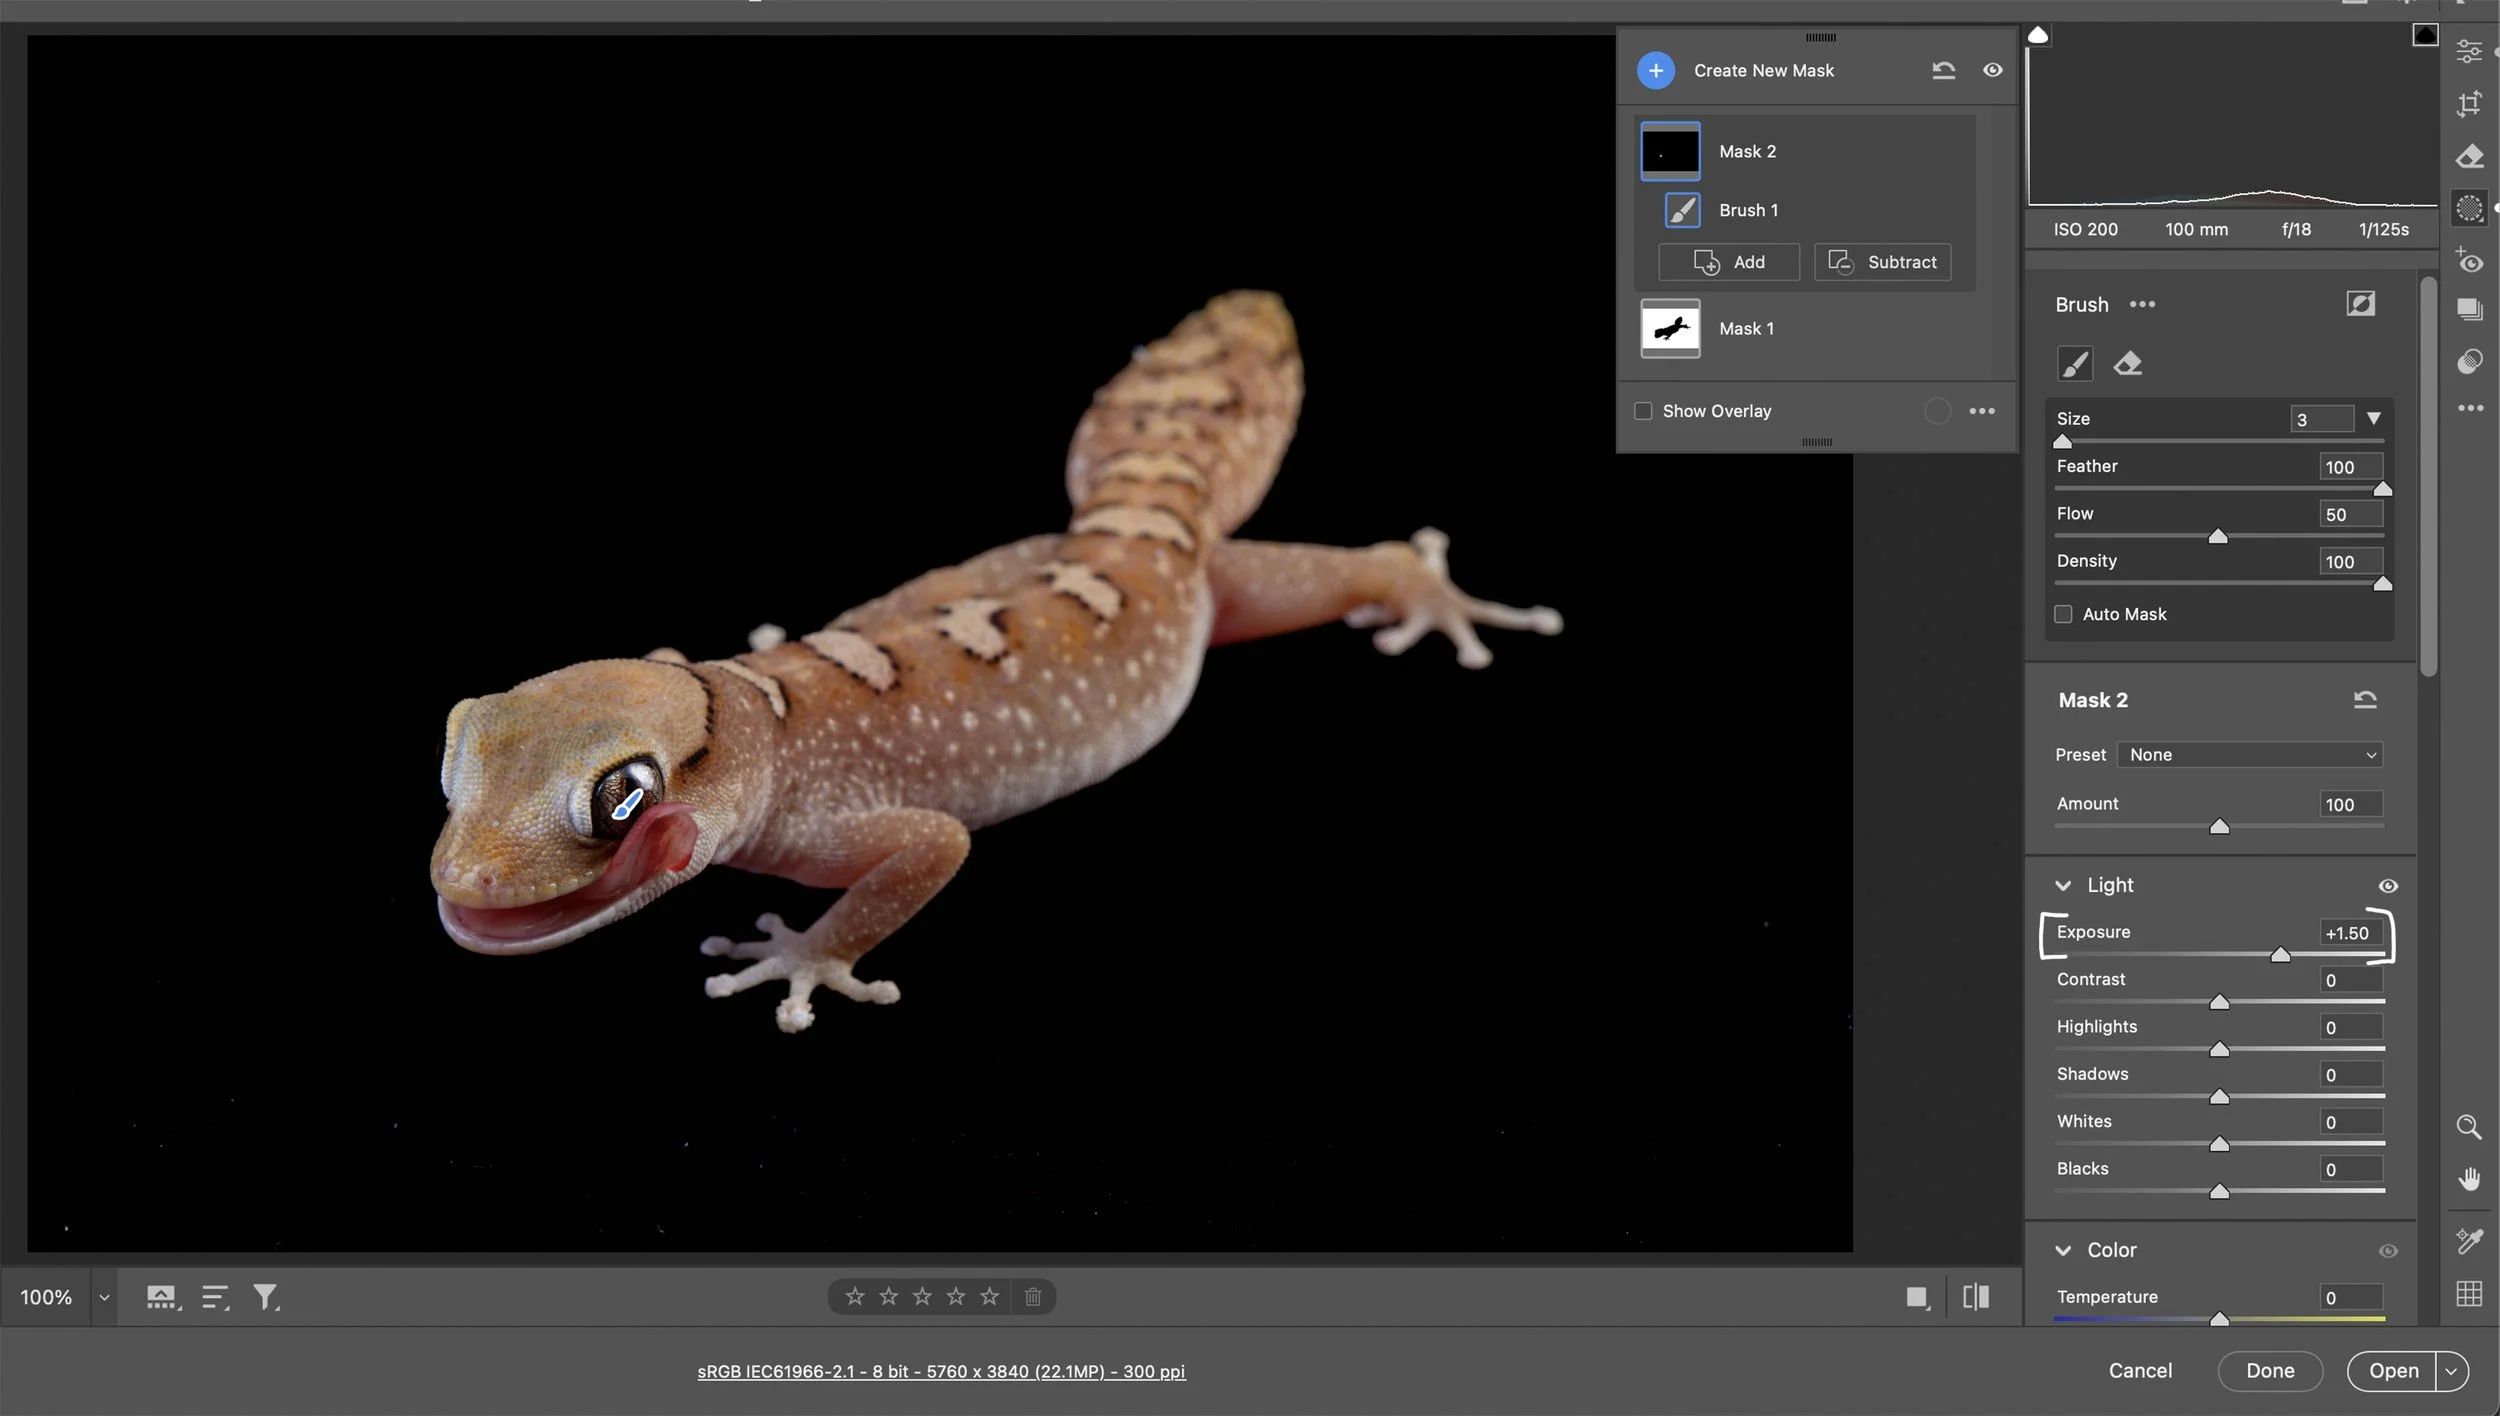
Next, click on Create New Mask, then click the Brush Tool. Use the Brush Tool to open up the eye by pushing the Exposure Slider to the right and painting in the area of the eye that needs to be brighter..
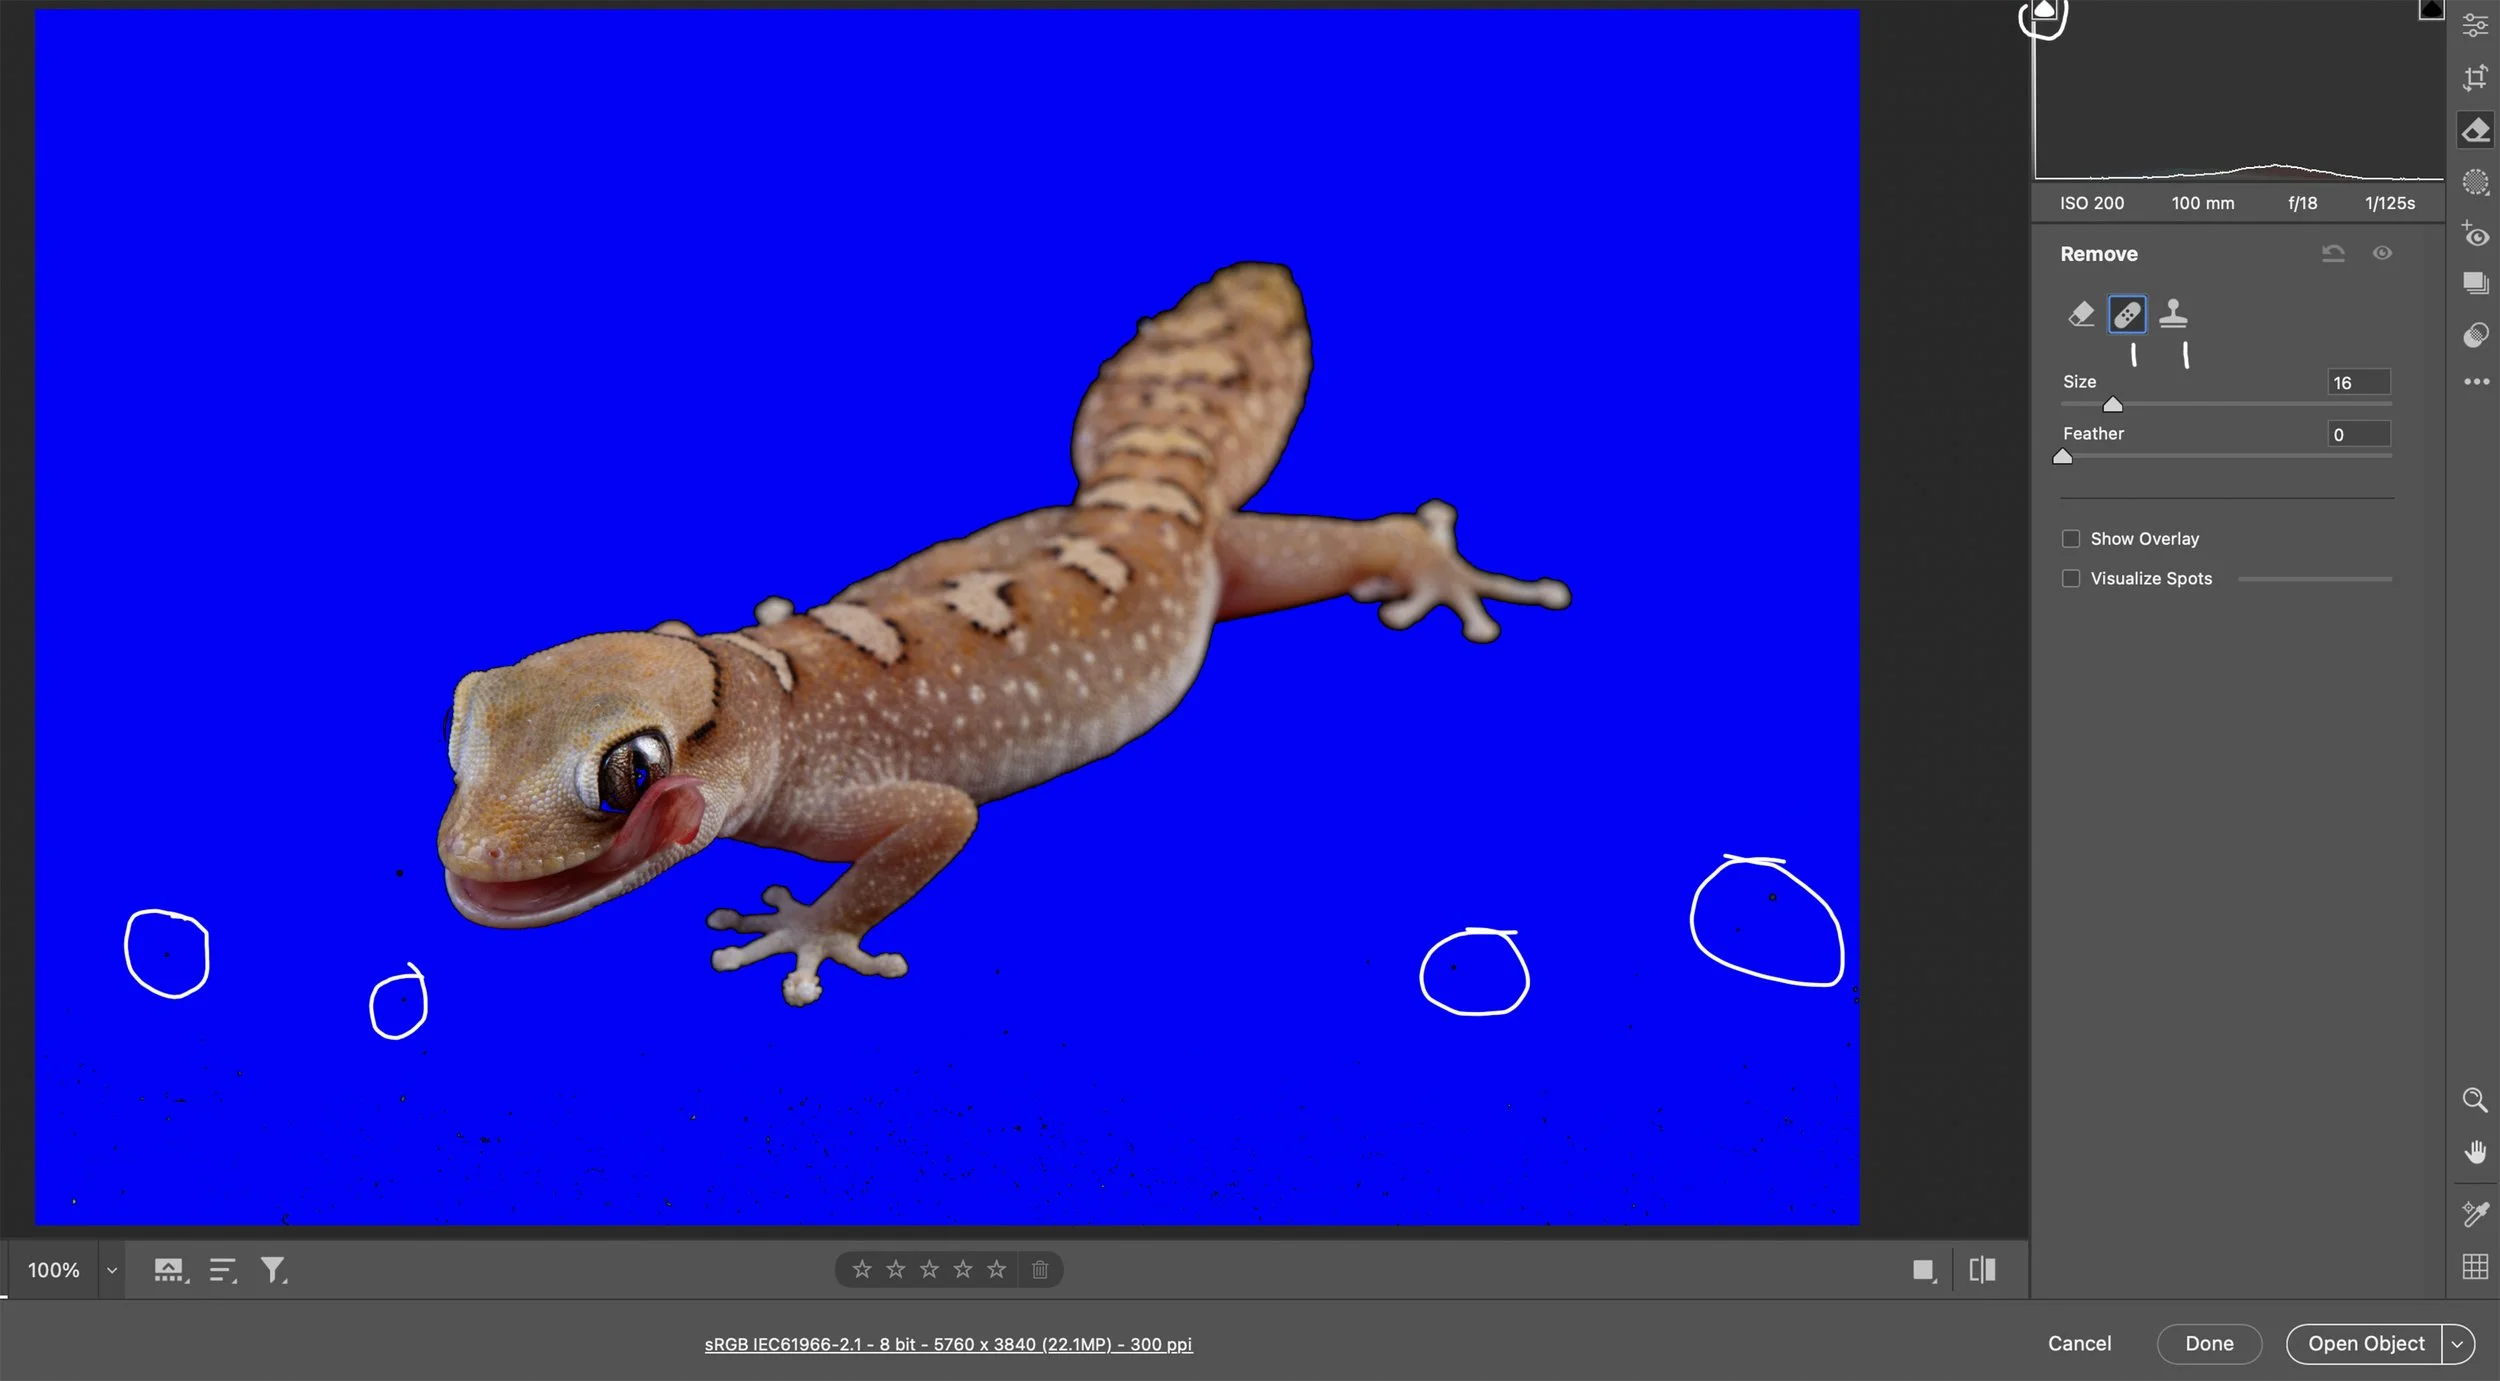
After masking the background and eye, it’s time to remove all of the artifacts in the background before doing the final edits in Photoshop. Click on the Remove icon just above the Masking icon. You can use Heal or Clone to remove all of the artifacts in the background. Make sure that the Shadow clipping warning arrow is turned on because it makes it so easy to see artifacts in the black background. They will show as black when the clipping warning is turned on while the rest of the black background will be blue. Once you’re satisfied that all artifacts have been removed from the background, it’s time to open the image in Photoshop and do all of the final edits and output sharpen for web and/or print.
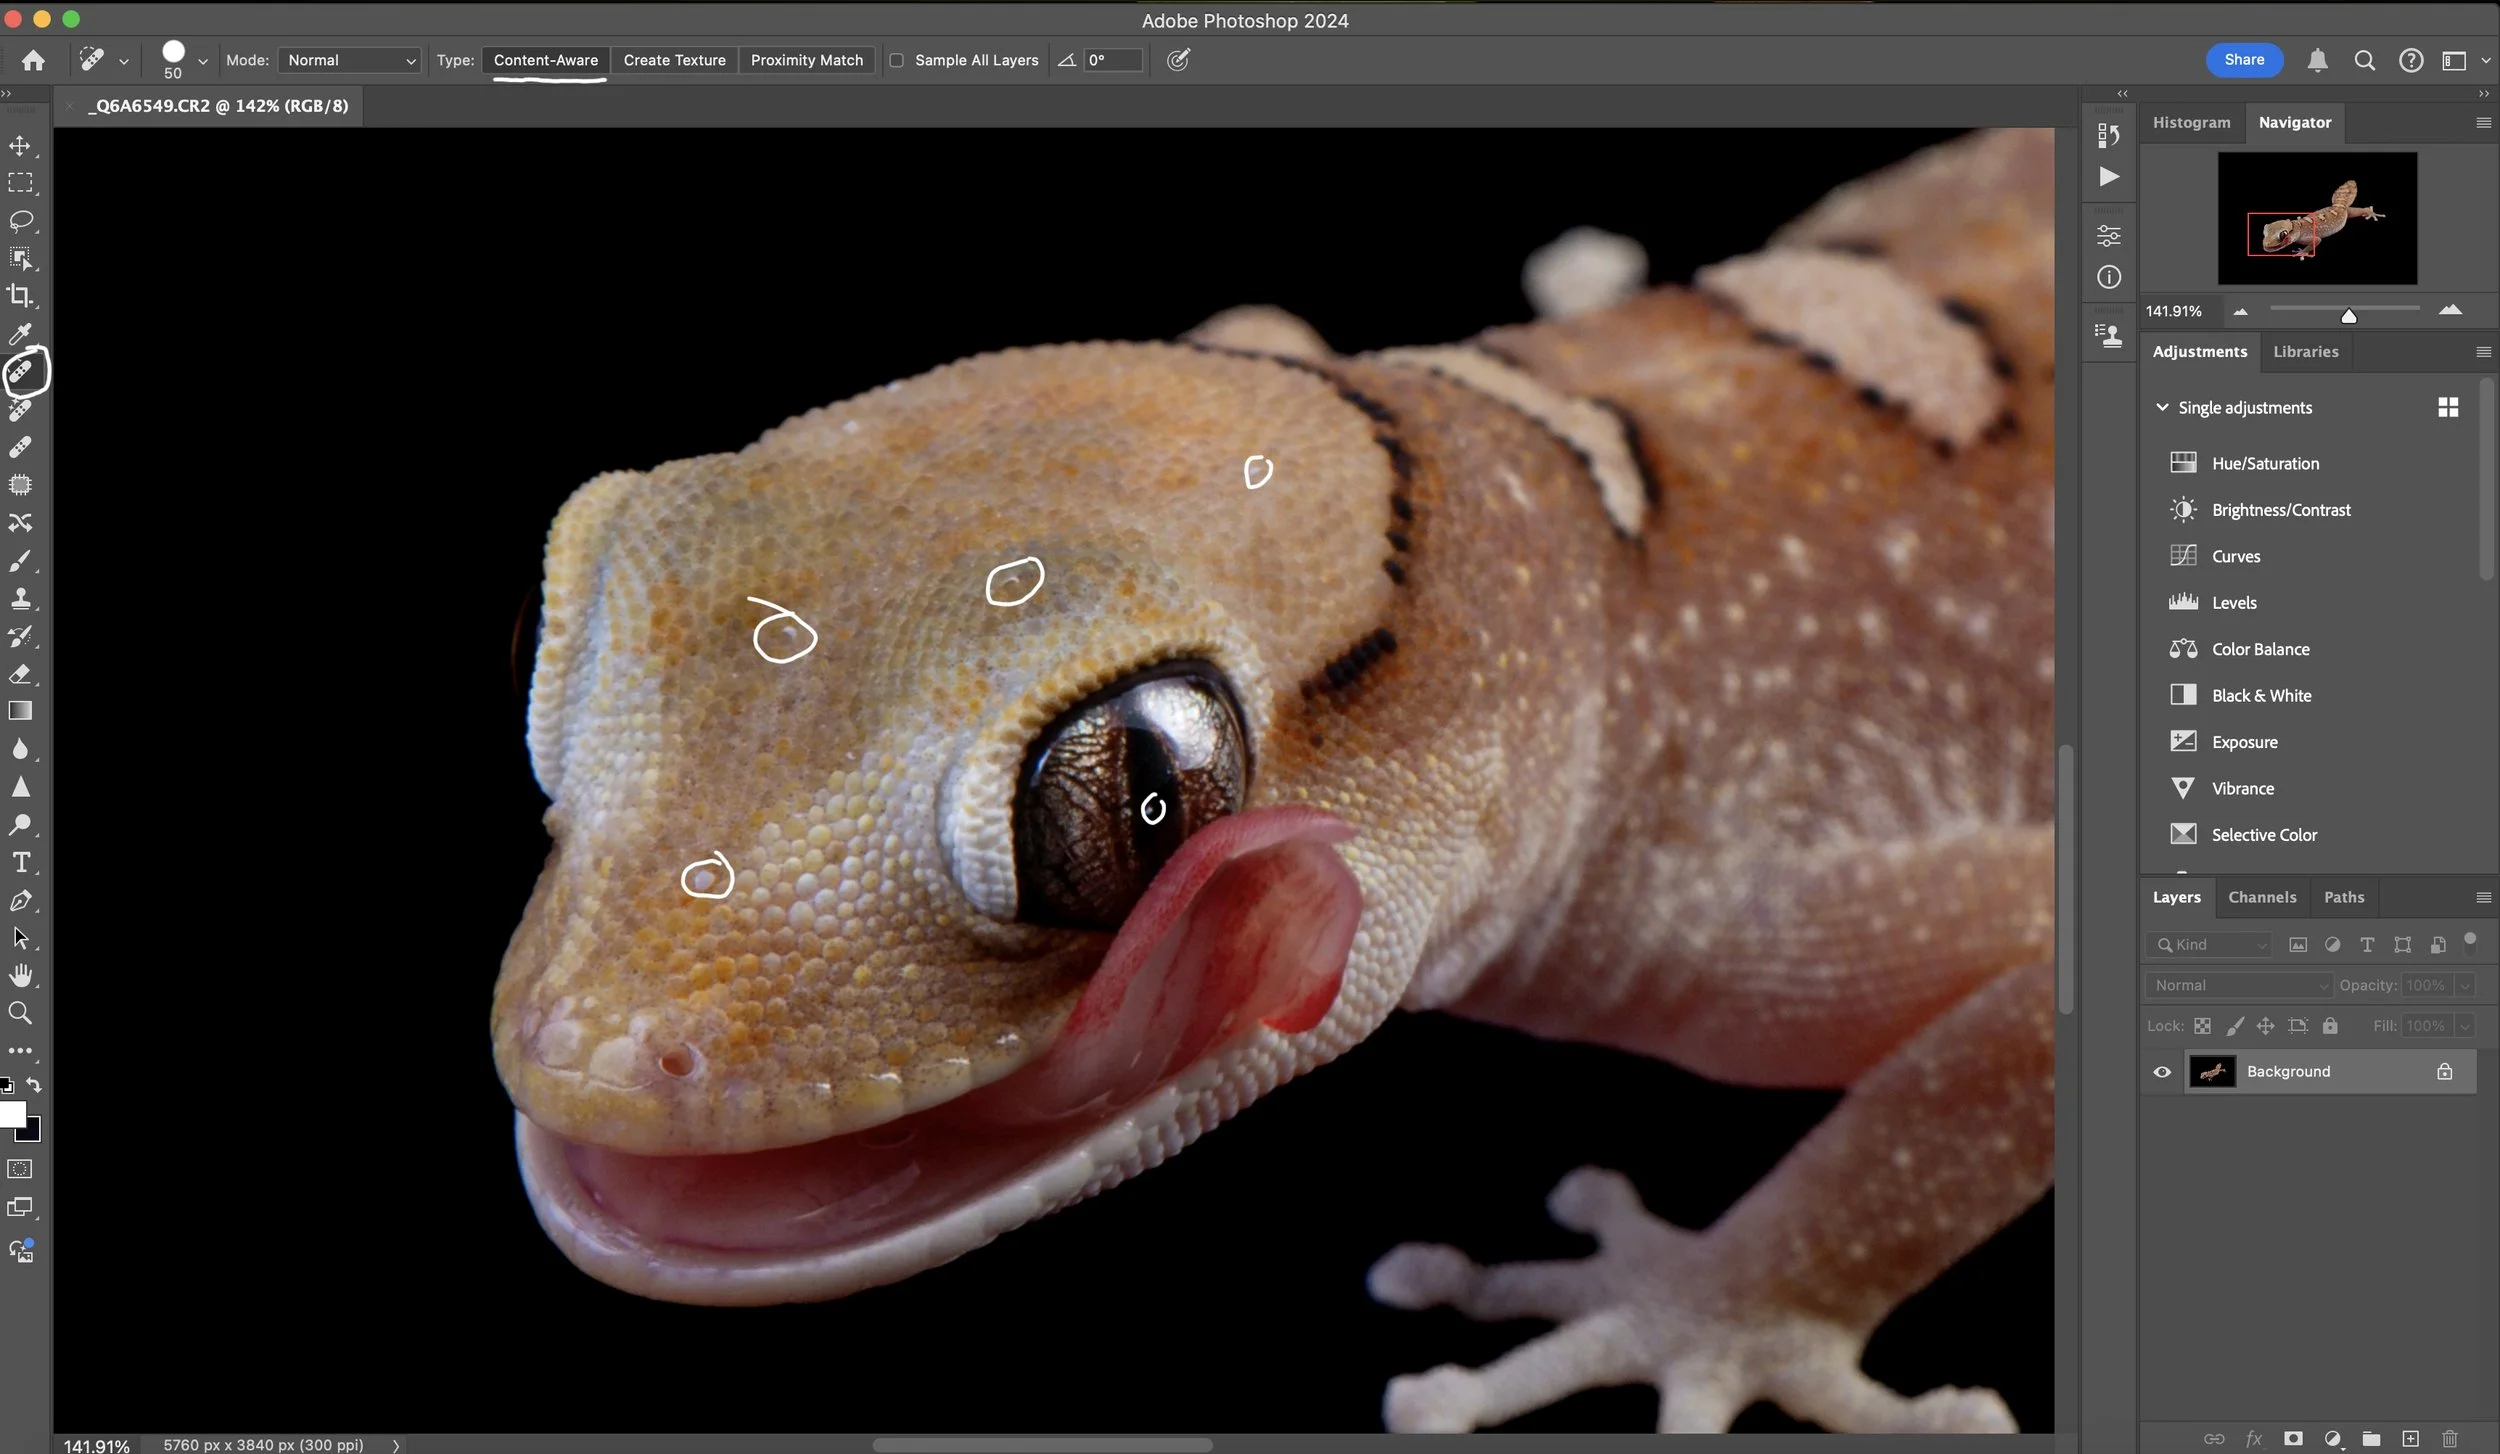
Open the image in Photoshop, and remove marks/artifacts from the subject and background (if some were missed in ACR) using the Spot Healing Brush tool with Type: Content-Aware.
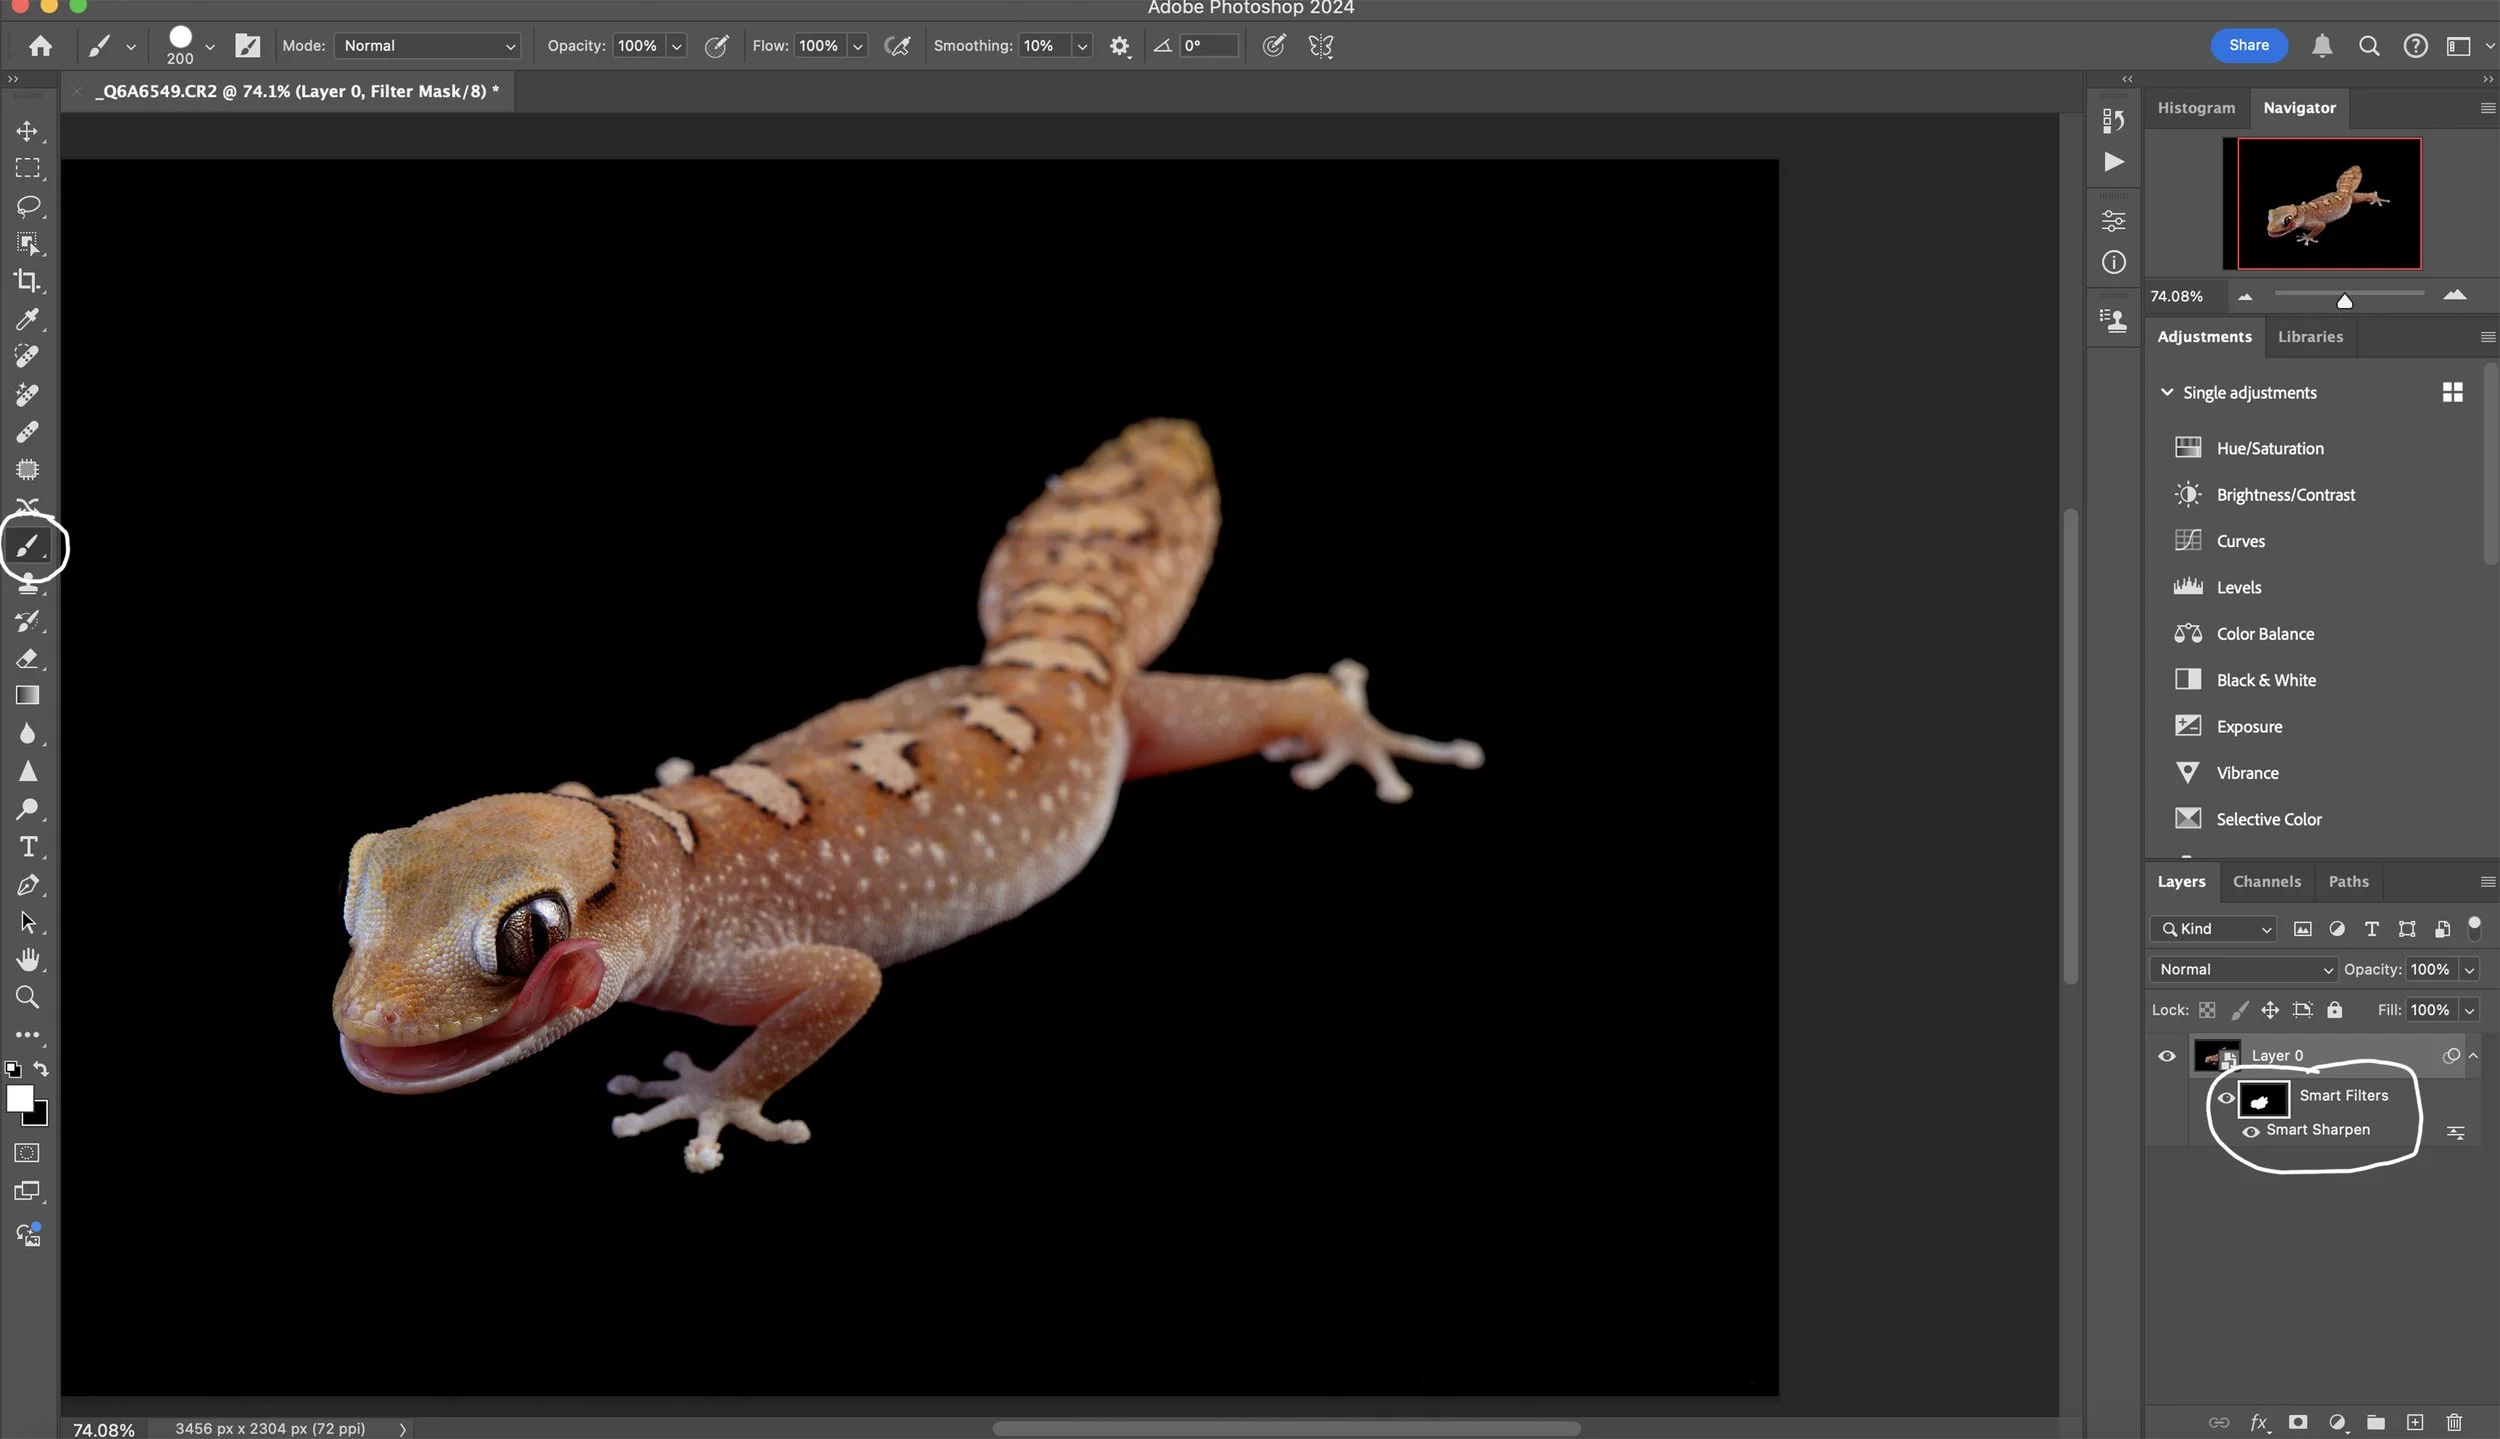
After marks/artifacts/blemishes are removed, it’s time to output sharpen the image for print and/or web. Convert the image for smart filters, then use Smart Sharpen. The Amount for Print and Web can be the same, but the radius needs to be adjusted. Radius for print is 1.2-1.4 and 0.5-0.7 for web. Once the Smart Sharpen settings are set, click ok. Click on the Smart Filters layer and press Command “I” to invert the layer. Once it’s inverted, use the brush tool to paint the sharpening back into the subject. Done!
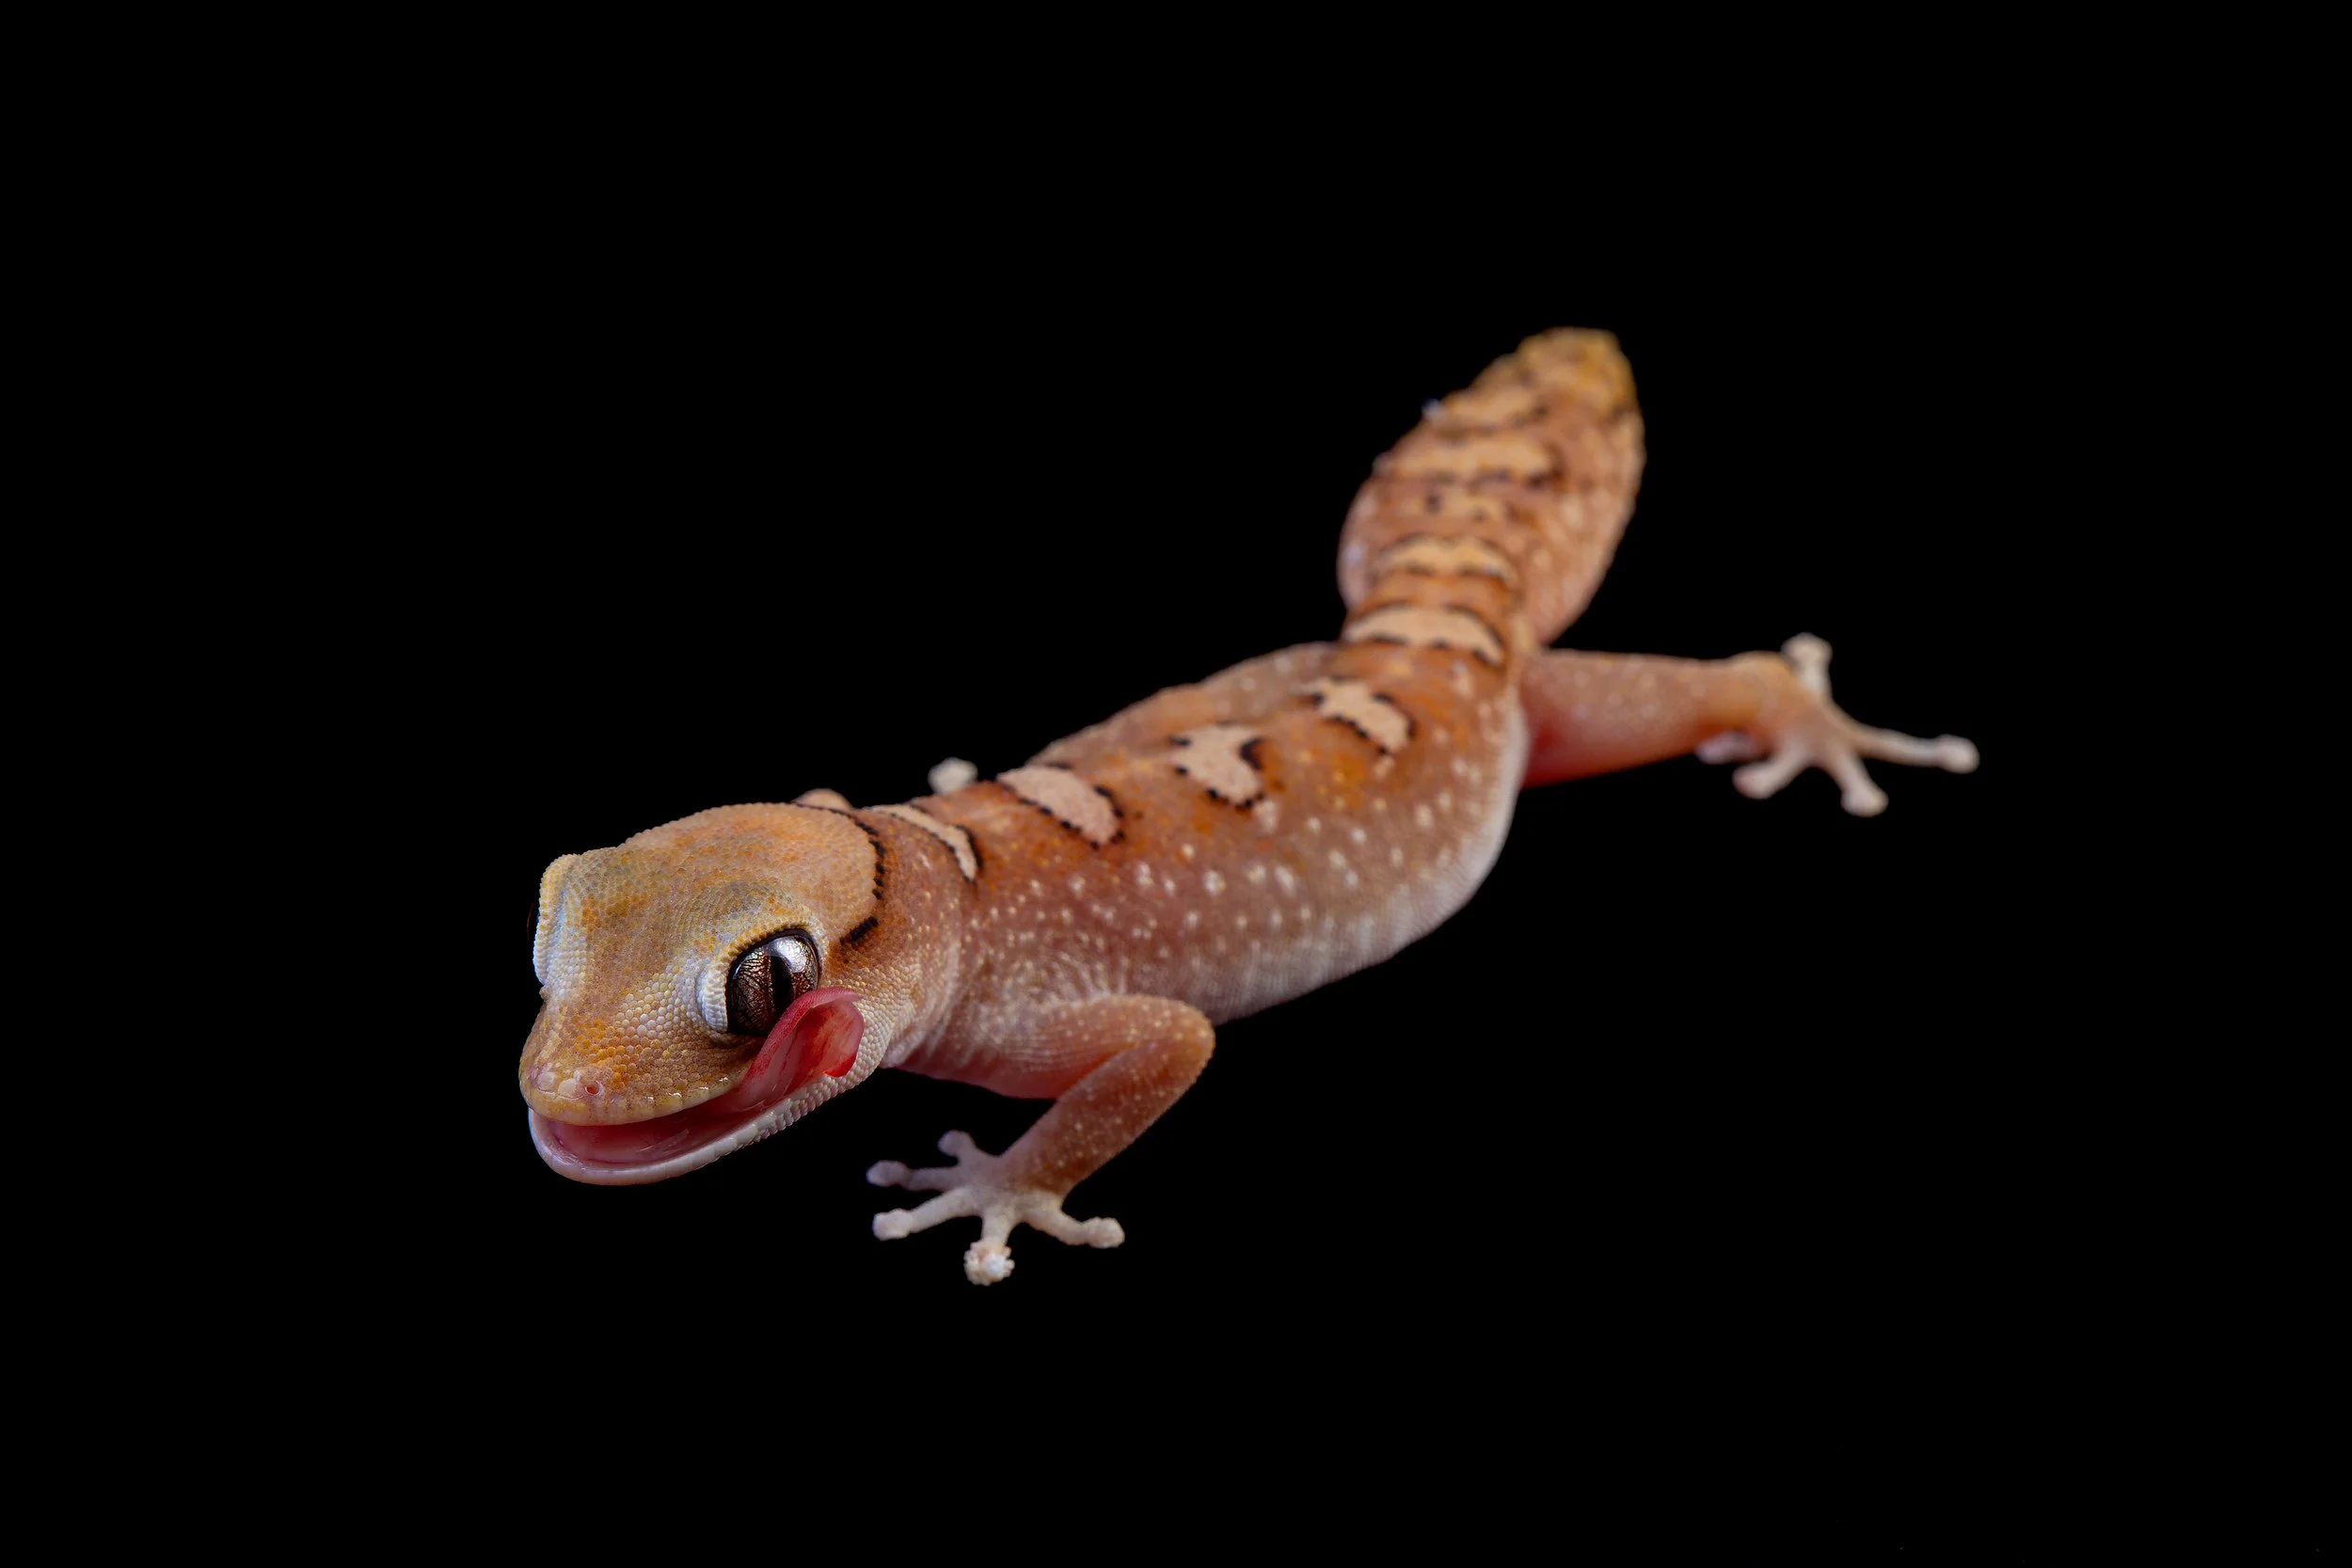
Final Image