Photographing Reptiles and Amphibians on a White Background:
Shoot through Workflow - UPDATED November 2025
My article about photographing reptiles and amphibians on a white background was published over a decade ago, and my technique and post-processing workflow have changed since then due to technological advances in gear and photo processing software. Surprisingly, some of the techniques I used back then are very similar to what I do now. I’m flattered that this technique has been utilized by so many herp photographers over the years. I’m also updating my tutorial about shooting reptiles and amphibians on a black background in a light tent that I created around 2016. Let’s get into it!
The technique I used over a decade ago involved cranking the whites in the image until the white background clipped completely, which made the background pure white. Unfortunately, when pushing the whites in an image to the point of clipping also tends to overexpose the subject. It’s 2025, and it is now quite simple to mask the background from the subject by utilizing the Masking Tool in Adobe Camera Raw or Lightroom. Some photographers like to eliminate all shadows in an image by either using strong fill light or eliminating the shadows in post. I think shadows give images dimension, and I personally think that shadowless images look flat. To each his own. Some photographers like to place subjects on a piece of clear acrylic on the white background, which creates a pleasing reflection of the subject. Initially, I used to use acrylic, but I found the reflections to be a little distracting. With that said, there are many prominent herp photographers who utilize this technique with much success.
I’d like to discuss the equipment, materials, and computer programs I use to make the images. There’s absolutely no need to have all of the more expensive equipment I use in order to achieve great results. I’m simply going to share what materials and computer programs I use to shoot reptiles and amphibians on a white background. I’m a Canon guy, and I’ve always been a Canon guy because I started my photography career with Canon equipment and am most comfortable using it. When shooting macro photos of herps, one will need a good camera body and macro lens. I shoot with a Canon EOS R and Canon EF 100mm f/2.8L Macro IS USM lens. An off-camera flash or LED light with a large diffuser is fundamentally important when doing this technique. I use an Elinchrom BX 500 Ri strobe with an Elinchrom 53” Midi Octa softbox. The strobe has a built-in wireless trigger, so I can fire the strobe wirelessly. The strobe is 500 watts, and the softbox creates beautiful wrapping soft light, which is important when shooting subjects on a white background. It minimizes hard shadows. Many photographers now use LED continuous lighting. I use a C-stand and boom/extension arm for the strobe and modifier. I’ll go into more detail later. The boom/extension arm is important so the modifier can be placed over the subject(s). The only other materials needed are a shooting table (I use a Lifetime 6-foot folding table), but a sheet of plywood and two plastic sawhorses work just as well), 4’x8’ sheet of white Formica, two A-clamps, and two 8-12’ light stands. I use Adobe Adobe Camera RAW (LIghtroom has the same Develop Module) and Adobe Photoshop 2025 to post-process all of the RAW images.
Equipment and Software
Canon EOS R Mirrorless Full Frame Digital Camera
Canon EF 100mm f/2.8L IS USM Autofocus Macro Lens
Elinchrom BX 500 Ri strobe or LED Continuous Lighting
Elinchrom 53-inch Midi Octa softbox
Skyport Wireless trigger
C-stand and boom/extension arm for strobe and modifier
6’x30” folding card table
4x8’ sheet of white Formica
Two A-clamps
8 to 12’ light stand (2)
Adobe Camera RAW (Lightroom has the same Develop Module)
Adobe Photoshop 2025
Gray card (white balance)
Photography/Camera Settings
Strobe at full power (500 watts) since stopped down to f/11-f/22
Shutter at 1/125
ISO 100
Handheld - herps are always on the move!
Always shoot RAW opposed to JPEG to have a lossless file. You’re going to want all of the pixels!
Feather the light (offset the modifier from center)
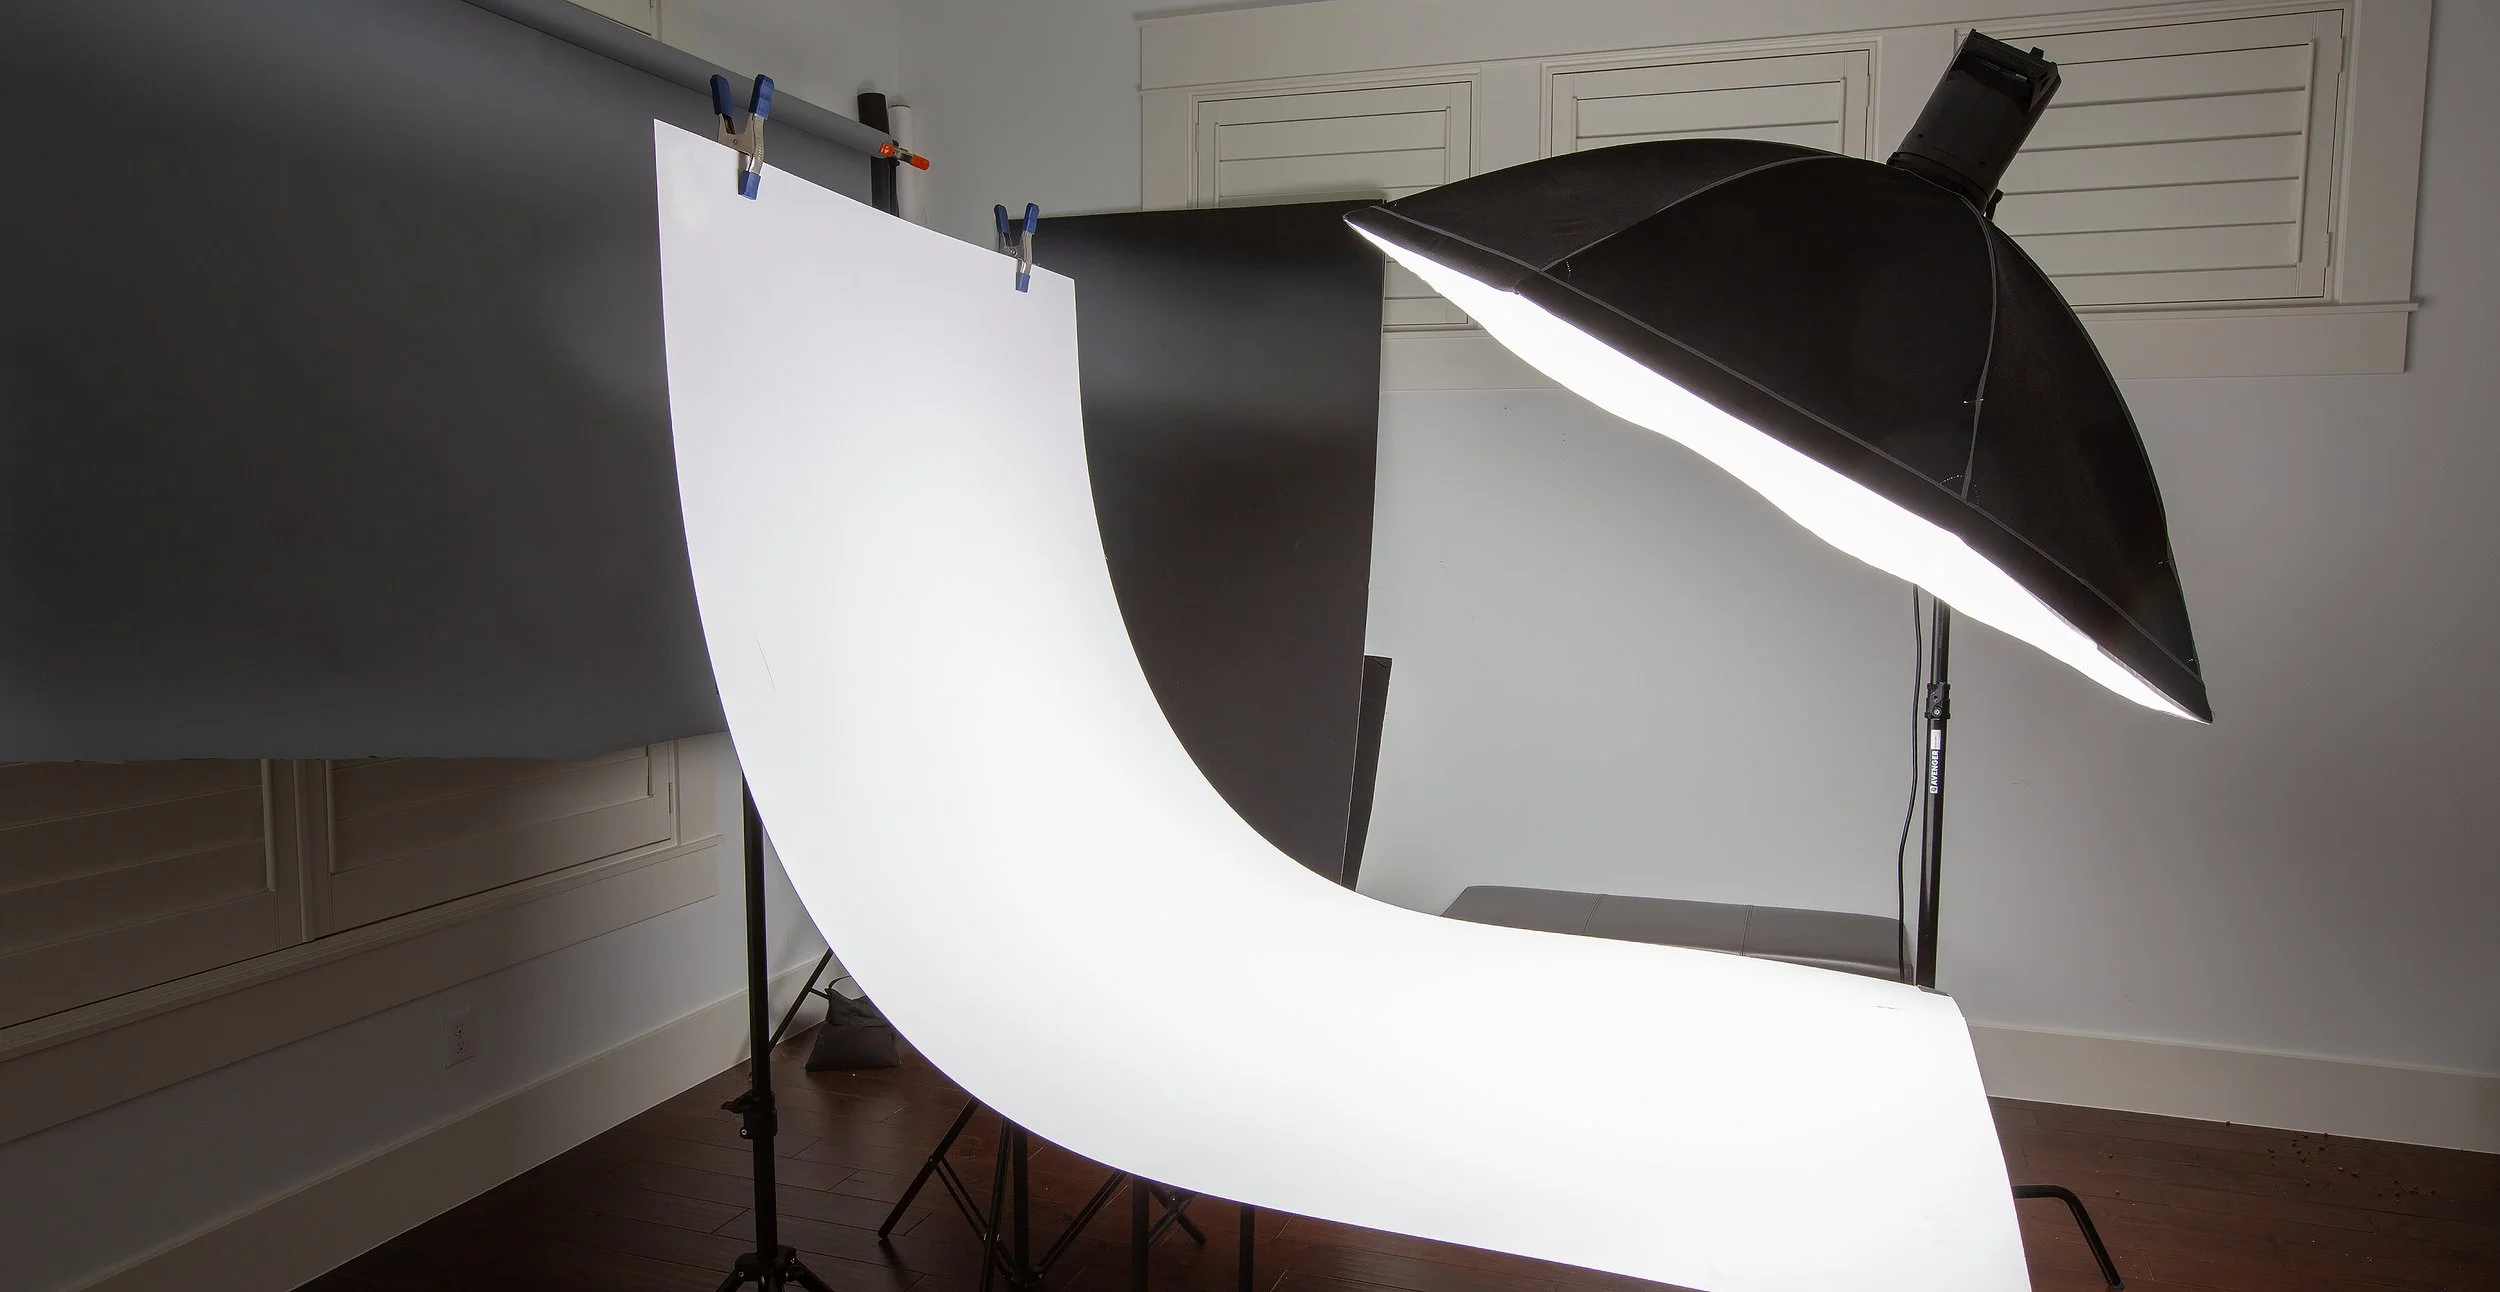
Set up the shooting table, and clamp the white Formica sheet to the two light stands with the A-clamps to form a ‘sweep’. Stands are positioned about 4 feet apart, and they’re about 6.5 feet high. Position the modifier over the sweep, slightly angled to illuminate the background. The modifier is about 3 feet from the sweep on the low end and about 4-5 feet on the high end.The slight angle creates just enough fill light to minimize shadows and light up the background. I’ve tried positioning the light at the classic 45/45 commonly used for studio portraiture, but I’ve found that a lesser angle tends to work better. A little more toppy than sidey. I’ve also tried a key and fill 2 or 3-light setup, but I’ve found that one large modifier works best for me. There are many ways to skin a feral cat. My technique is simple and effective and can be replicated by any home photographer on a tight budget. I crank the strobe all of the way up to full power since I’m stopped down to f/11-f/22. That’s 500 watts of light! I want detail throughout the subject, which is why I’m shooting at such a small aperture. My shutter speed is 1/125 of a second. I shoot reptiles and amphibians handheld because they're constantly on the move, and a tripod is impractical when shooting moving subjects. I want as clean an image as possible, so ISO is always 100. I always shoot RAW opposed to jpeg to have a lossless file. I feather the light. I place the subject on the sweep so the light hits the subject from the edge of the modifier and not the hotspot in the middle where the bulb is.
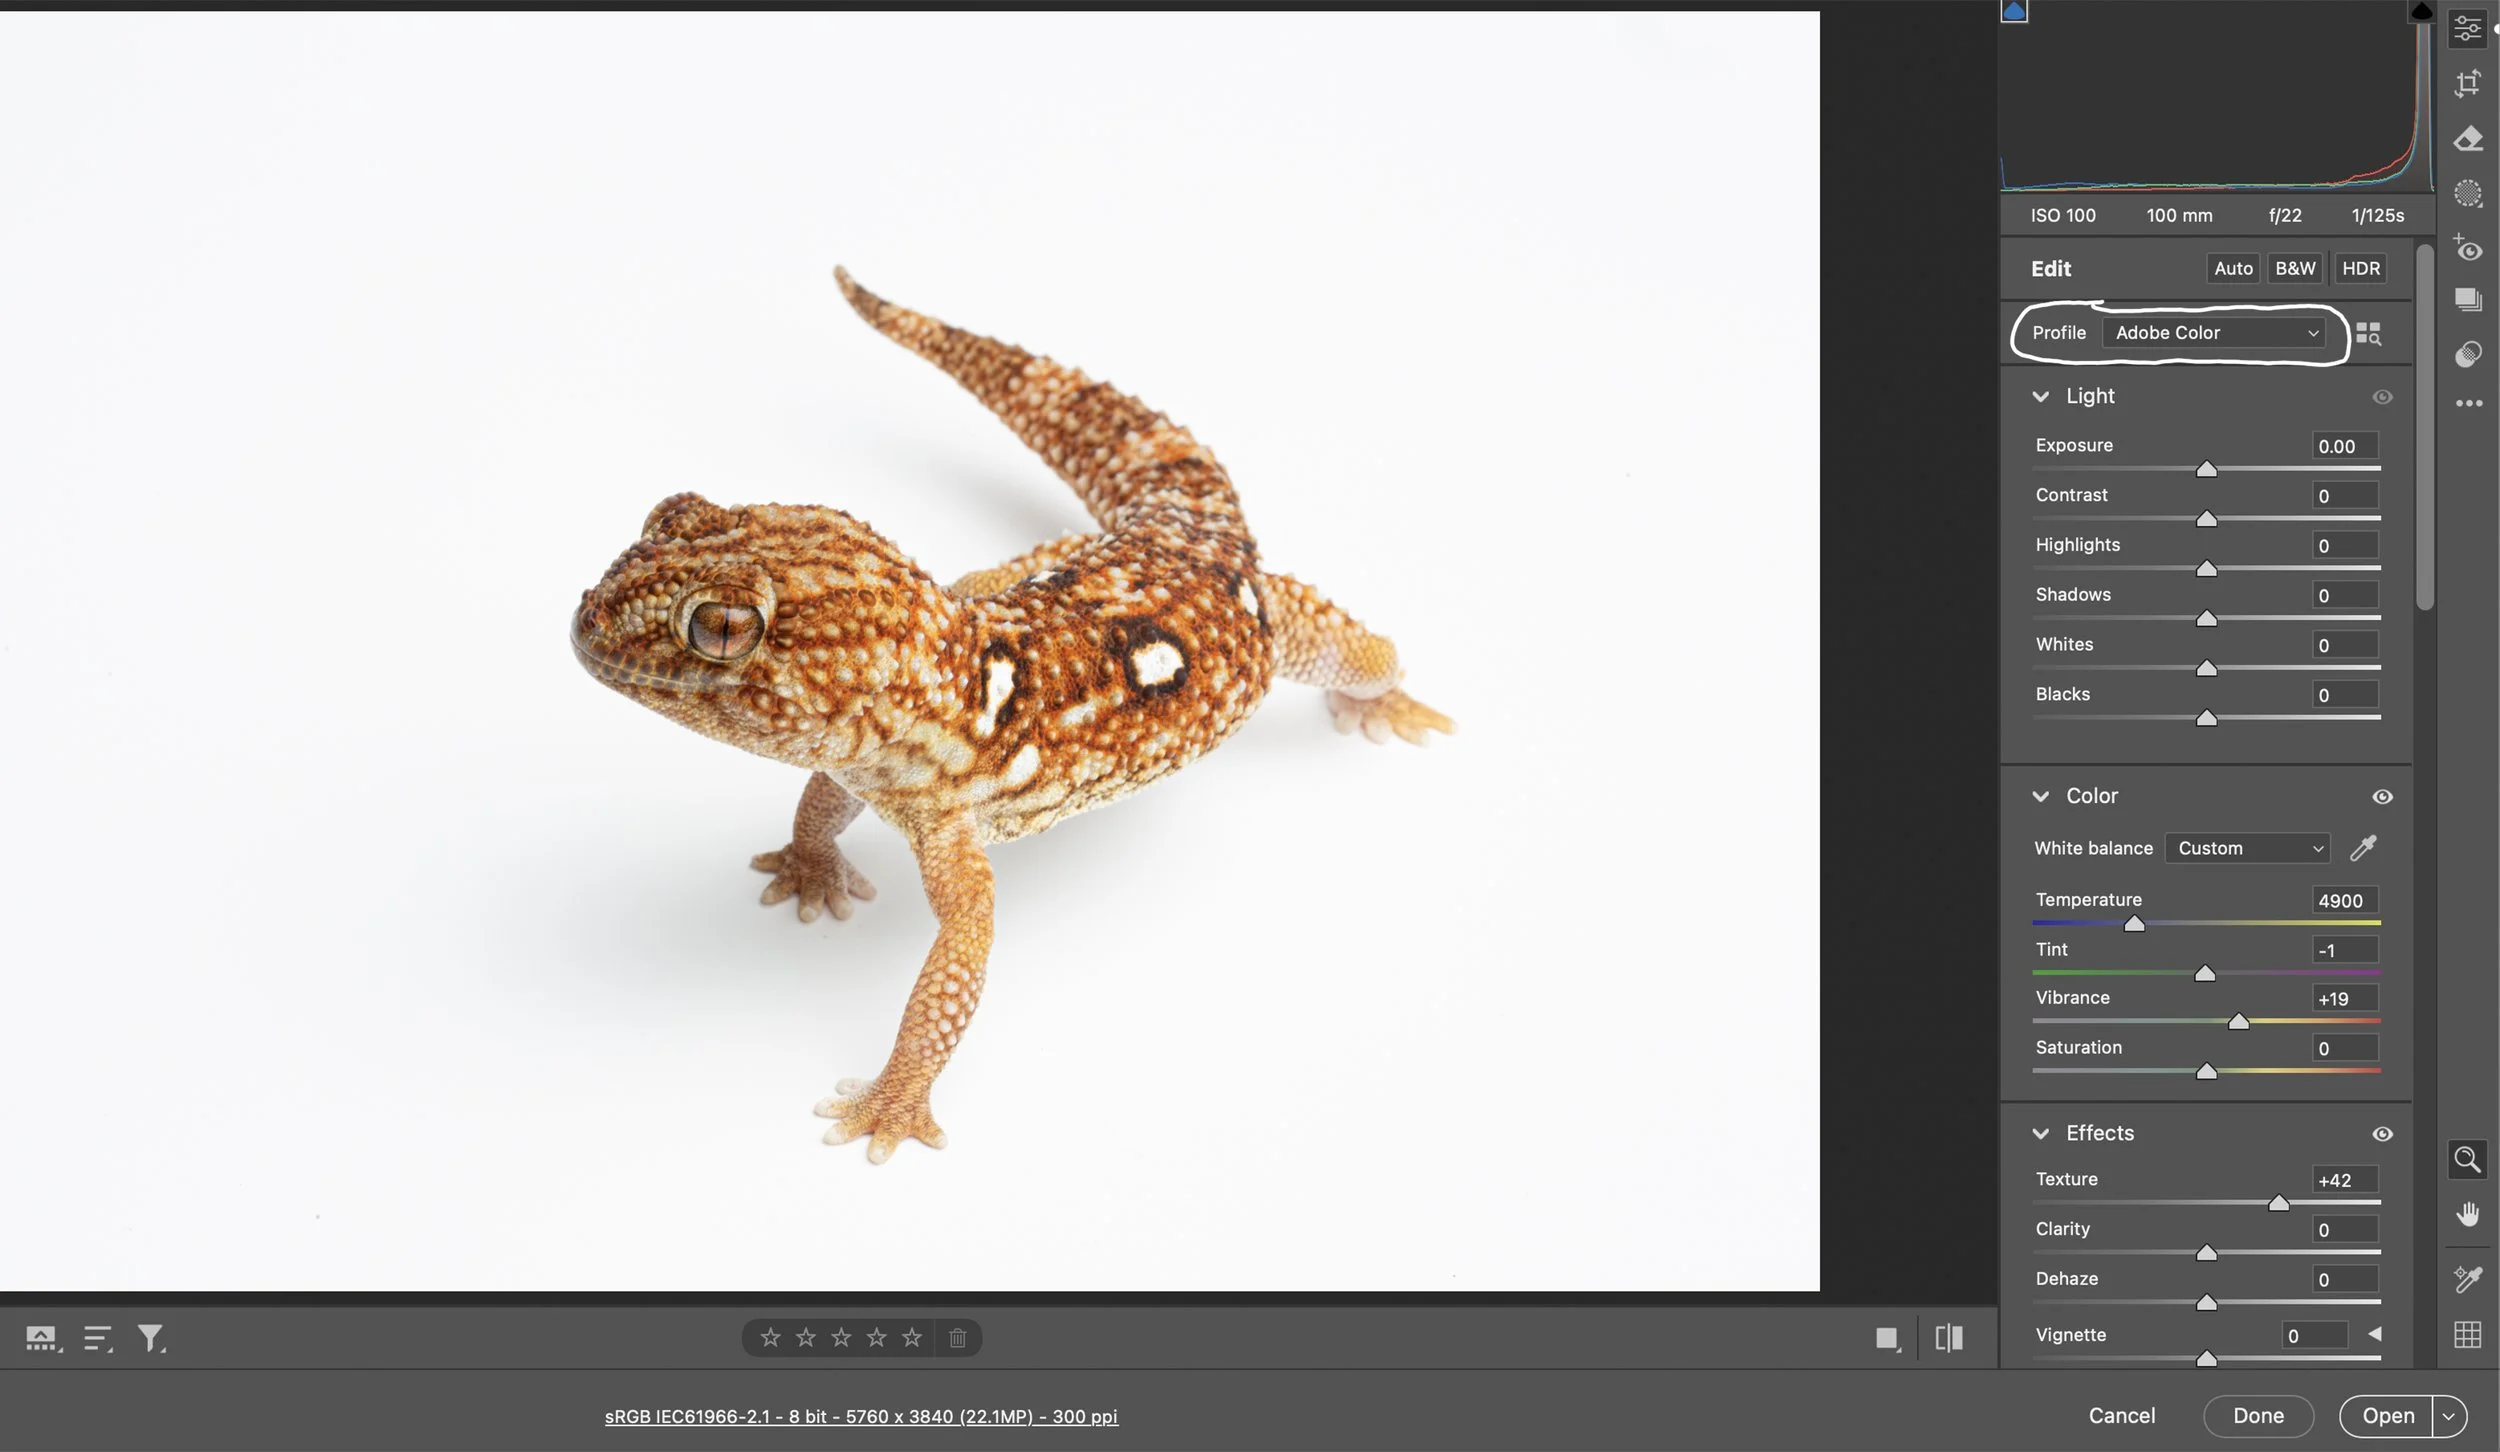
My subject for this tutorial is a cantankerous male Chondrodactylus angulifer. He wasn't feeling' it. Open the image in Adobe Camera Raw (Lightroom has the same Develop Module) and select the Color Profile you want to use. I use Adobe Color most of the time because I feel like it's a really good starting point. Try some of the profiles to see which ones are most appealing to you.
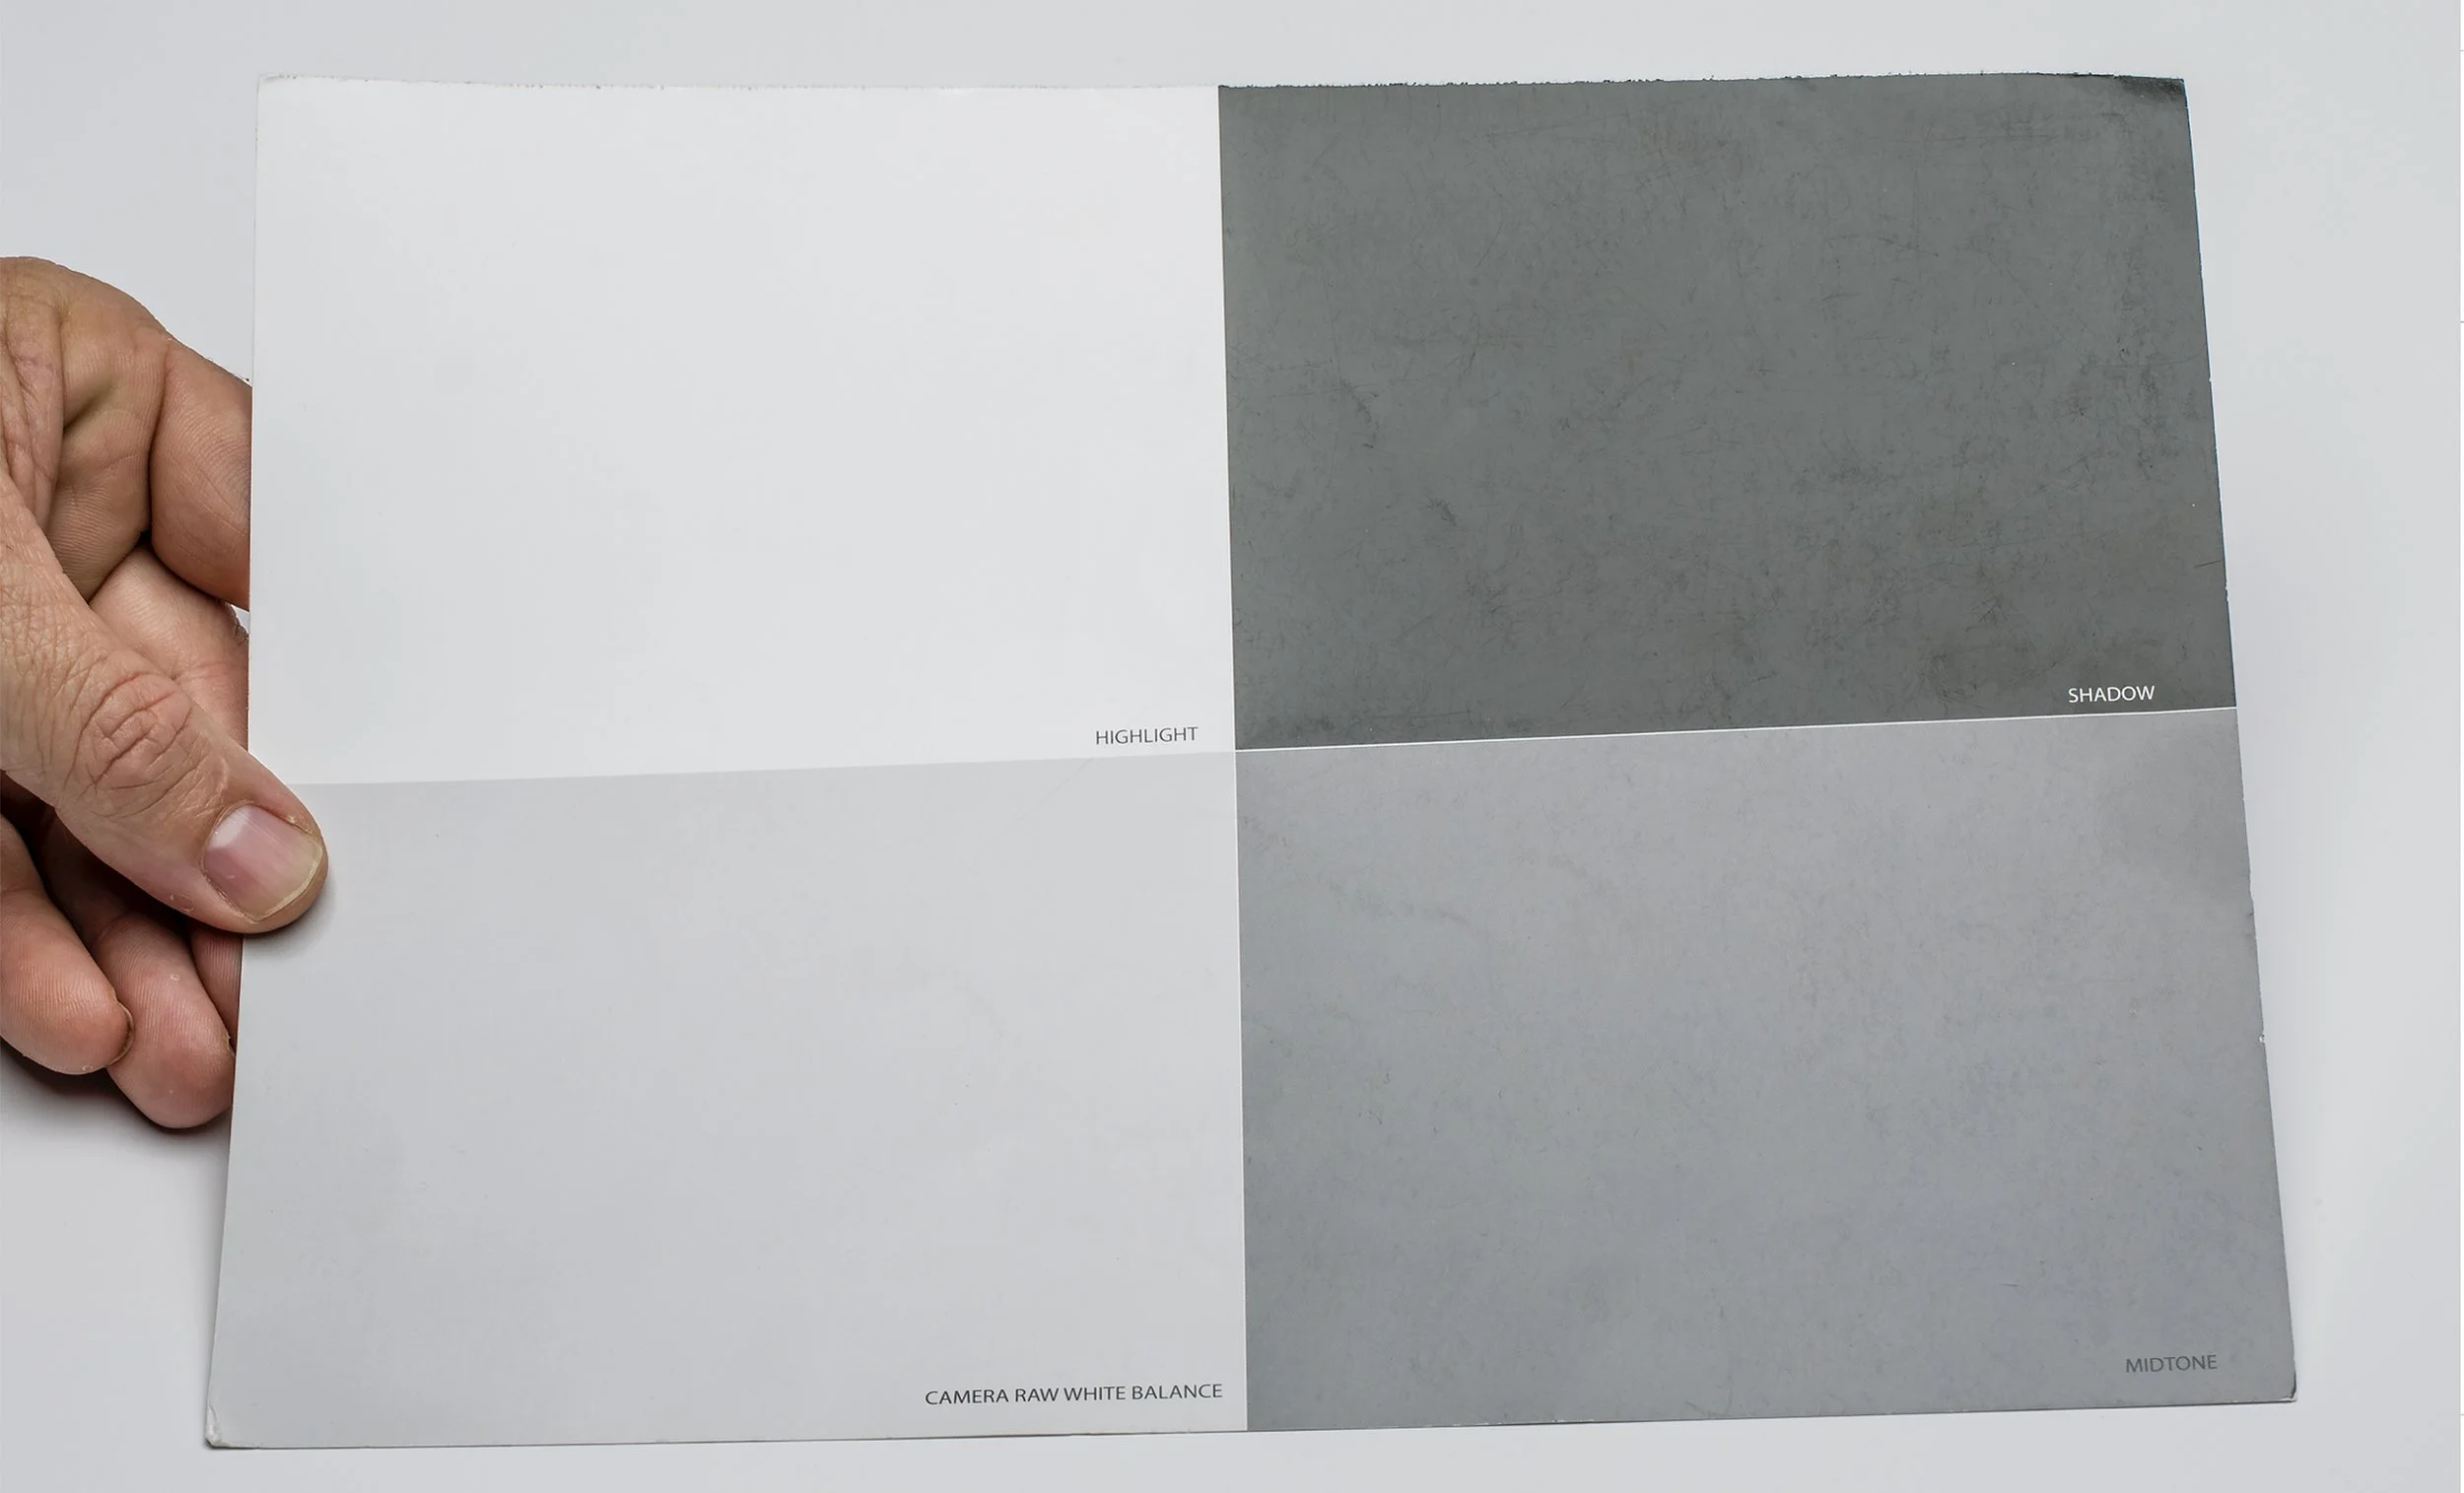
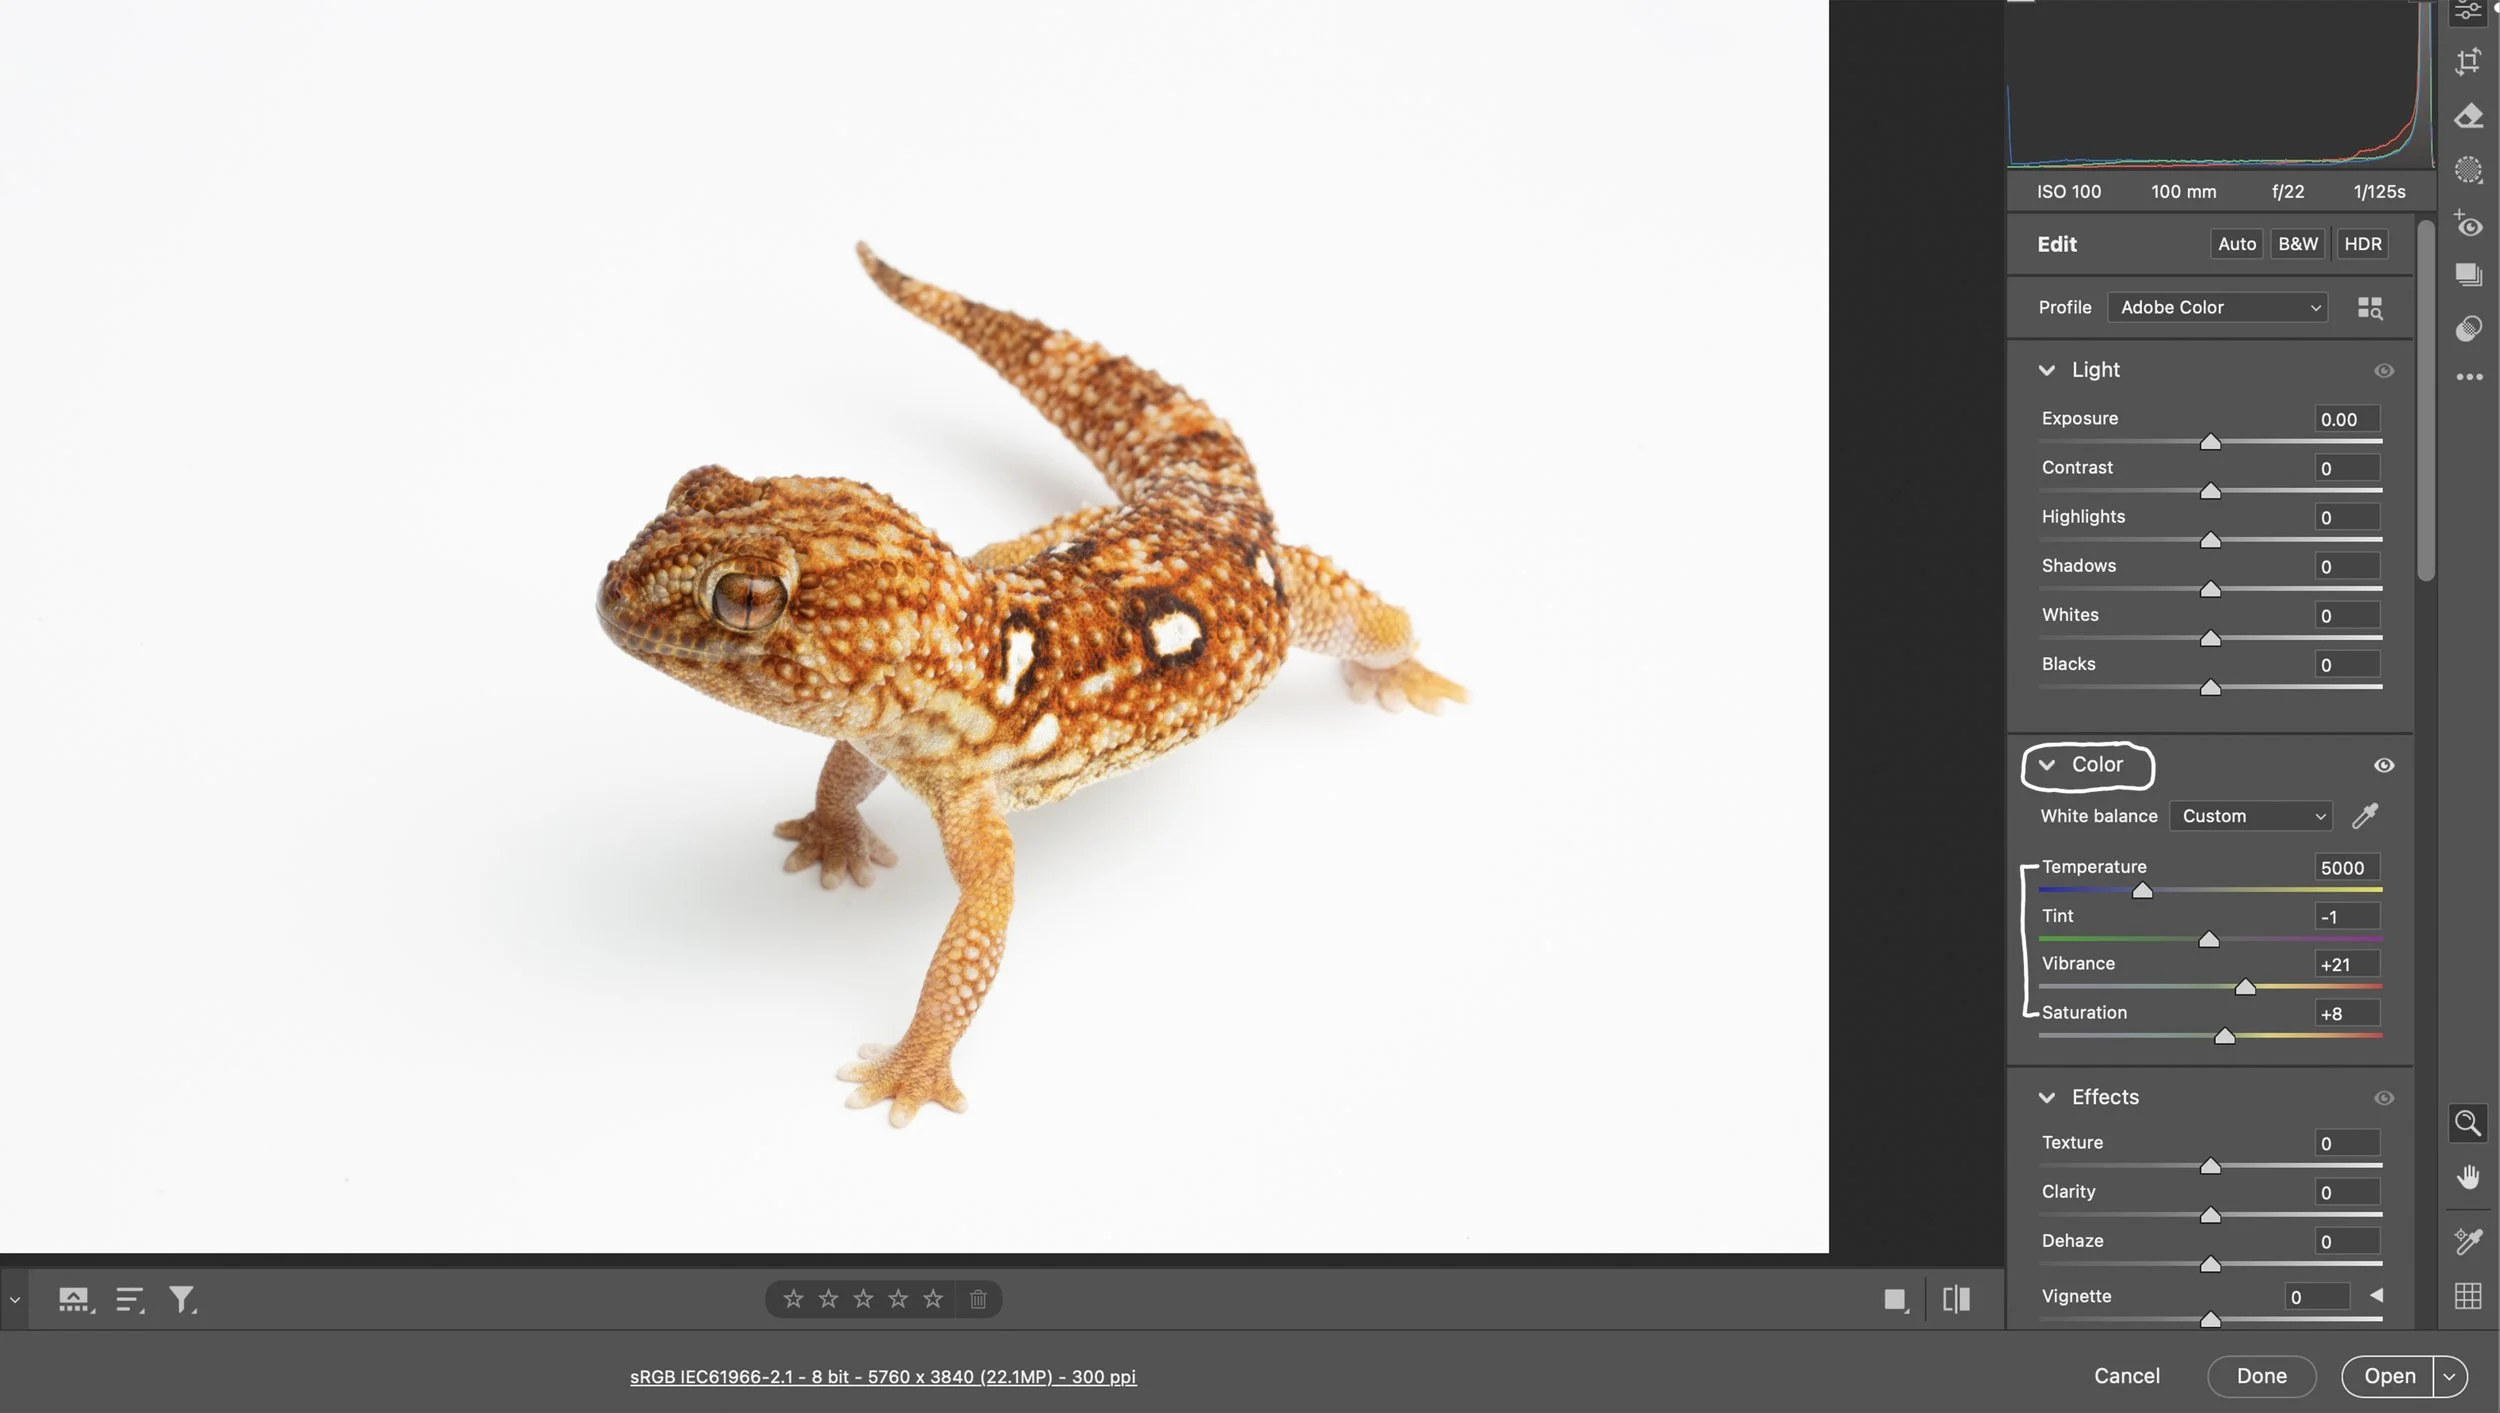
Next, let's move down to the Color sliders (White Balance - Temperature, Tint, Vibrance, and Saturation). I know my Elinchrom strobes are around 4900-5100K, but you can use a gray card to easily get the correct white balance by using the White Balance Eye Dropper Tool in ACR to sample the Camera Raw White Balance (18% gray) swatch on a gray card. It works like a charm, and you'll nail white balance every time. White balance is a creative decision, but I like the specimens to look as true to life as possible. The next slider is Tint. I rarely touch this slider and usually leave it as-is. After the Tint slider is Vibrance. It changes the saturation of the image without causing unpleasant color casts. I usually try to keep it around +20. The final slider in the Color Panel is Saturation. Stay conservative, y'all. Oversaturating an image is bush league. This Chondrodactylus angulifer needs a little saturation, so I pushed this slider to +8.
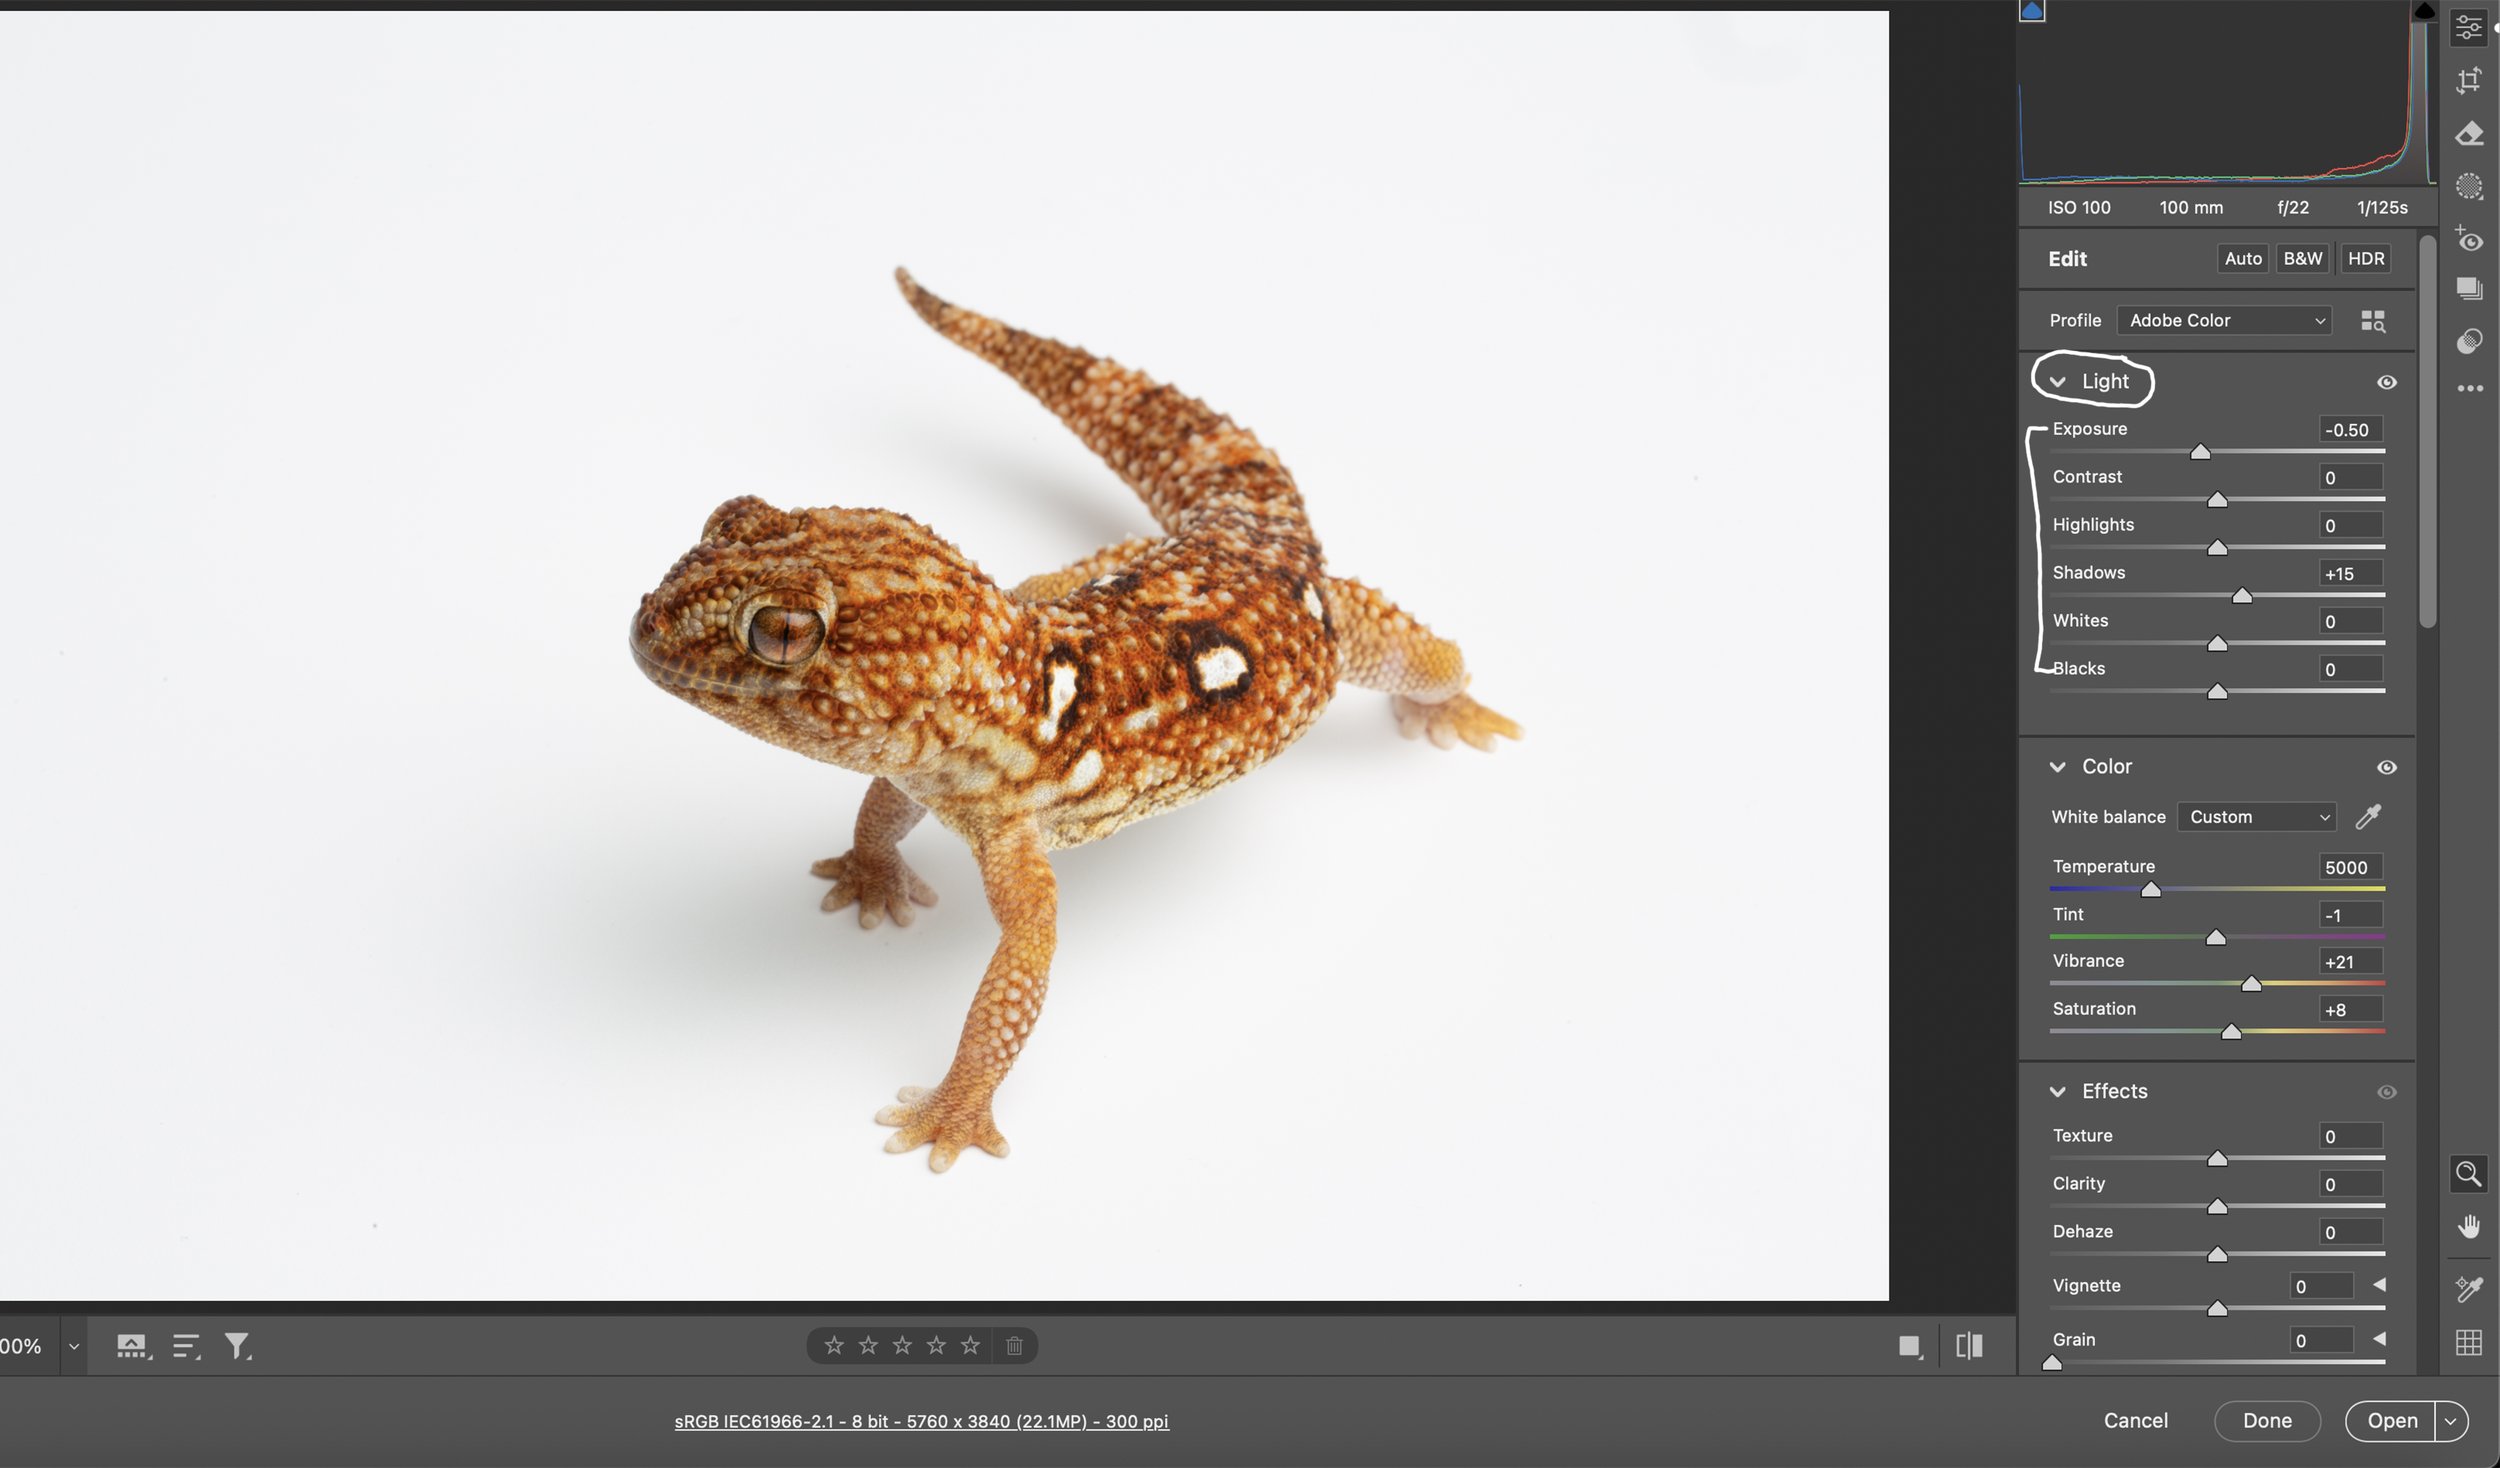
After the Color sliders, it’s time to work down the Light sliders (Exposure through Blacks). The subject is slightly overexposed, so I’m going move the Exposure slider to the left to make the image darker. I moved that slider to the left by about 1/2 a stop. I always prefer overexposing in-camera as opposed to underexposing simply because I would rather have more pixels to work with than less (underexposed). The next slider down is Contrast, and I typically don’t mess with that slider since I adjust contrast with some of the other sliders. The next slider down is Highlights, which only needs to be used to control the brightness of the lighter parts of the photo. The next slider is Shadows, and that controls the brightness of the darker parts of the photo. I’m going to open them up a bit by pushing the slider to the right. You can see the rear front leg is shadowed a touch. The next slider down is Whites, which I rarely touch. This is the slider I used to push to the right to clip the background until it was completely white before I started masking the background. The last slider in the Light panel is Blacks. I use the Blacks slider to deepen some of the blacks in the subject if needed.
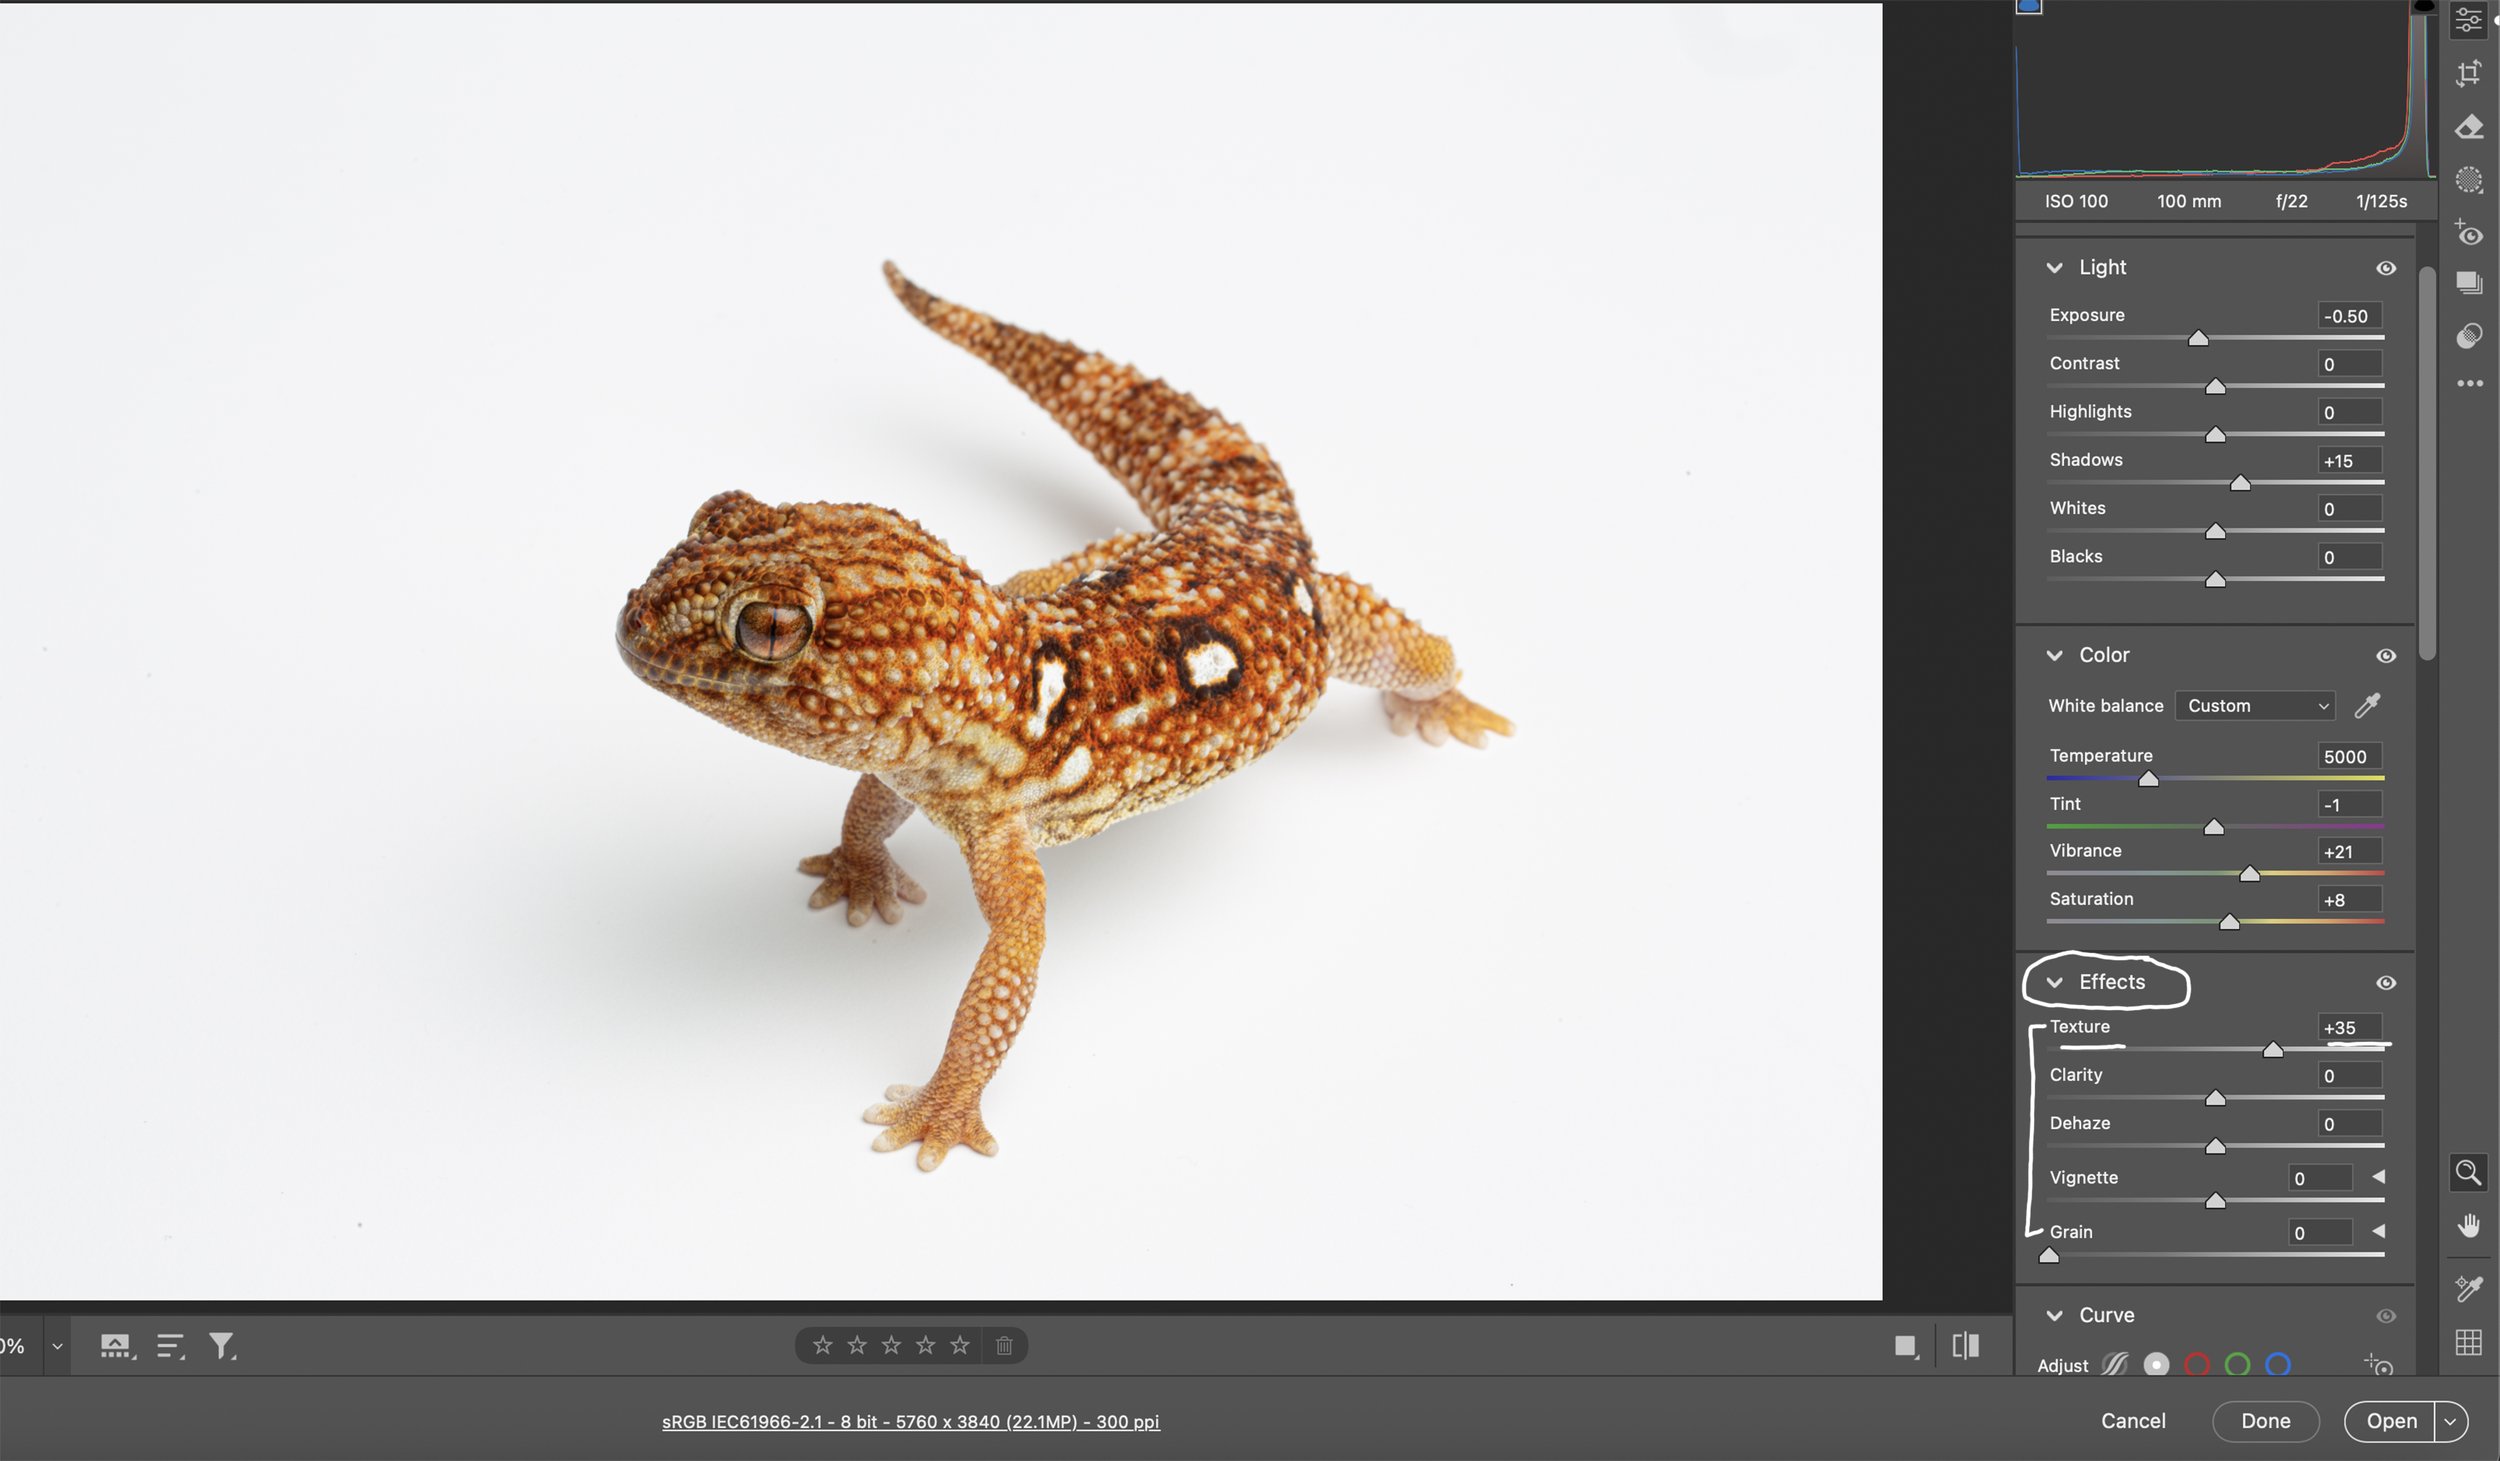
Next Panel is the Effects Panel. I really only use the Texture Slider in this panel because, quite frankly, the others are unnecessary. The Texture Slider is great for reptiles and amphibians. I pushed this one to +35 to show those prominent scales. I usually move this slider to the right +20 to +40. Sometimes I use the Clarity Slider to increase edge contrast.
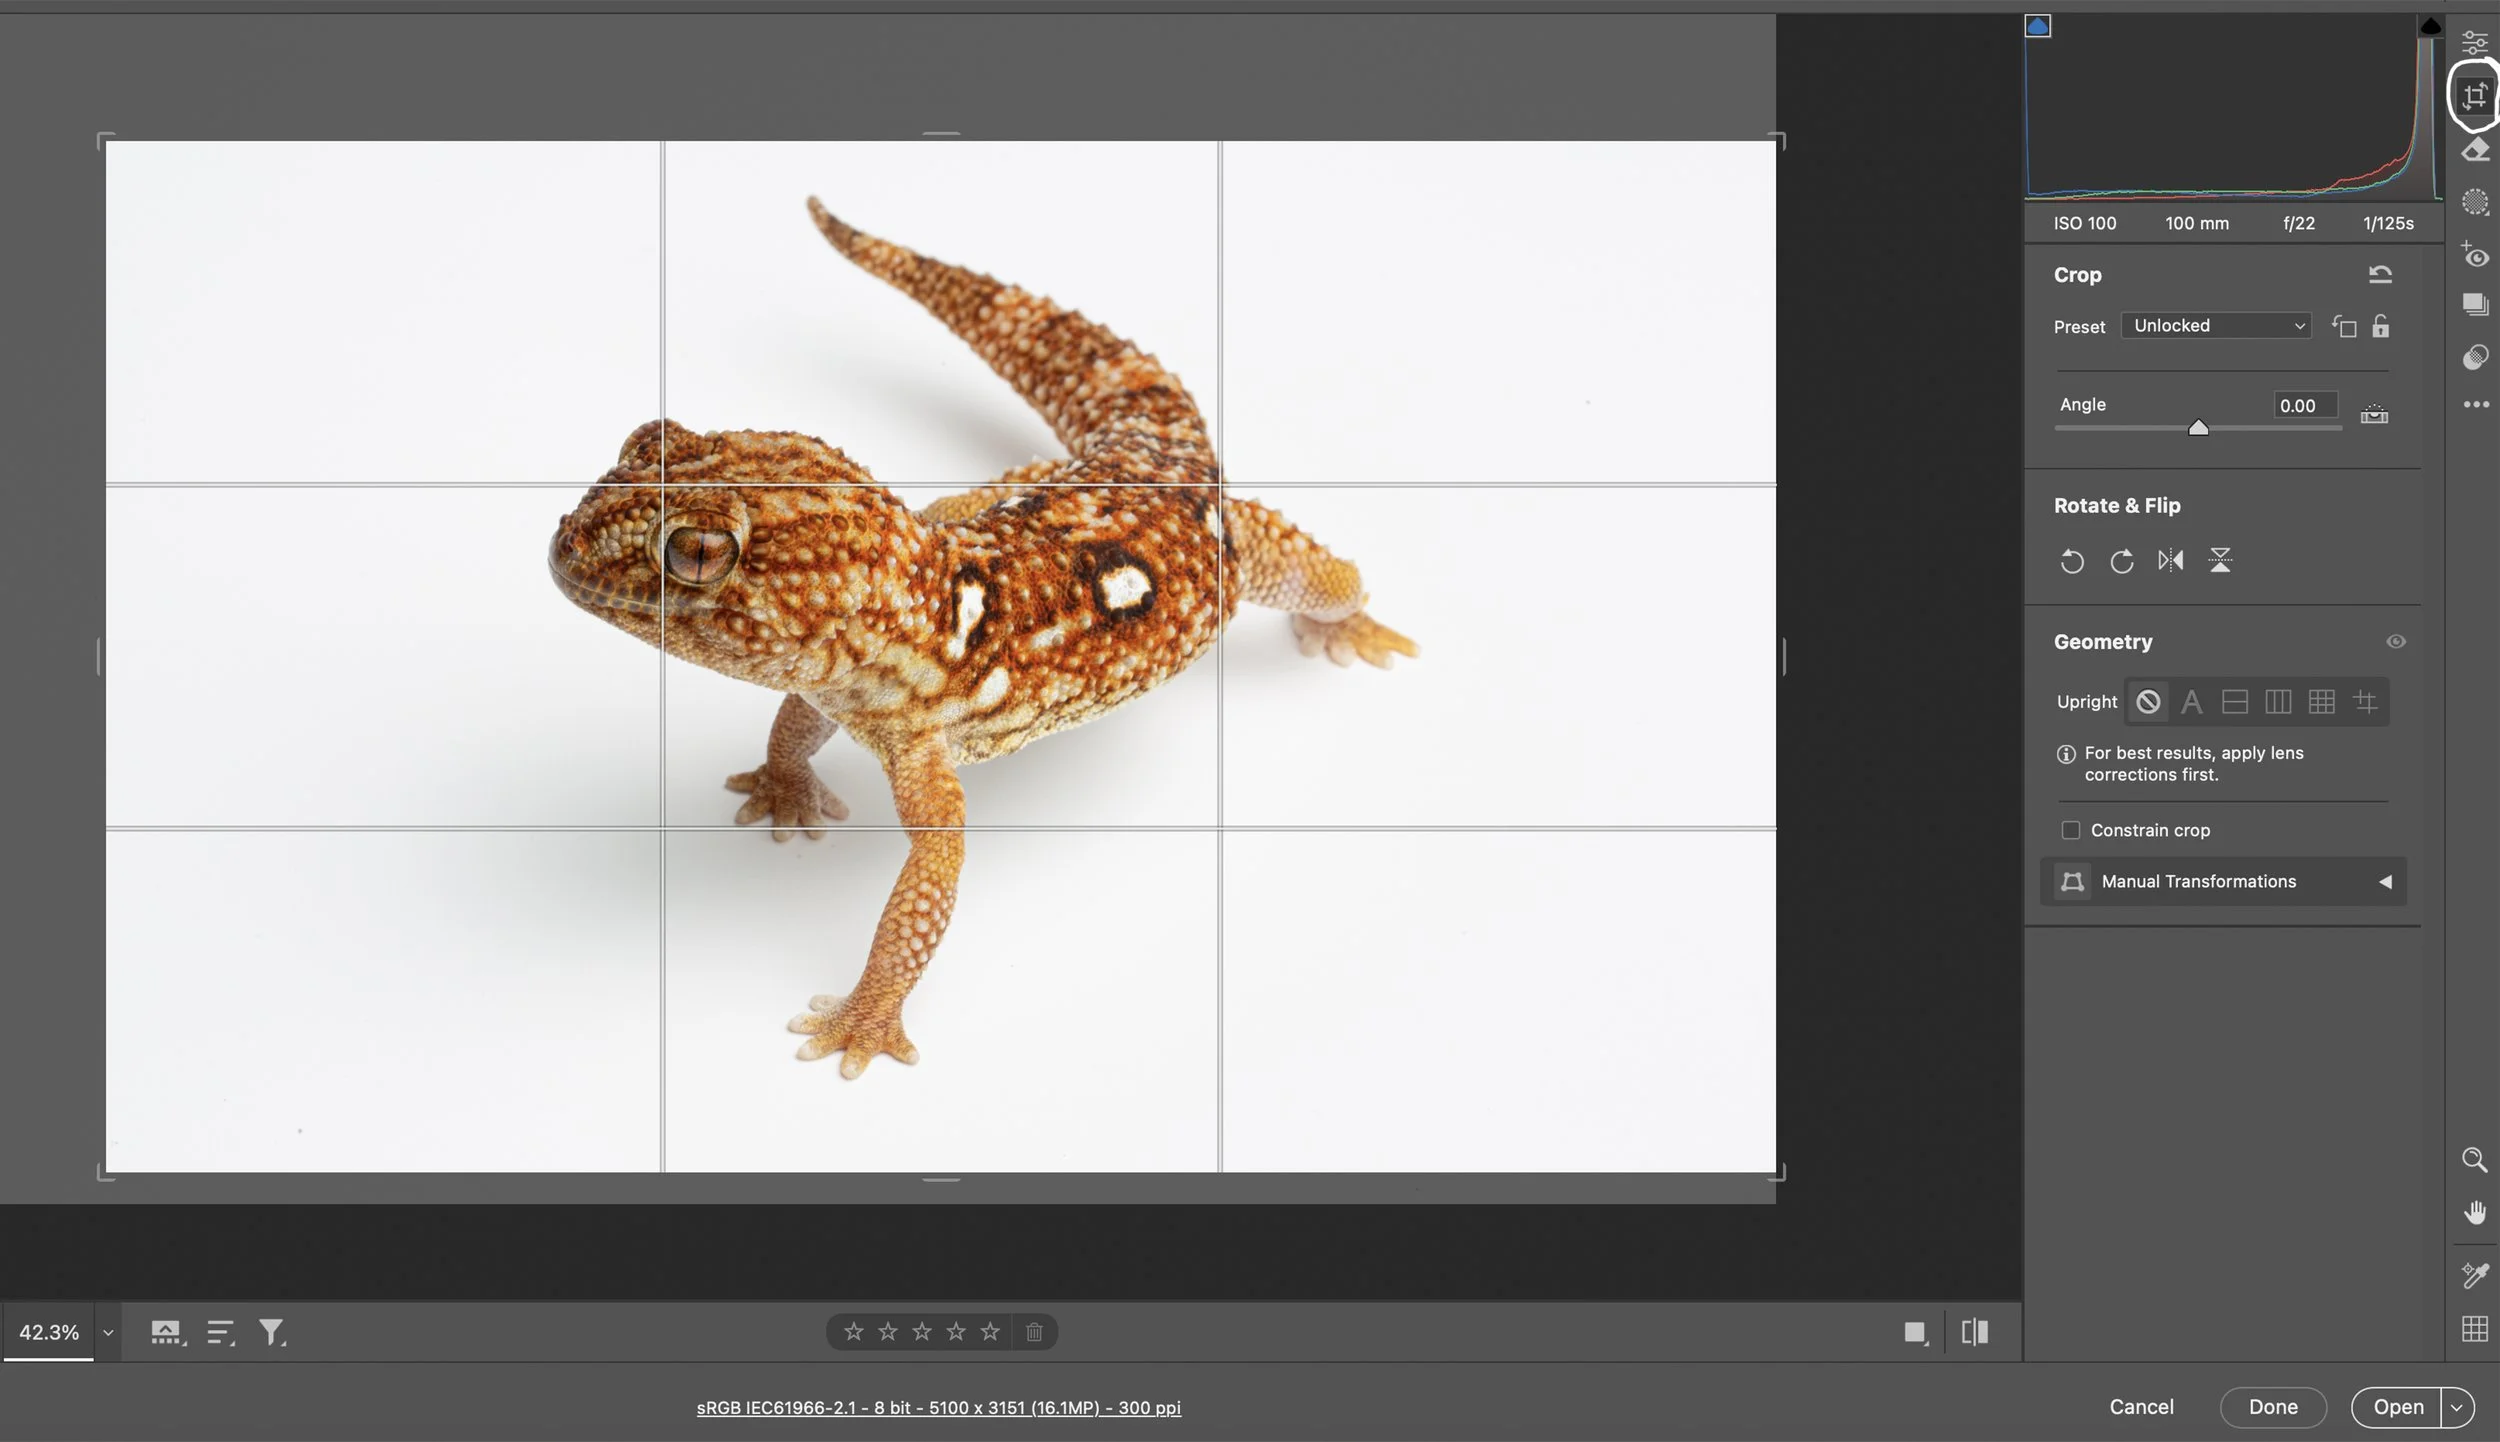
Next, I crop the image as needed, using the rule of thirds. The rule of thirds is a composition guideline in photography and art that suggests dividing an image into nine equal parts with two horizontal and two vertical lines, and placing key elements along these lines or at their intersections. I usually like to put the subject’s eye near one of the intersections as seen in this image.
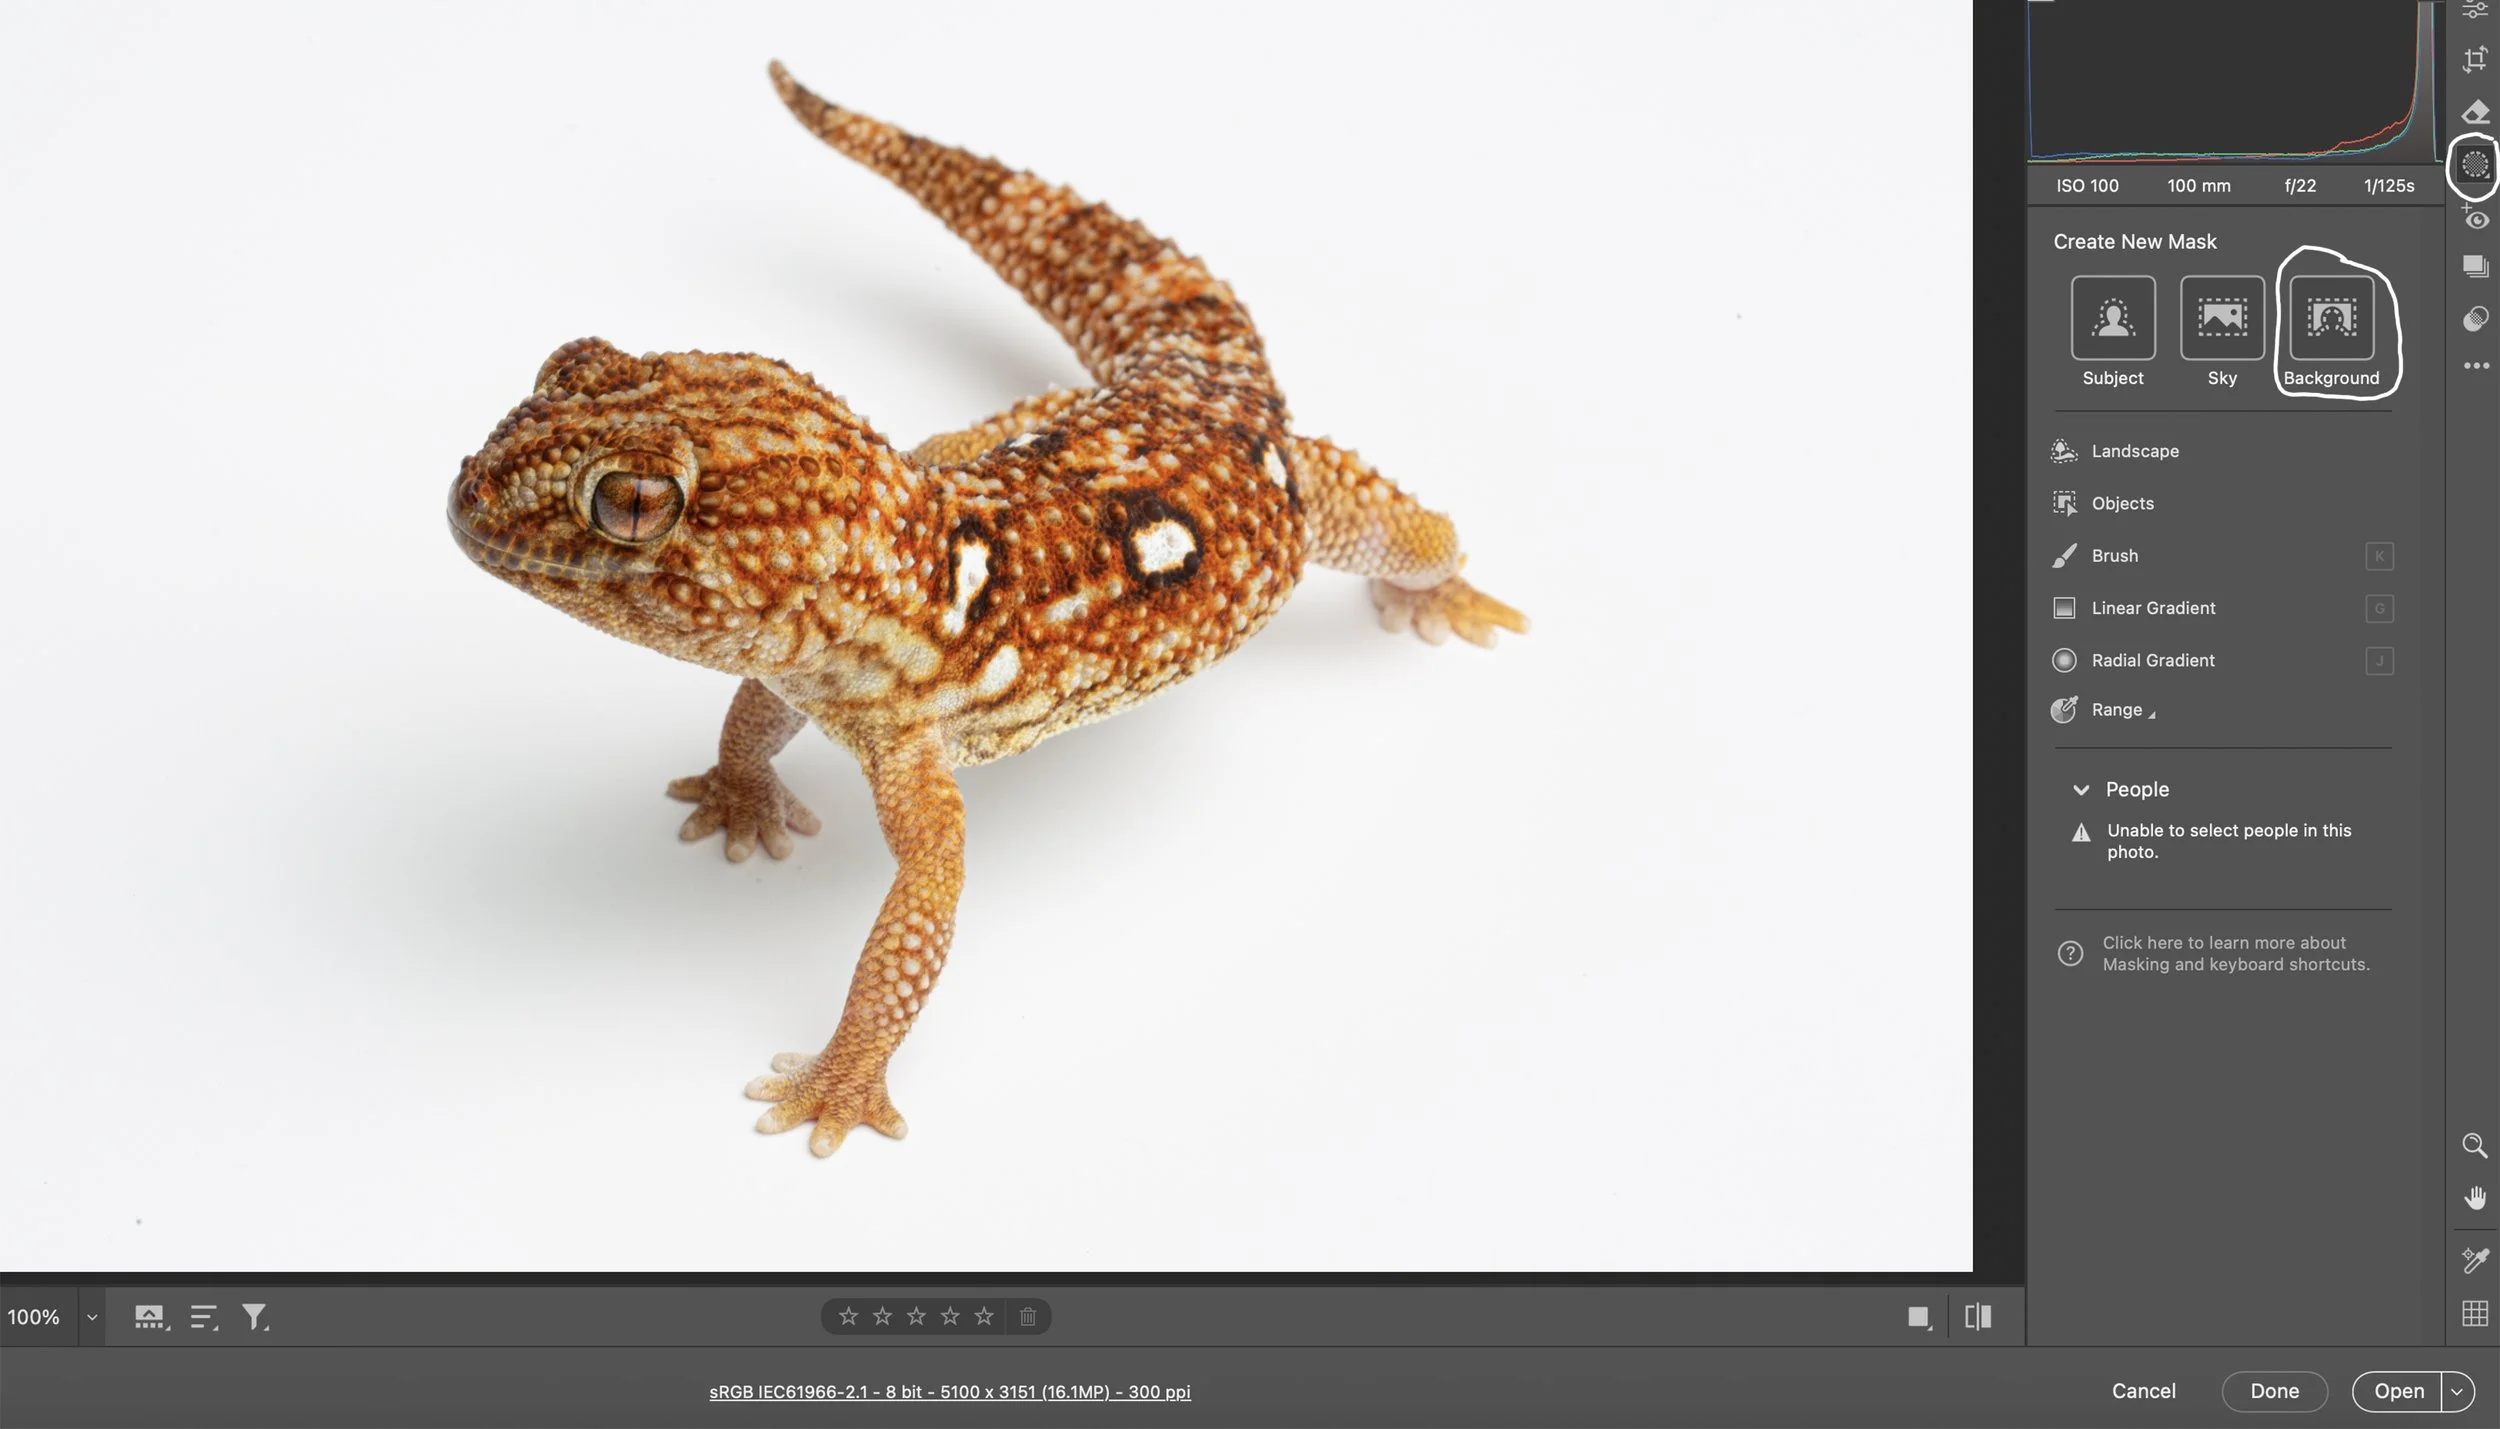

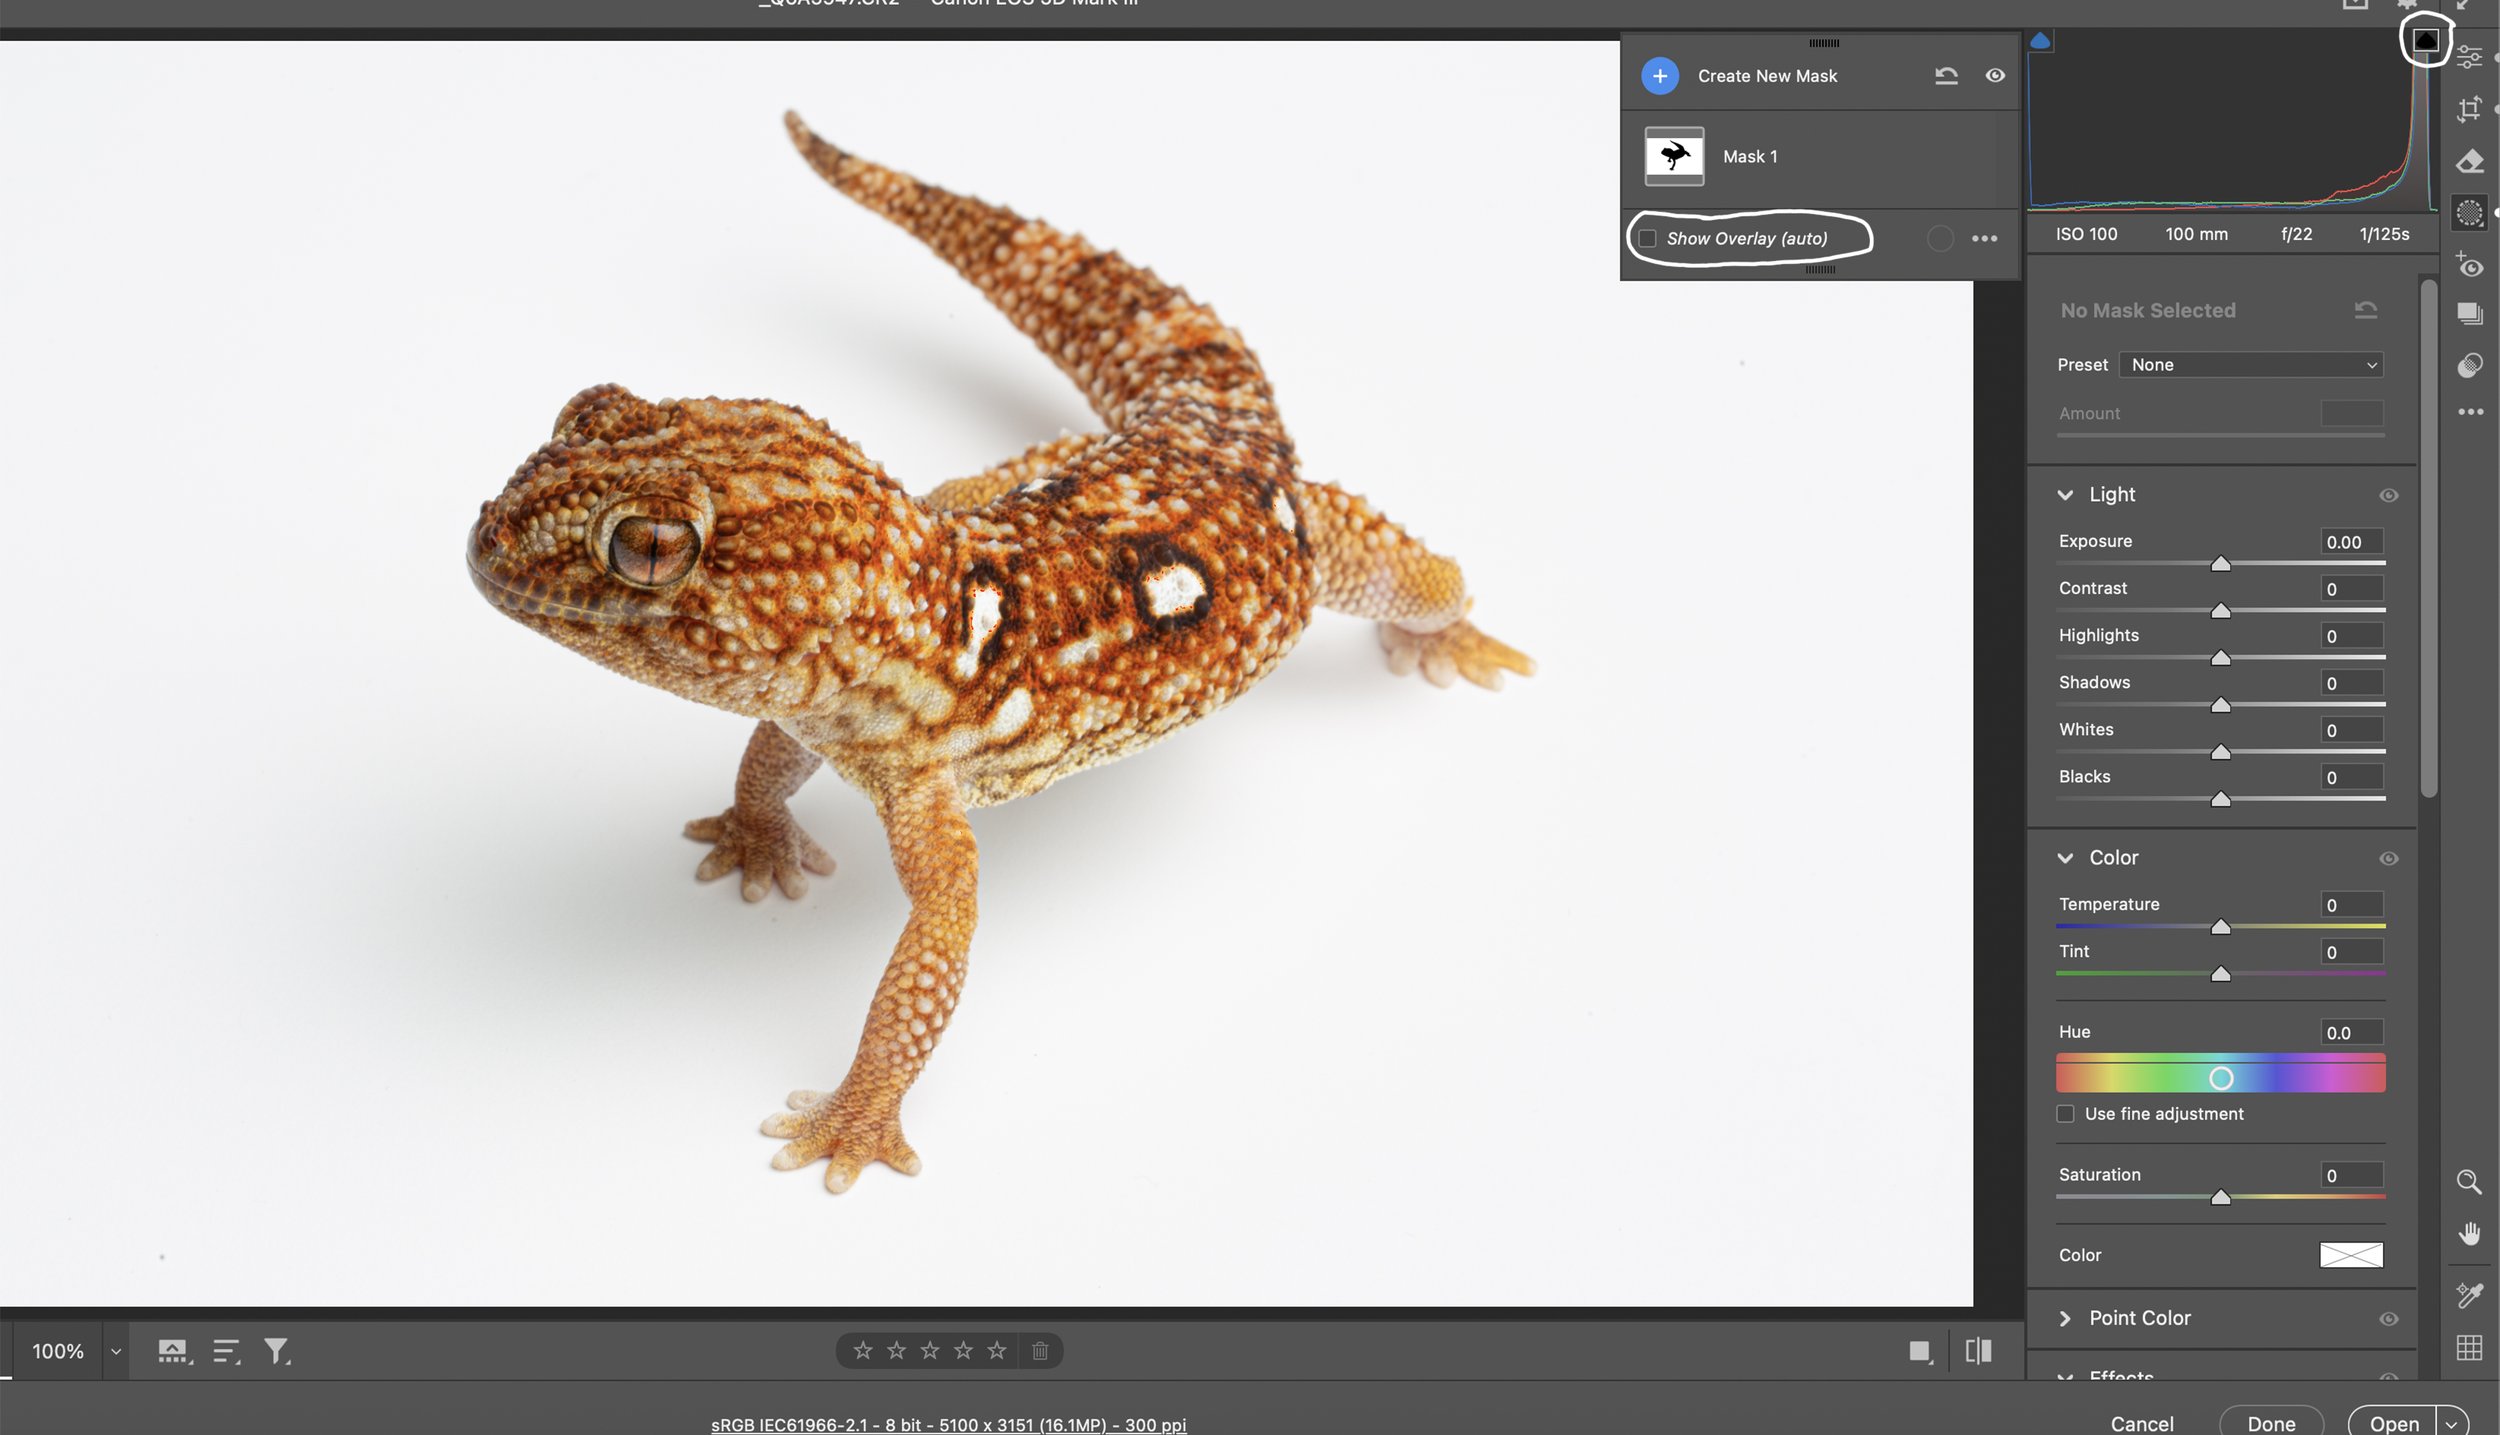
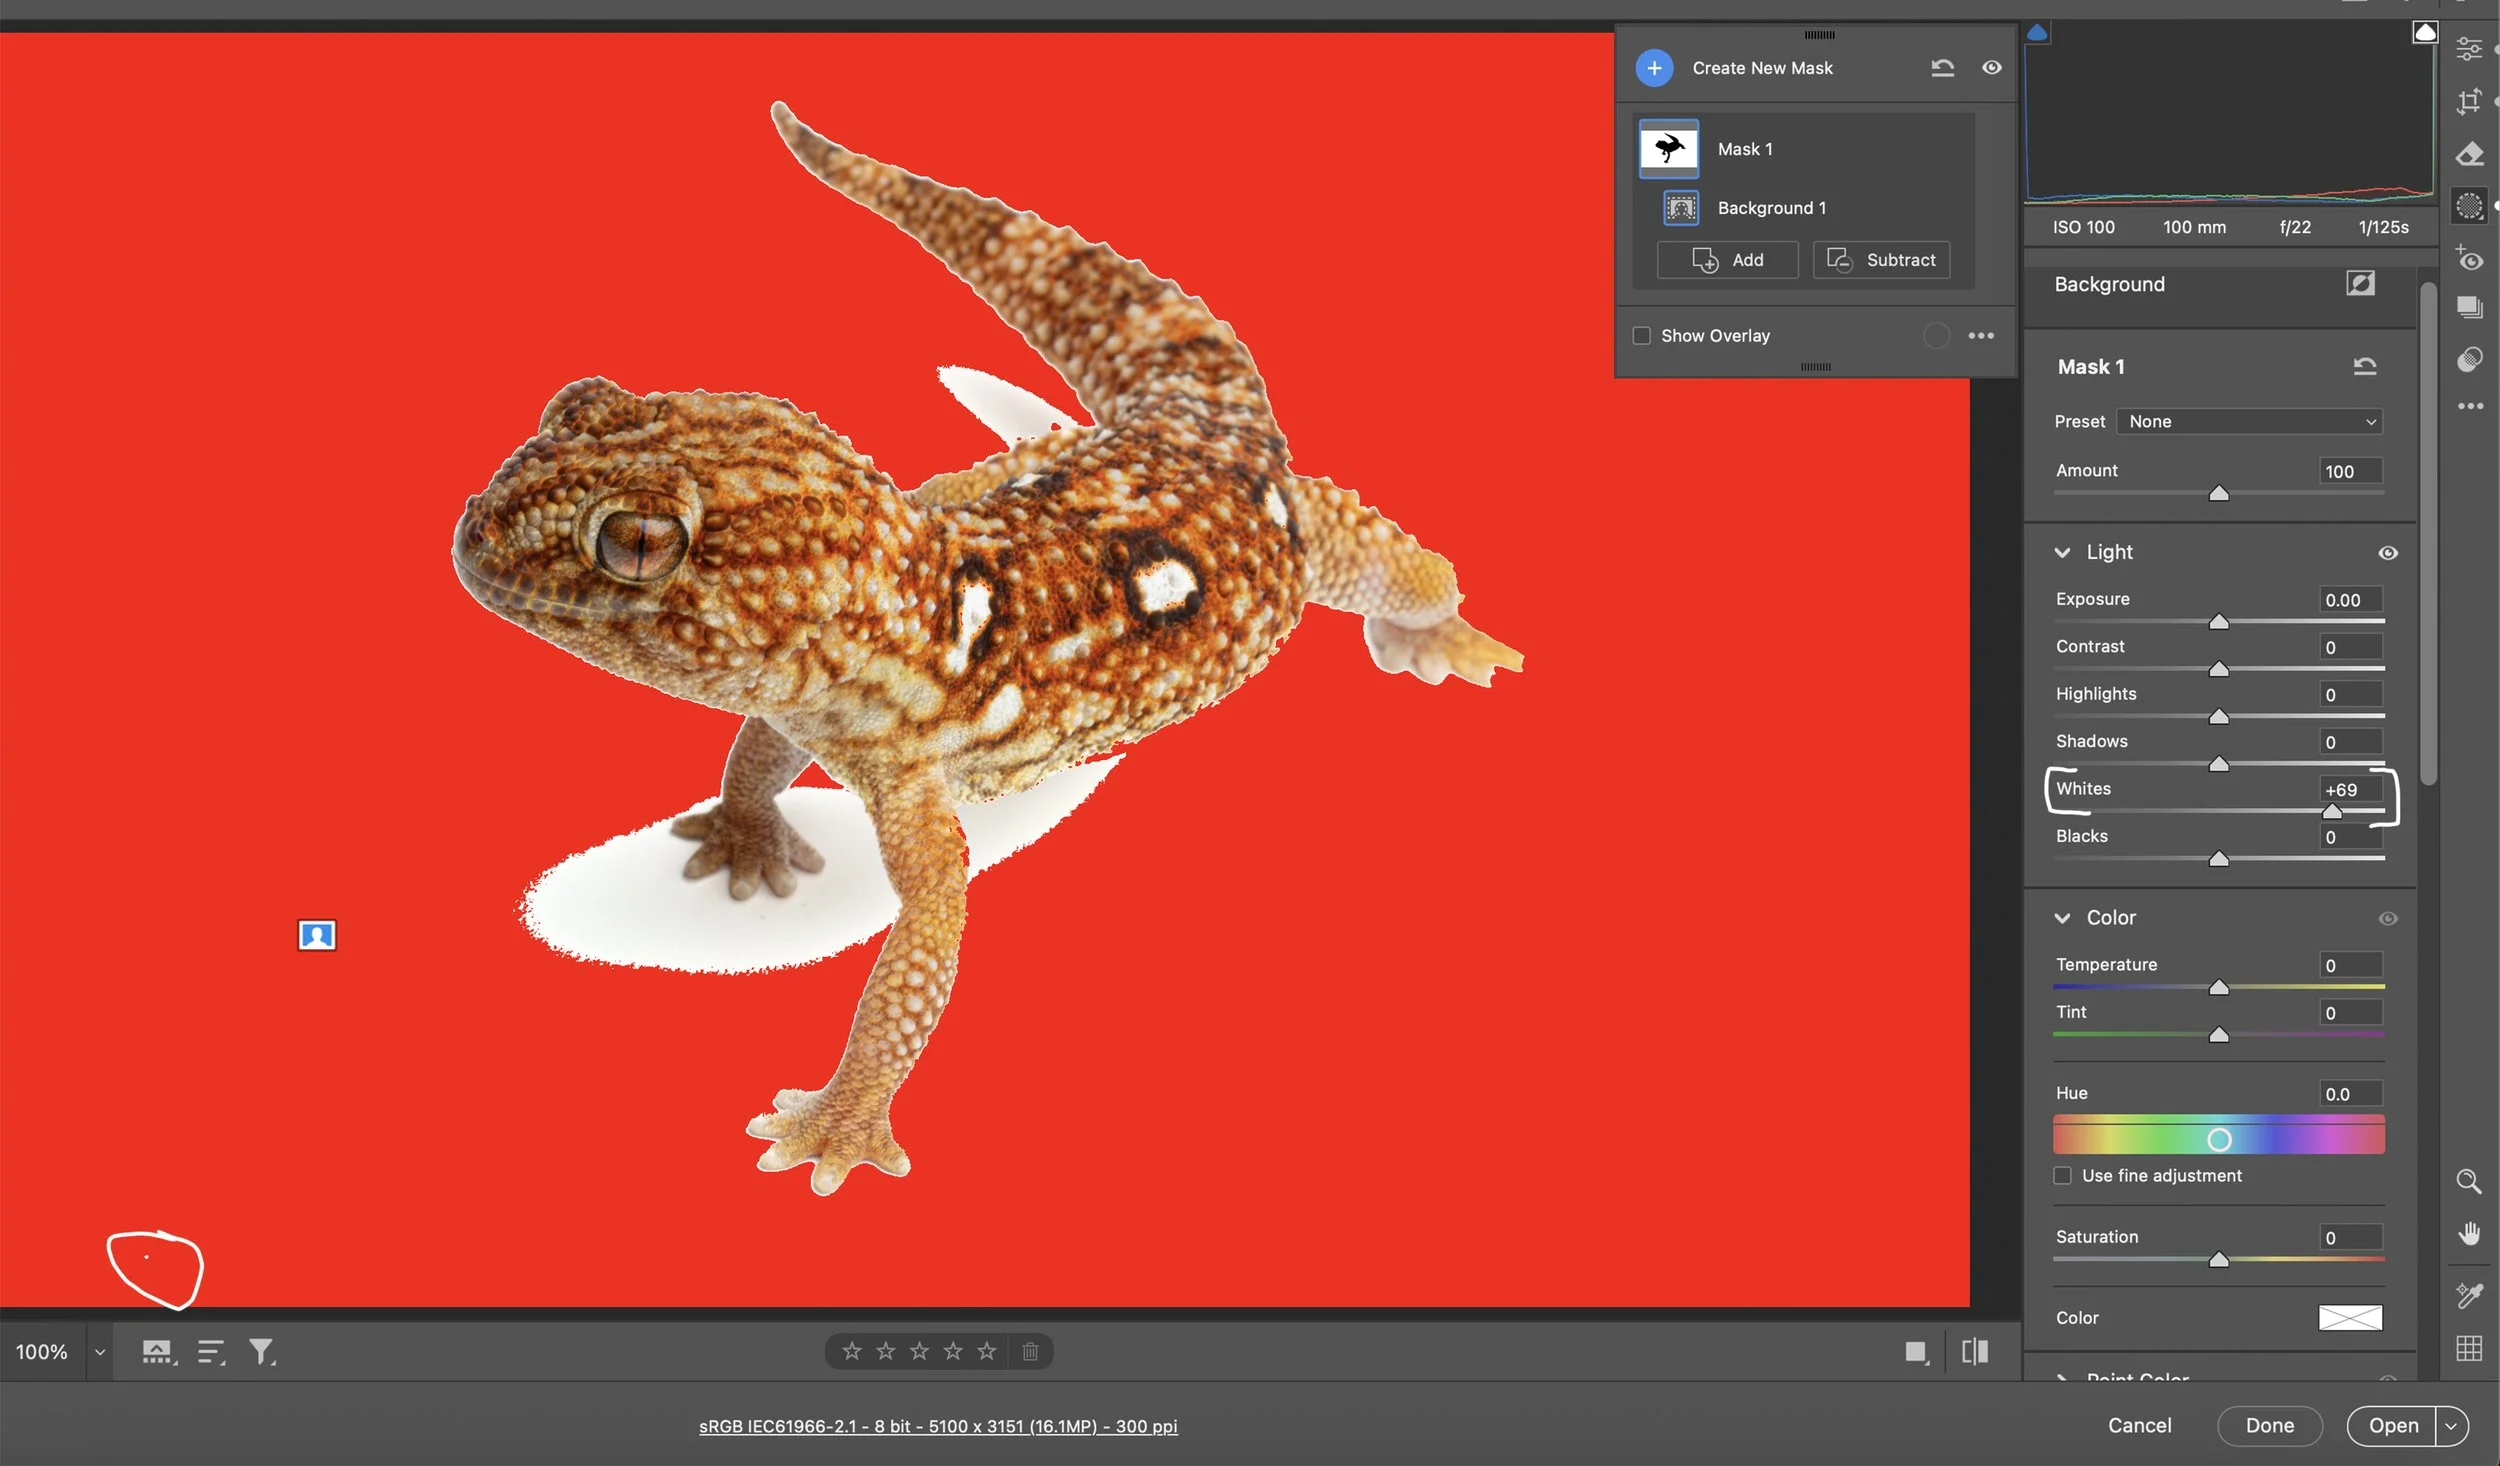
It’s time to make the background PURE WHITE! Click the Masking (M) icon in the right sidebar. The Masking Tool allows you to edit any sort of the image using a variety of tools to define the area you want to edit. Click on the Background in Create New Mask. Once it is clicked, it will show an overlay of the background (red). You’re going to want to uncheck Show Overlay so you can see the white background. Next, click the Highlight clipping warning. It’s the black arrow in the top right of the Histogram. When it is clicked, it will show the areas of the image that are completely white/blown out as the red in the image. Move the White Slider to the right until the background is pure white/blown out (it will show as red with the clipping warning turned on). I pushed the Whites Slider to +69, which made the background pure white. You will notice some artifacts in the image that will need to be removed from the background with the Remove Tool.
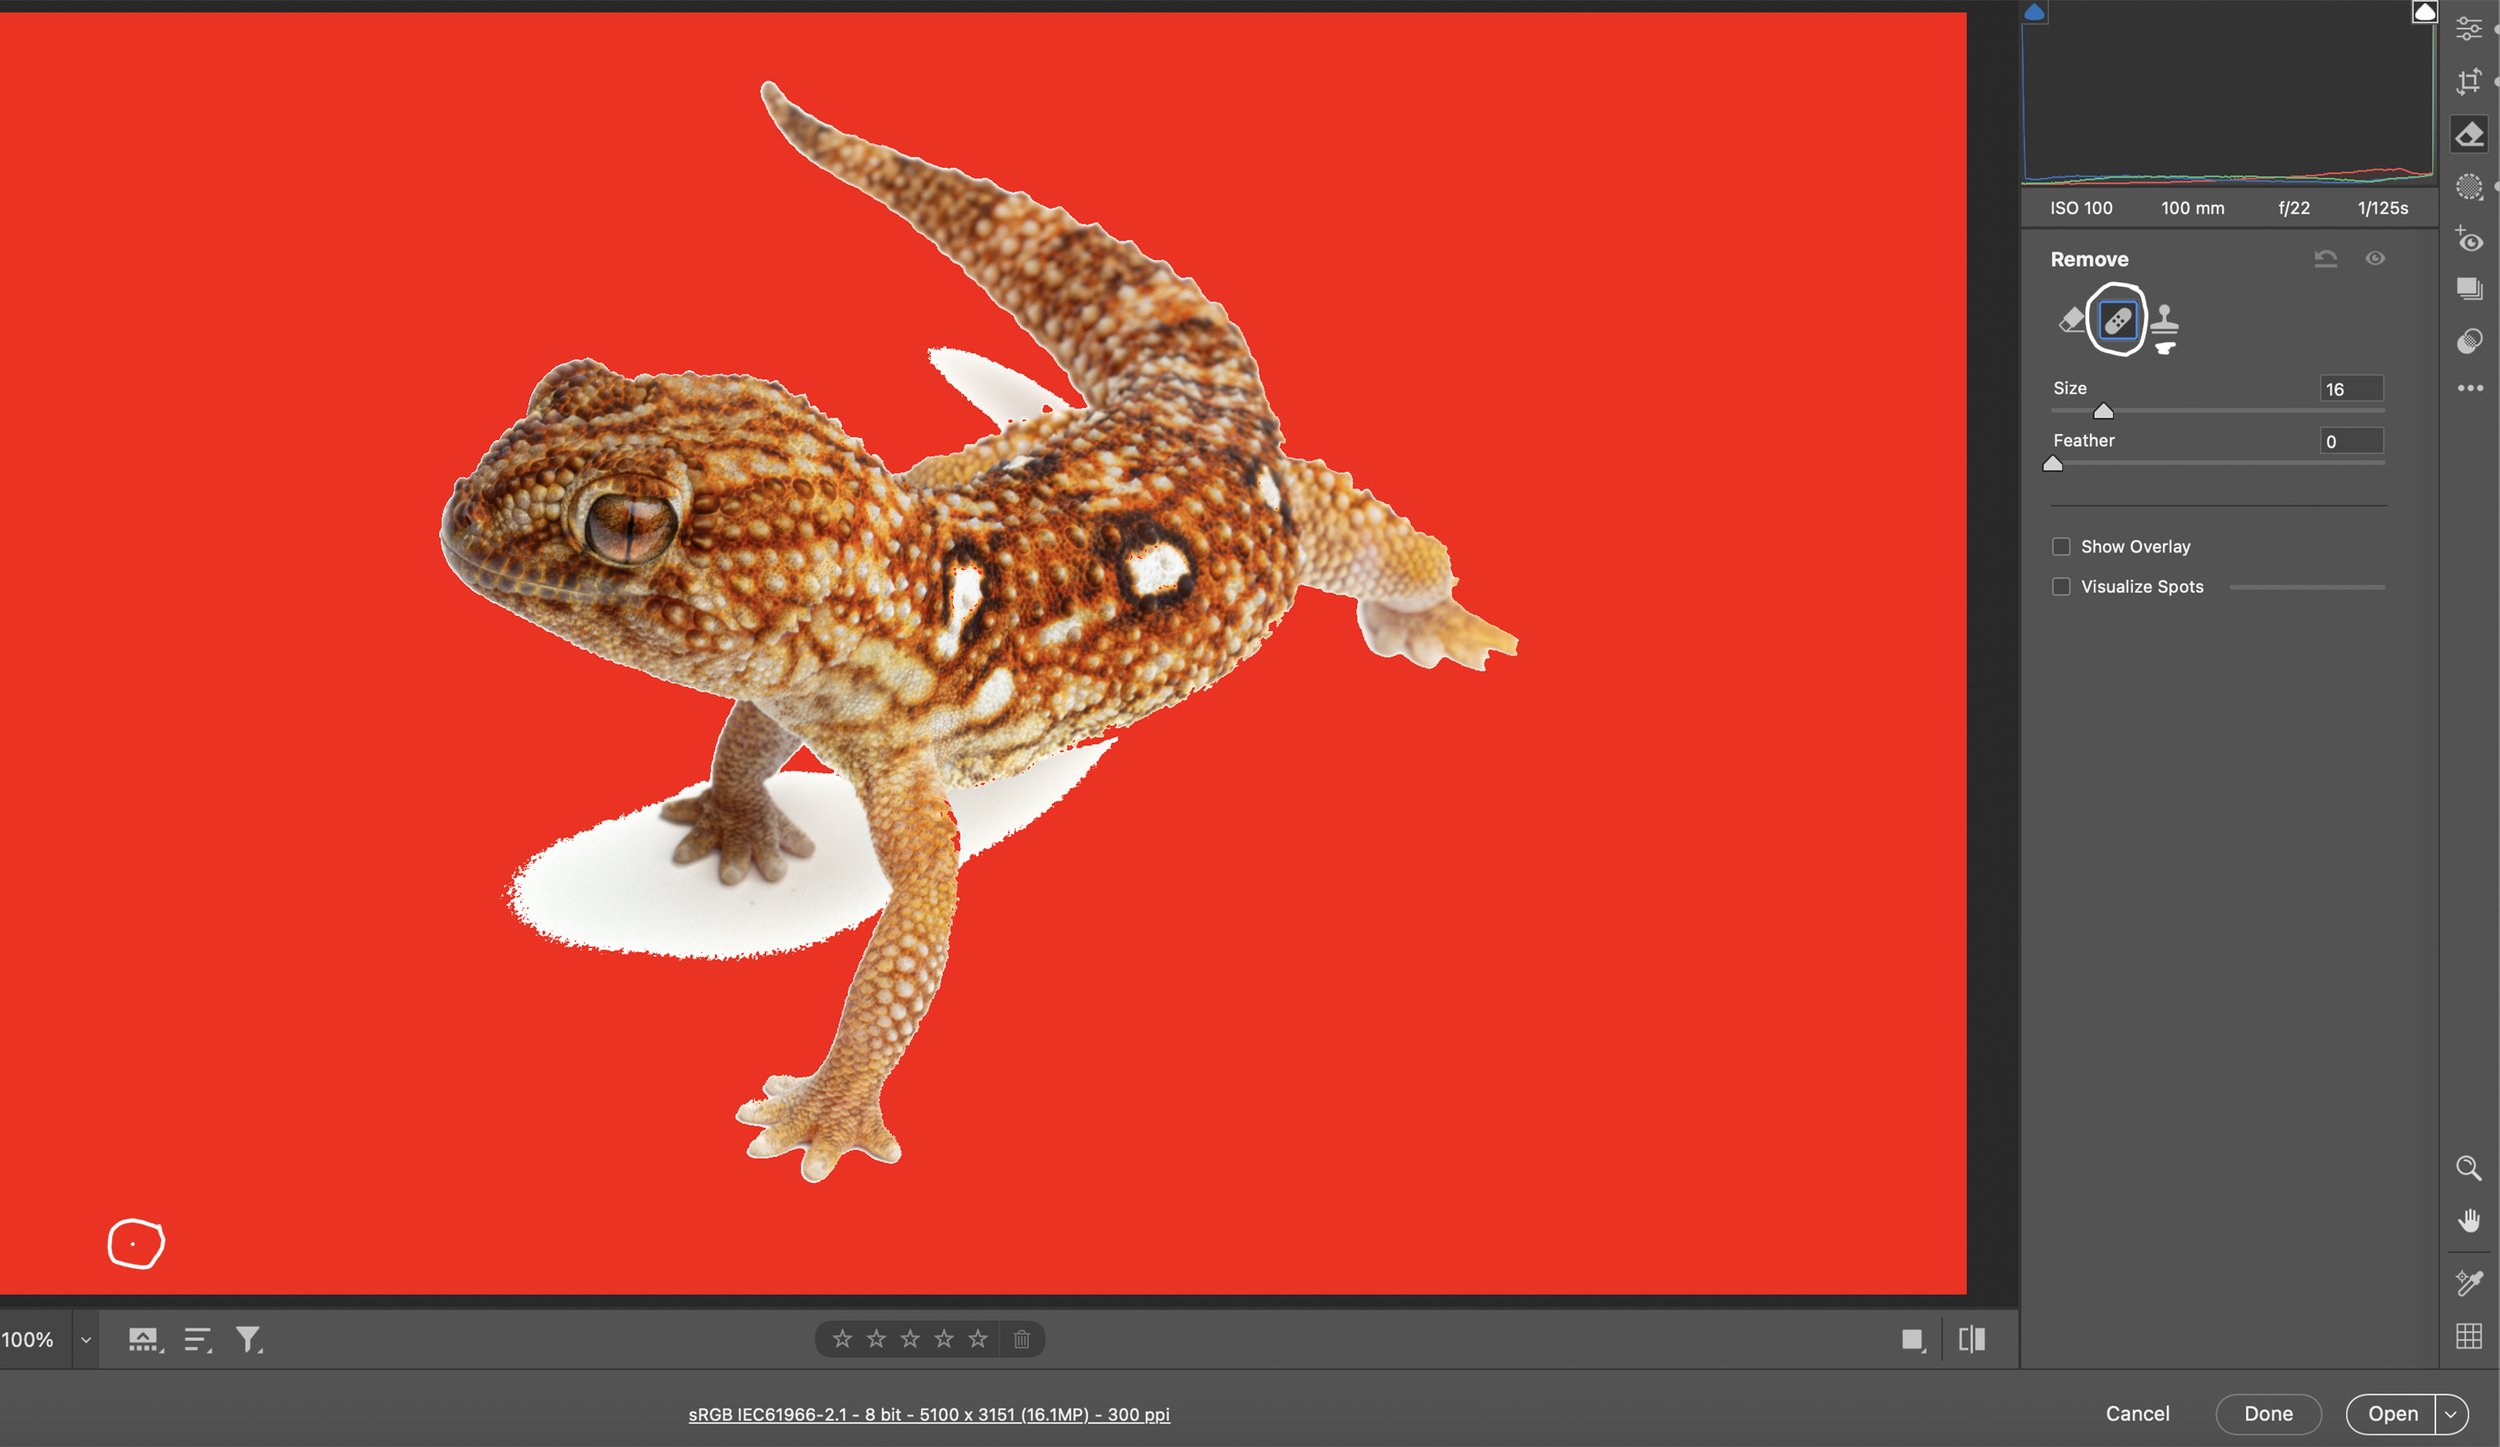
After masking the background, it’s time to remove all of the artifacts in the background before doing the final edits in Photoshop. Click on the Remove icon just above the Masking icon. You can use Heal or Clone to remove all of the artifacts in the background. Make sure that the Highlight clipping warning arrow is turned on because it makes it so easy to see artifacts in the white background. They will show as white specks/dots when the clipping warning is turned on while the rest of the white background will be red. Shadows under the subject will also appear white. I like to keep the faint shadows to add dimension to the image. Once you’re satisfied that all artifacts have been removed from the background, it’s time to open the image in Photoshop and do all of the final edits and output sharpen for web and/or print.

Open the image in Photoshop, and remove marks/artifacts from the subject and background (if some were missed in ACR) using the Spot Healing Brush tool with Type: Content-Aware.
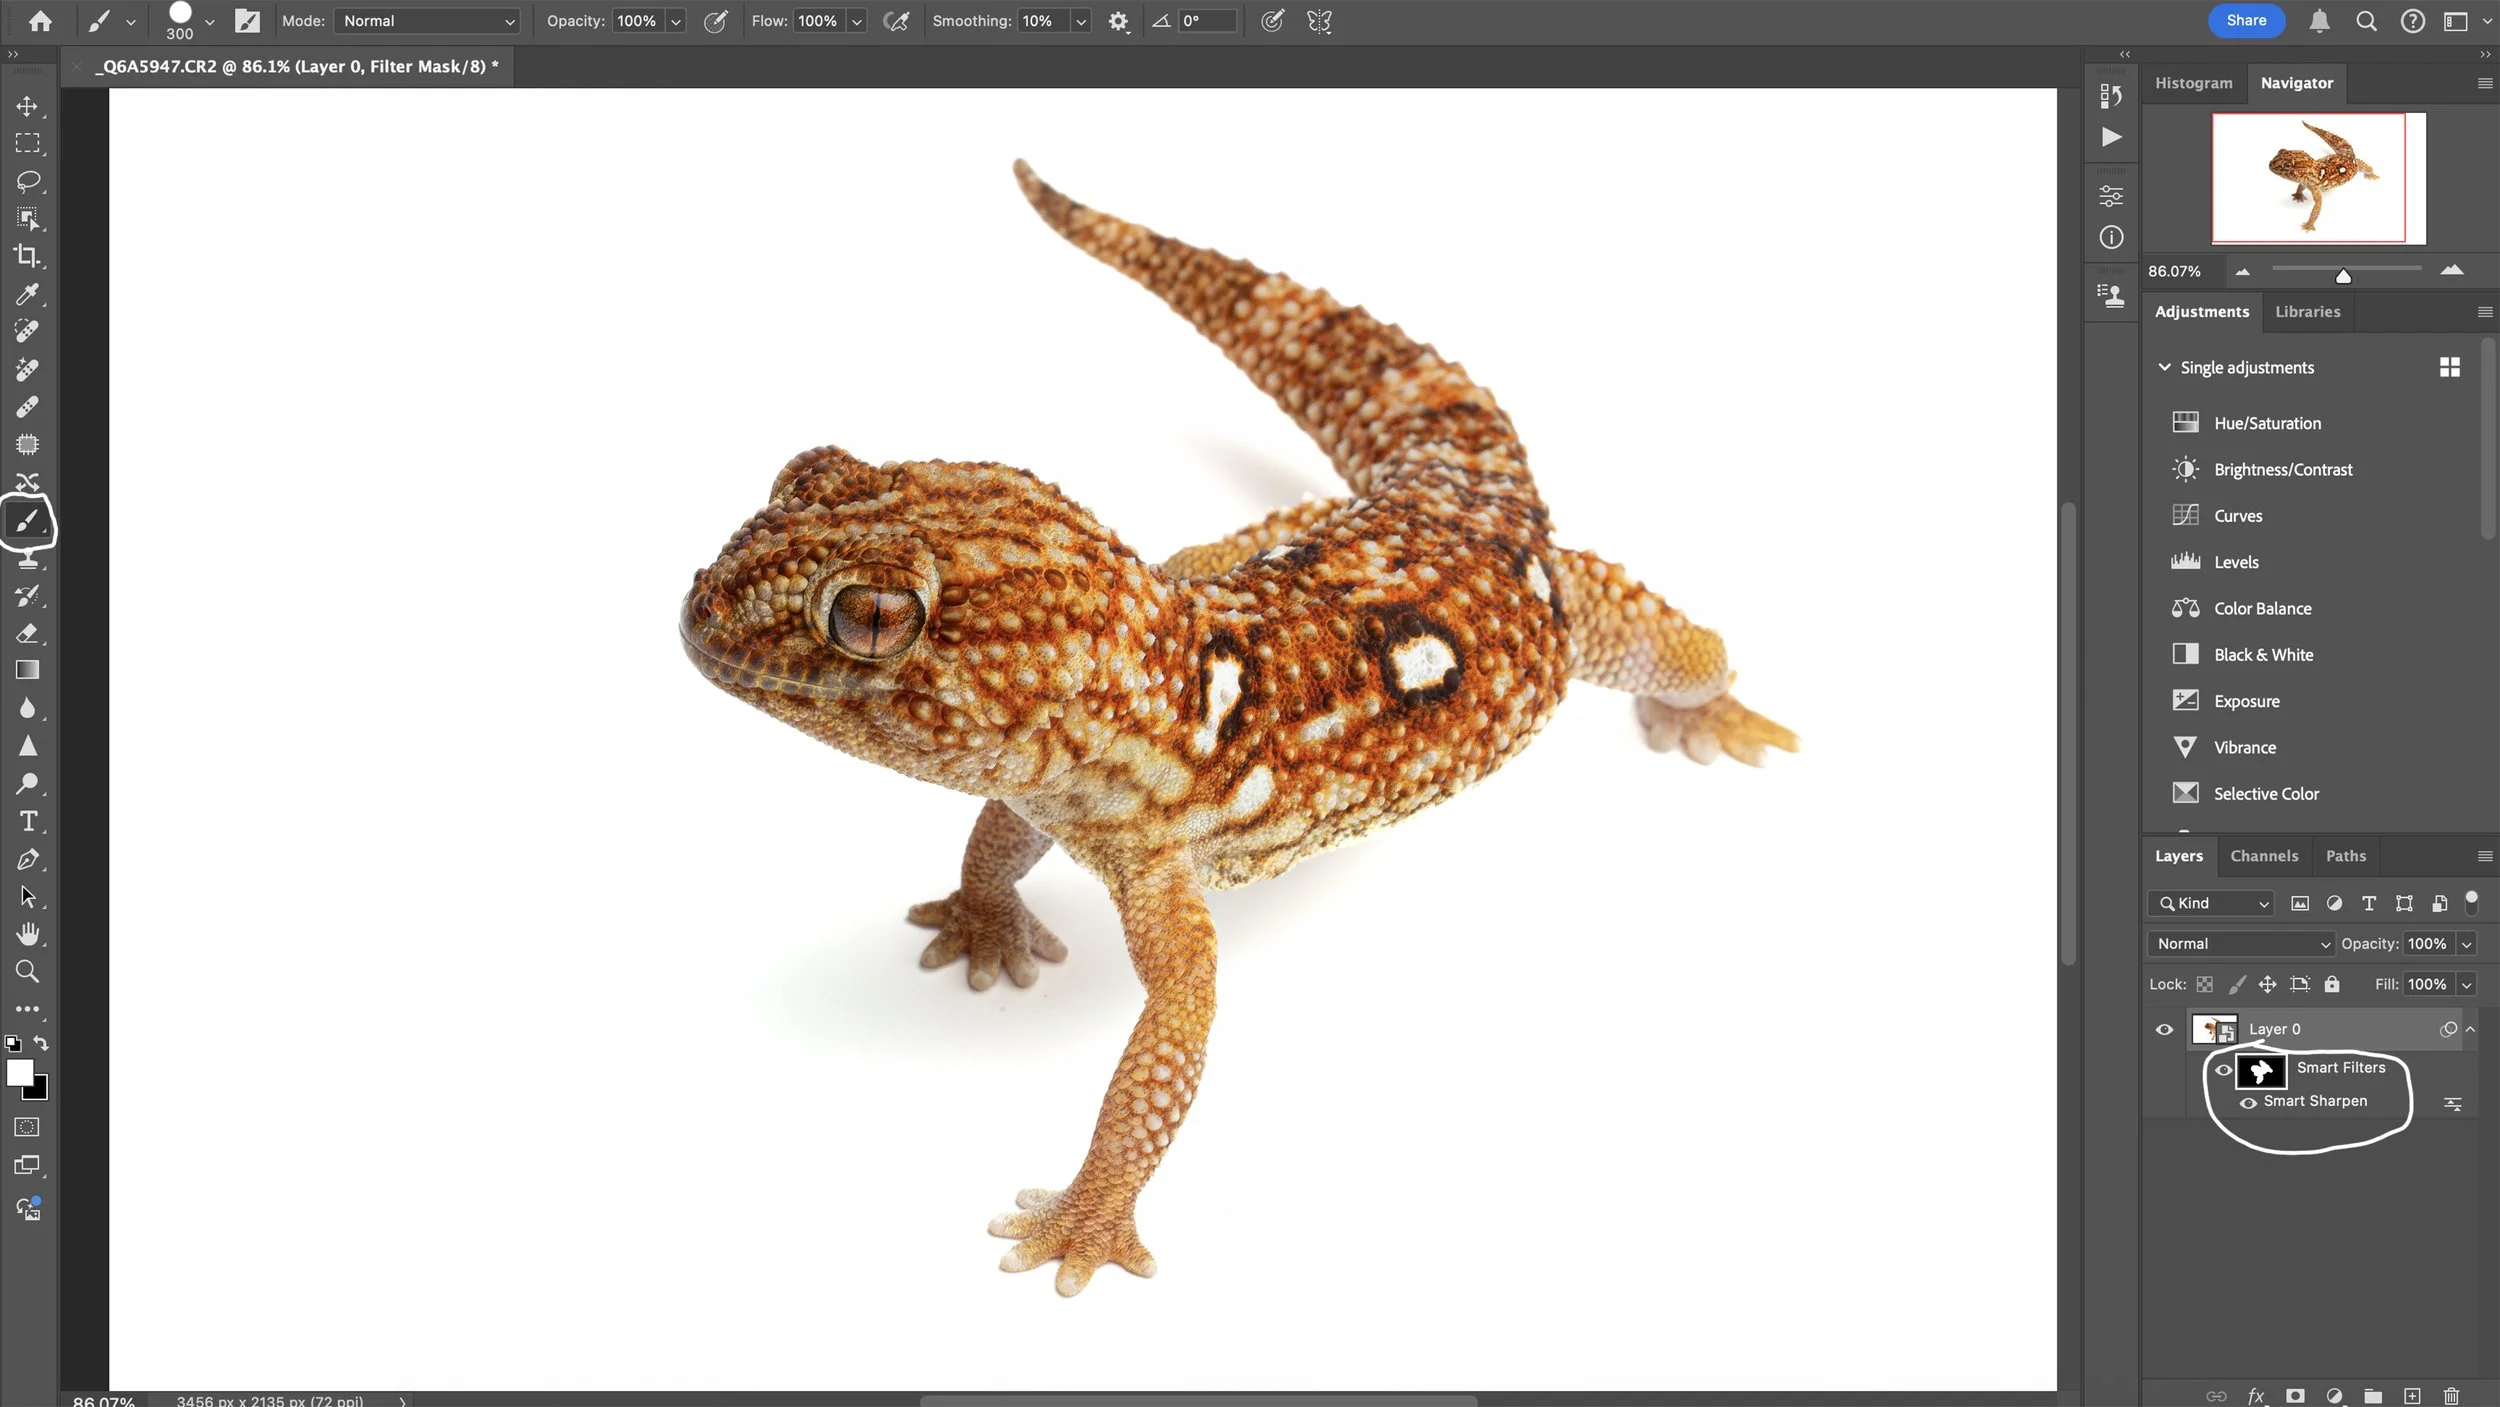
After marks/artifacts/blemishes are removed, it’s time to output sharpen the image for print and/or web. Convert the image for Smart Filters, then use Smart Sharpen. The Amount for Print and Web can be the same, but the radius needs to be adjusted. Radius for print is 1.2-1.4 and 0.5-0.7 for web. Once the Smart Sharpen settings are set, click ok. Click on the Smart Filters layer and press Command “I” to invert the layer. Once it’s inverted, use the brush tool to paint the sharpening back into the subject. Done!
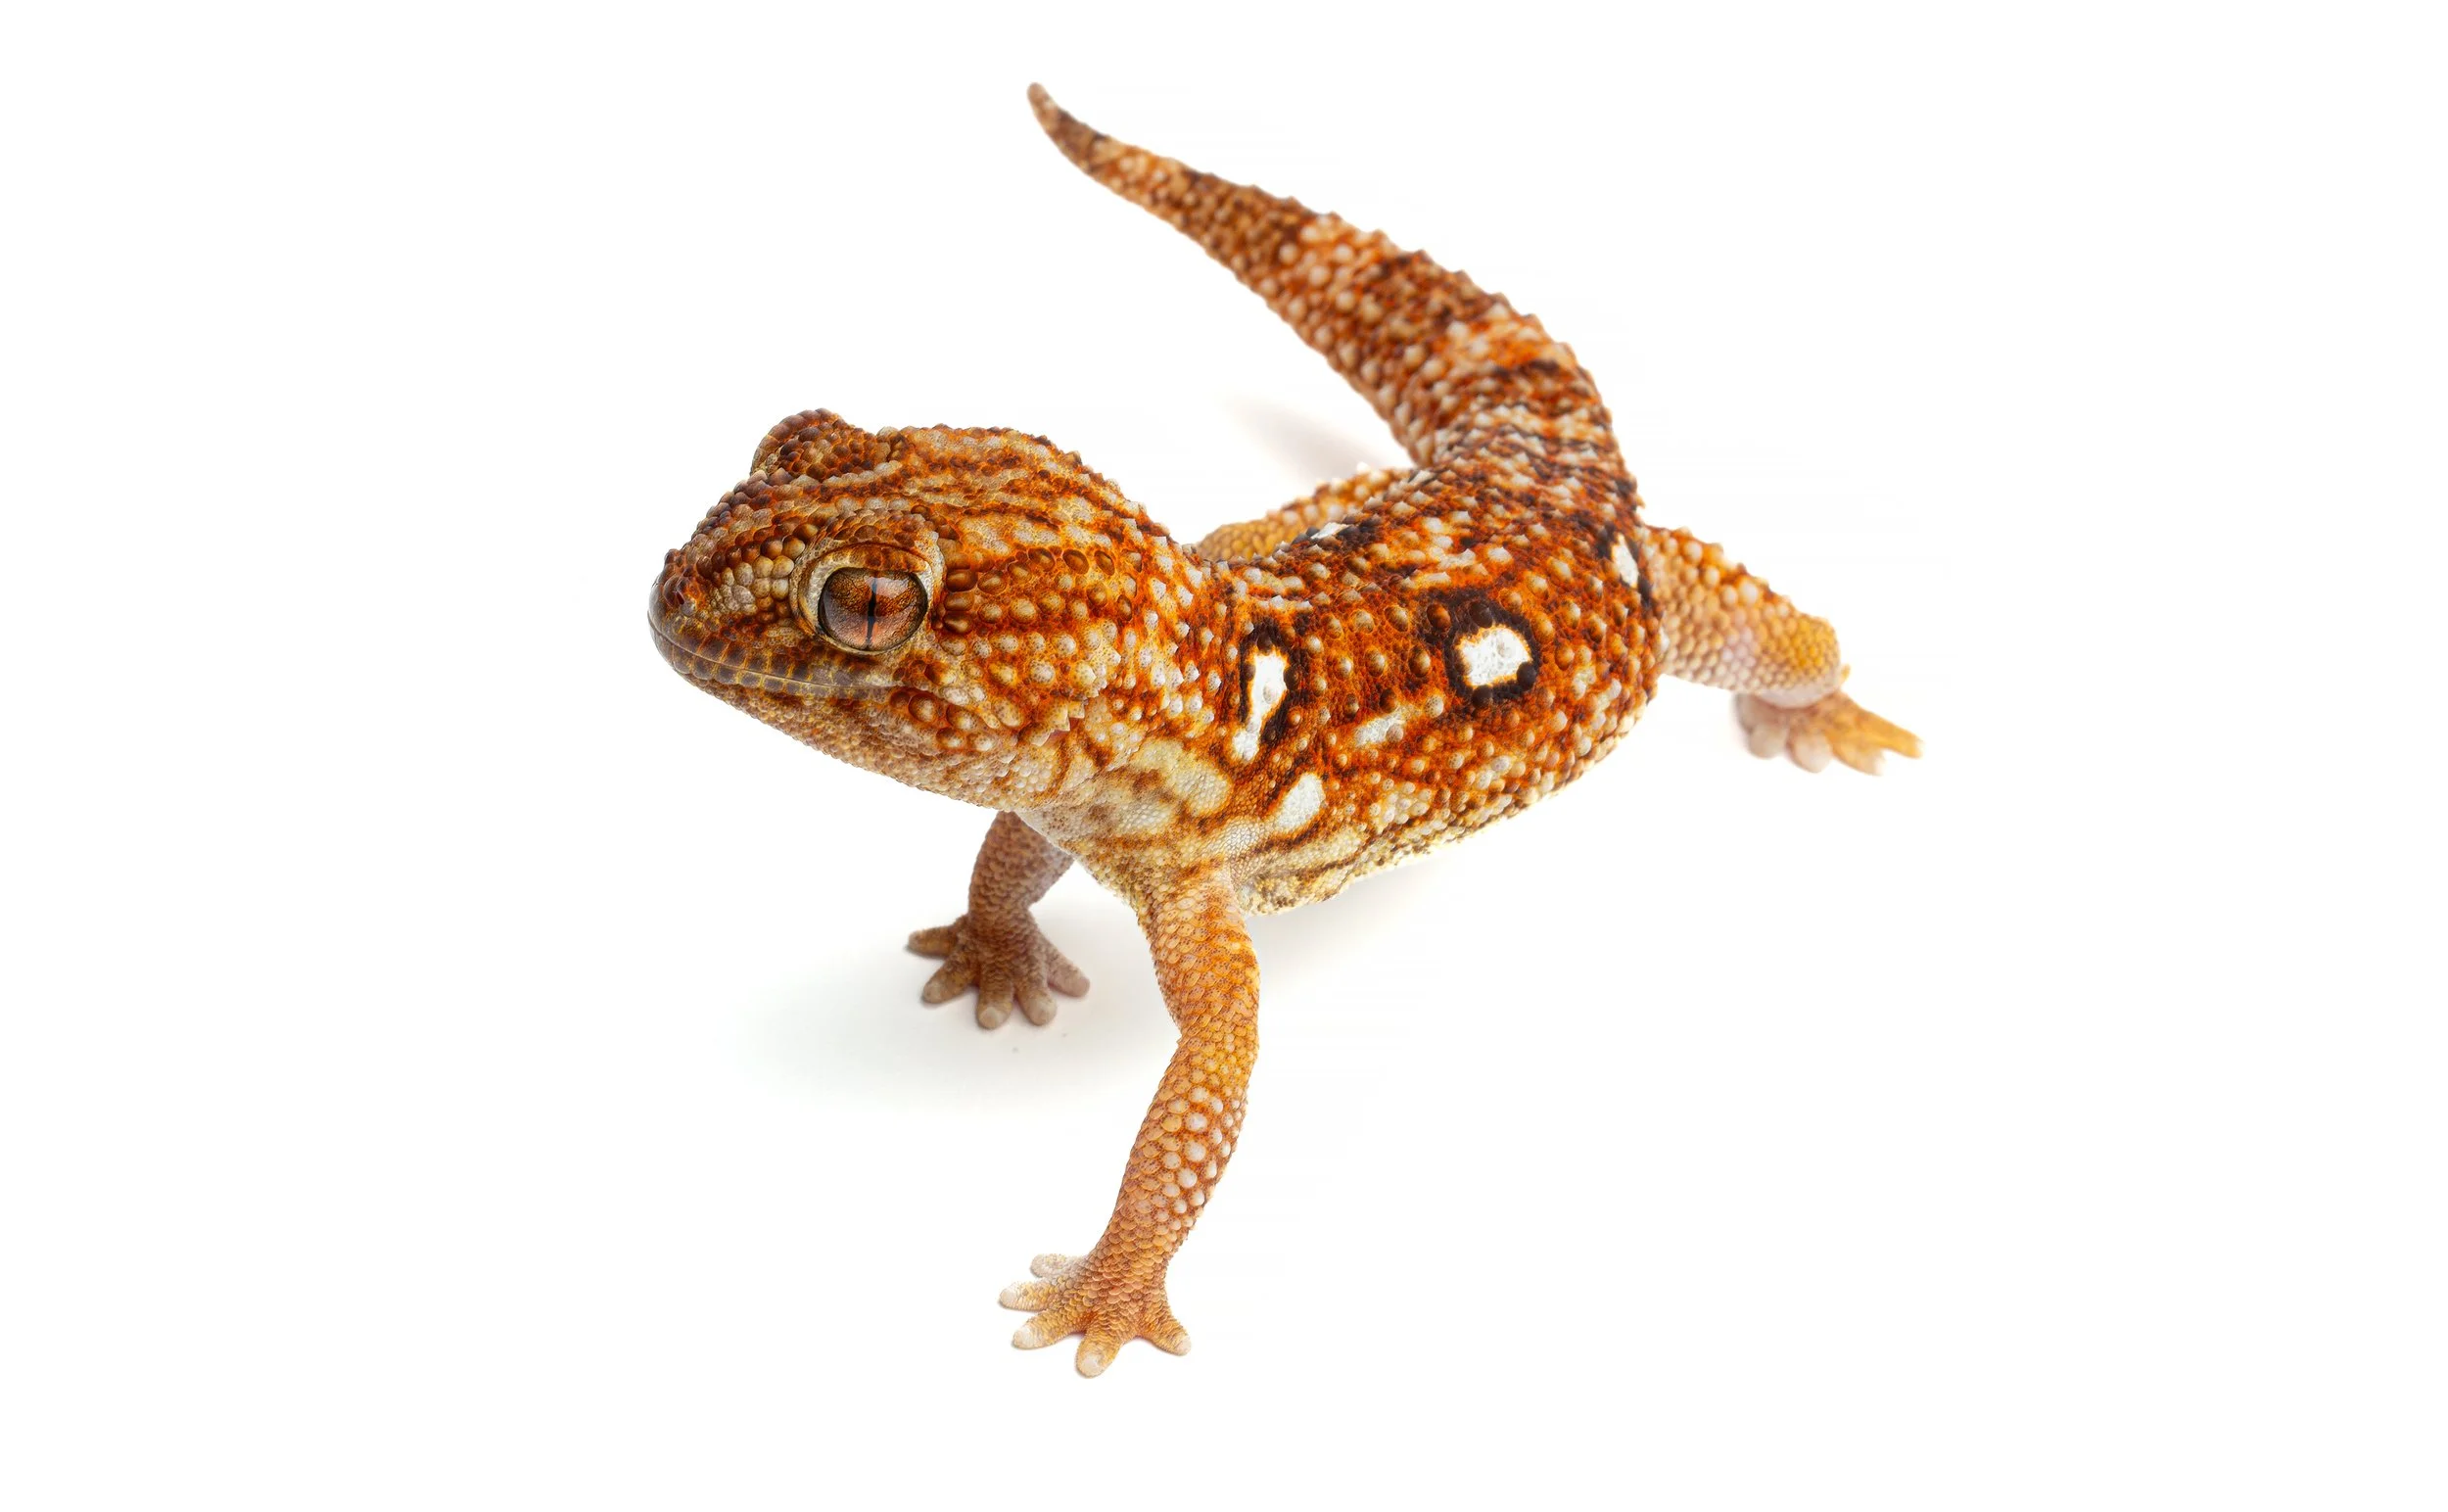
Final Image
